| Author | Thread |
|
|
04/30/2011 09:06:00 PM · #51 |
Originally posted by joynim:
Thanks Judi ;) Since Im not a member I've just got to figure out a good way to share my images will get onto lessons very soon :D |
You can always email them to me and I will put them up in a folder for you.
Originally posted by Shanny403:
I'm not seeing the view as full size link. It's on the ball one for me, but not on these. You may have to email them to me Judi. Sorry for being a pain. I'll pm you my email address. |
Sent.
|
|
|
|
04/30/2011 09:08:11 PM · #52 |
Originally posted by Judi:
Originally posted by joynim:
Thanks Judi ;) Since Im not a member I've just got to figure out a good way to share my images will get onto lessons very soon :D |
You can always email them to me and I will put them up in a folder for you.
Originally posted by Shanny403:
I'm not seeing the view as full size link. It's on the ball one for me, but not on these. You may have to email them to me Judi. Sorry for being a pain. I'll pm you my email address. |
Sent. |
What a great idea thanks! |
|
|
|
04/30/2011 09:16:35 PM · #53 |
|
If it's not to late, I want to join. |
|
|
|
04/30/2011 09:29:00 PM · #54 |
|
It feels like lesson one layers and masks starts part way through, it starts at adding a border........................is this correct? |
|
|
|
04/30/2011 09:29:18 PM · #55 |
For the ones having trouble saving the images for the 'Ive been framed' image, I have uploaded a zip file for you to download. They are all in there.
Images for ive been framed image.
|
|
|
|
04/30/2011 10:31:34 PM · #56 |
|
If it's not too late, I'd like to join too. Just saw this thread and it's awesome!! |
|
|
|
04/30/2011 10:35:27 PM · #57 |
For all the newbies, it is great to have you on board. Jump in and start the lessons and post your results here.
|
|
|
|
04/30/2011 10:55:15 PM · #58 |
Okay, Judi. I'm batting 2 for 3 here. Now I used my own image, because if I can't do it on mine, well...
The border one was easy: 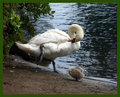
I just didn't get the gaussian blur one. Even the work around using the Layers Palette and Outside Glow (which looked ok on the screen, but went away on the flattened image) just didn't work for me. 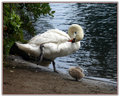
The first mask was easy. hard to see here, but I get the idea: 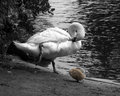
Maybe I'll try again to understand step 2 tomorrow... |
|
|
|
04/30/2011 11:22:09 PM · #59 |
Ok it looks like your drop shadow settings are a bit out. You can try what I suggested to  Jon_H - There are so many ways of doing different steps. The way I teach you is only one way. In PSP or PS you can add new layer between your background layer and your image layer. Select an area the same size as your image layer (top layer), fill it with black and then do a gaussian blur of between 10-20 depending on the size of the image. Then drop the opacity of that layer until it looks like a gentle shadow around the image layer. If you are using a black background layer then choose a light colour for the blur...preferrably white. Jon_H - There are so many ways of doing different steps. The way I teach you is only one way. In PSP or PS you can add new layer between your background layer and your image layer. Select an area the same size as your image layer (top layer), fill it with black and then do a gaussian blur of between 10-20 depending on the size of the image. Then drop the opacity of that layer until it looks like a gentle shadow around the image layer. If you are using a black background layer then choose a light colour for the blur...preferrably white.
|
|
|
|
05/01/2011 02:33:40 AM · #60 |
Originally posted by Judi:
 Maggye - it's never to late. Great to have everyone on board. Maggye - it's never to late. Great to have everyone on board. |
Thanks Judi, I'll start working on the first lesson now... I'm so excited! |
|
|
|
05/01/2011 05:30:23 AM · #61 |
|
If it's not too late, I would like to join too. I'll try immediately with the first lesson. Thanks Judi. |
|
|
|
05/01/2011 05:33:52 AM · #62 |
Originally posted by gadion:
If it's not too late, I would like to join too. I'll try immediately with the first lesson. Thanks Judi. |
You're in!
|
|
|
|
05/01/2011 08:54:04 AM · #63 |


Thank you Judi:-) Learning how to post was a lesson in itself. |
|
|
|
05/01/2011 10:09:24 AM · #64 |
I've started with this one:

|
|
|
|
05/01/2011 11:37:25 AM · #65 |
Originally posted by Judi:
Originally posted by sfalice:
Okay, Judi. I'm batting 2 for 3 here. Now I used my own image, because if I can't do it on mine, well...
The border one was easy
I just didn't get the gaussian blur one. Even the work around using the Layers Palette and Outside Glow (which looked ok on the screen, but went away on the flattened image) just didn't work for me.
Maybe I'll try again to understand step 2 tomorrow... |
Ok it looks like your drop shadow settings are a bit out. You can try what I suggested to Jon_H - There are so many ways of doing different steps. The way I teach you is only one way. In PSP or PS you can add new layer between your background layer and your image layer. Select an area the same size as your image layer (top layer), fill it with black and then do a gaussian blur of between 10-20 depending on the size of the image. Then drop the opacity of that layer until it looks like a gentle shadow around the image layer. If you are using a black background layer then choose a light colour for the blur...preferrably white. |
LOL - Well, tomorrow has arrived and a fresh look at your instructions did the trick. It was an easy and delightful effect. 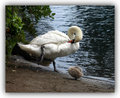
Lesson two, here I come!
|
|
|
|
05/01/2011 12:05:00 PM · #66 |
|
What a great idea! Count me in if it's not too late. |
|
|
|
05/01/2011 12:27:12 PM · #67 |
|
Just discovered this thread. For sure I want to participate - as much as my schedule permits! I'll go check on the back lessons. |
|
|
|
05/01/2011 01:43:49 PM · #68 |
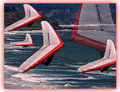
Cloning objects was a matter of concentrating and keeping separate layers.
So, here's my Hang Glider traffic jam...
 |
|
|
|
05/01/2011 01:44:32 PM · #69 |
|
Like to join if there is enough room. |
|
|
|
05/01/2011 02:44:17 PM · #70 |
Lesson #2 (Great lesson - had difficulty with the color being translucent. I had changed normal to color in the layer palette but it was brushing on a solid color. When I double clicked on the layer itself a blending options menu (where I found "stroke" for lesson one) and the center column had the work "normal" so I pulled down and there was color. Have never been in those locations before - thanks Judi for guiding me to these wonderful locations. Sorry, I rather rushed around on the applications - spent more time on the technical aspects.
 
|
|
|
|
05/01/2011 04:50:28 PM · #71 |
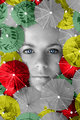
This was fascinating. I didn't know anything about this technique, Judi, and feel as if I've had a whole door opened. Making a layer for each color is brilliant. easy to go back in and erase, change, and modify color.
Nice, nice, nice.
My apologies for the size of this worksheet as I just used the 1st B&W image that happened to come up and sliced out a bit of it. The colors are fanciful, but perhaps appropriate for our San Francisco Museum of Modern Art.
Alice
 Here's the original: Here's the original: 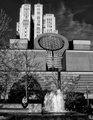
Message edited by author 2011-05-01 16:54:45. |
|
|
|
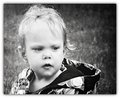
05/01/2011 05:56:58 PM · #72 |
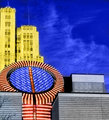
My selective coloring try.
My border try
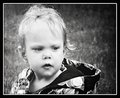
Message edited by author 2011-05-01 18:17:18. |
|
|
|
05/01/2011 06:24:28 PM · #73 |
 jaynek - I am pleased to see you got them up into your portfolio. You are going to learn so much around here. jaynek - I am pleased to see you got them up into your portfolio. You are going to learn so much around here.
Your results are good, however watch your details. You missed a part of the desaturation on the second cat. Near the orange cat's back leg is a bit of the green...always check Alt+click to ensure you haven't missed any bits. It's a good safety net. Your other two images are spot on...keep up the great work.
gadion - Now that's a pretty damn good result. Only a couple of edges that were wobbly but the rest....well done. I love that exercise purely for the possibilities that you could achieve from that knowledge.
sfalice - Yayyyy...I'm so glad you tried again...I knew you could do it. I'm so proud of you for not giving up.
Adz, tanguera and amnon - You are now in the group. Welcome.
[thumb]sfalice[/thumb] - Now that gaveme a giggle...and it is okay to move things around on separate layers...that was the next step from that lesson. It keeps things separate and easier to work with individually. It allows you to reduce opacity, change colours, brightness, transform etc. And if you need to remove part of that layer....DO NOT USE AN ERASER....throw them away....use your mask from now on. It will save you so much time and swearing.
jaynek - Hey I don't mind how you get to the result, as long as you understand it and are happy with how you got there. There are so many ways to do things in editing, these are only way to get there. Over time you will find so many more ways to do things. With your Coloouring image there are many edges missed and bits in the middle. Again using Alt+click will show you where you missed.
sfalice - Excellent work. One thing you may have noticed that the lighter the area you are painting over, the less colour will be seen over that area. That is a neat tip to remember for when you are colour high key imagery!!!!! HINT, HINT!!!
Shanny403 - Even though you didn't colour the entire image, your edges are pretty darn good. It shows me that you have got the hang of it. Did you rename the layers themselves?? Keep up the good work. Your border looks good...I see you chose to do an inner drop shadow.
Message edited by author 2011-05-01 18:25:09.
|
|
|
|
05/01/2011 07:08:18 PM · #74 |
Originally posted by Judi:
Shanny403 - Even though you didn't colour the entire image, your edges are pretty darn good. It shows me that you have got the hang of it. Did you rename the layers themselves?? Keep up the good work. Your border looks good...I see you chose to do an inner drop shadow. |
Yeah, I cheated and didn't color the whole image haha. But I figured it looked kind of cool like that. I did rename the layers with the color codes like you suggested. It's genius really. I never would have thought of that. I would have kept using the eye dropper tool. Your idea saves so much time!
I did add the drop shadow on the first one. You mentioned in the tutorial that's how some people did it and I wanted to see what it would look like.
Here's my other boarder. I just did it now. I hope I did that one right. It took me a little bit to figure it out.
 |
|
|
|
05/01/2011 07:20:54 PM · #75 |
Originally posted by Shanny403:
Originally posted by Judi:
Shanny403 - Even though you didn't colour the entire image, your edges are pretty darn good. It shows me that you have got the hang of it. Did you rename the layers themselves?? Keep up the good work. Your border looks good...I see you chose to do an inner drop shadow. |
Yeah, I cheated and didn't color the whole image haha. But I figured it looked kind of cool like that. I did rename the layers with the color codes like you suggested. It's genius really. I never would have thought of that. I would have kept using the eye dropper tool. Your idea saves so much time!
I did add the drop shadow on the first one. You mentioned in the tutorial that's how some people did it and I wanted to see what it would look like.
Here's my other boarder. I just did it now. I hope I did that one right. It took me a little bit to figure it out.
|
Coolies. Whilst some may prefer one method over another, I am trying to spread the usage of different tools within the programme so you can see what else you can do in there. It may open up other doors for you all and give you some inspiration to try other things as well.
|
|
Home -
Challenges -
Community -
League -
Photos -
Cameras -
Lenses -
Learn -
Help -
Terms of Use -
Privacy -
Top ^
DPChallenge, and website content and design, Copyright © 2001-2026 Challenging Technologies, LLC.
All digital photo copyrights belong to the photographers and may not be used without permission.
Current Server Time: 07/19/2026 03:31:01 AM EDT.


