| Author | Thread |
|
|
05/10/2011 01:00:39 AM · #176 |
Originally posted by pamb:
Oops!
*hangs head in shame*
Is this better? :)
 |
Getting there girl. Move onto the next lesson as I know you are able to do a drop shadow.
|
|
|
|
05/10/2011 03:25:01 AM · #177 |
I'm still working on the areas in the face, but I wanted to show you what I've got so far.
 |
|
|
|
05/10/2011 04:27:32 AM · #178 |

My 2nd attempt, I've got some difficulty placing the face. |
|
|
|
05/10/2011 04:50:28 AM · #179 |
 amnon - The actual face is too big for the head....but the body/head proportion is good. amnon - The actual face is too big for the head....but the body/head proportion is good.
 Maggye - You are on the right track. Just use the patch tool to clean up the side of his face. Maggye - You are on the right track. Just use the patch tool to clean up the side of his face.
|
|
|
|
05/10/2011 12:44:16 PM · #180 |
Originally posted by thrumyiis:
Judi, Im still back in lesson 1 as I cant seem to upload your cat pictures. (Im so new to all this, sorry) When I click onto the words cat 1 a message comes up saying i am forbidden from entering the DPC tutorials. Any idea what I'm doing wrong.?? I did do the border lesson on one of my own images though. |
For those of you who are having trouble accessing the images, try this link:
Images for Judi's Photoshop Boot Camp
This link will open the index of images. Then click on the image you want to open and download.
I get the forbidden error in both Firefox or Internet Explorer, but this link worked for me.
Thanks!
Message edited by author 2011-05-10 12:45:54. |
|
|
|
05/10/2011 10:16:03 PM · #181 |
What does it look like I am doing wrong on the face?

Thanks! |
|
|
|
05/10/2011 10:32:18 PM · #182 |
Originally posted by dianapf1:
What does it look like I am doing wrong on the face?
Thanks! |
You have a lot of dirty dark areas which is quite normal. Just clean them up with the patch tool.
|
|
|
|
05/11/2011 10:27:15 PM · #183 |
OK Judi here are my borders from lesson 1 Finally Yay, Im on my way.. I shall get the rest of lesson one out later today. Thanks [/img] [/img] |
|
|
|
05/11/2011 10:52:52 PM · #184 |
thrumyiis - Your border looks good. When posting a DPC image try to use the thumb icon above your reply box (it is the second from the right).

|
|
|
|
05/12/2011 04:16:28 AM · #185 |
Judi part 2 lesson 1.  I used the thumbnail icon for this one. Hope I got it right I used the thumbnail icon for this one. Hope I got it right |
|
|
|
05/12/2011 04:54:37 AM · #186 |
thrumyiis - You sure did get it right...and your selective desat is very neat...job well done.
|
|
|
|
05/12/2011 09:24:33 AM · #187 |
Started over many times....good way to learn.

Face is still a little dark.
|
|
|
|
05/12/2011 05:12:55 PM · #188 |
 dianapf1 - You are getting better. See if you can move on to the small character that needs joining. dianapf1 - You are getting better. See if you can move on to the small character that needs joining.
|
|
|
|
05/12/2011 08:27:27 PM · #189 |
|
|
|
05/13/2011 01:23:28 AM · #190 |
Judi Im having trouble cloning the balls in Childs Play. They are only coming out extremely faint. Also Im not sure how to get rid of my first clone source (if that makes sense) even when I try to start a new source 2 the first source remains in my cursor? I have attached my attempt. I have CS4 by the way.  |
|
|
|
05/13/2011 01:27:38 AM · #191 |

Not as clean as I wanted it, but I don't seem to get it to look better than this :( |
|
|
|
05/13/2011 01:53:37 AM · #192 |
And here is the small one
 |
|
|
|
05/13/2011 02:35:43 AM · #193 |
thrumyiisIt appears you are using a pattern with your cloning. Can you post a screenshot of your cloning options window and your settings at the top of your PS window for your clone brush please?
Maggye - They both look good. Tomorrow morning I will be posting the next stage...so take a break today and relax knowing you are up to date.
|
|
|
|
05/13/2011 03:02:59 AM · #194 |
| ok Judi, Ill go in a check again. Thanks heaps. |
|
|
|
05/13/2011 04:57:45 PM · #195 |
Next Stage
Now you need to open the image below and take the centre of the frame and copy it to a new layer (Ctrl+J).

Using Free Transform (Ctrl+T) stretch the corners off the edge of the image. This is now your background of your image so title this layer Background. Drag your background layer to the bin. Open your main character and either drag him or copy and paste him as a new layer above your background layer. Move him into place. If he is on more than one layer (ie, head, face, body) then merge his layers into one. Open your three frames and either drag or copy and paste them onto your main image.
Duplicate each of your frames three times. Save this file as your PSD file. This is the file that we will be building the image on. You should now have a background layer, main character layer and 9 frame layers.
Turn off the visibility of all your frames except the bottom one. Click on that visible layer to make sure that is the active layer and using Free Transform (Ctrl+T) stretch, move or twist this frame into place. (DO NOT WORRY ABOUT ANY OVERLAP AREAS as this step is purely for placement of the frames). We will get to the overlap sections later. Repeat this step for all the other frames, turning each layers visiblity on as you work on it. Have fun working out where you want each frame to go. It does not need to be the same as mine....be creative!!!! When you have done that save your PSD and post what you have done so far into this thread.
|
|
|
|
05/13/2011 09:06:47 PM · #196 |
Hi Judi, good news, I figured out the clone stamp. I had it set to pattern stamp. So here is my 2nd attempt at childsplay. Balls worked but rainbow was hit and miss. (mostly miss) I zoomed in and just tried to draw in the rainbow by dragging cursor down. Not sure if this was how I was supposed to do it?? You may have worked out by now I have absolutely no clue about photoshop!! |
|
|
|
05/14/2011 12:28:52 AM · #197 |
and here is my colouring in.  |
|
|
|
05/14/2011 02:44:36 AM · #198 |

How does this look? |
|
|
|
05/14/2011 03:12:01 AM · #199 |

My try
Message edited by author 2011-05-14 14:45:50. |
|
|
|
05/14/2011 12:01:26 PM · #200 |
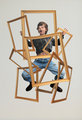
I did some changes, since the first one felt a bit crowded and I also made the main character bigger. Does it look better? |
|
Home -
Challenges -
Community -
League -
Photos -
Cameras -
Lenses -
Learn -
Prints! -
Help -
Terms of Use -
Privacy -
Top ^
DPChallenge, and website content and design, Copyright © 2001-2024 Challenging Technologies, LLC.
All digital photo copyrights belong to the photographers and may not be used without permission.
Current Server Time: 04/25/2024 01:52:06 PM EDT.


