| Author | Thread |
|
|
04/30/2011 09:44:37 AM · #26 |
| Judi, would you please add me to the list as well. Thank you so much for taking the time to do these lessons. |
|
|
|
04/30/2011 11:05:35 AM · #27 |
| Judi, thank you so much -I just this minute joined and would like to be included on your lesson list. |
|
|
|
04/30/2011 11:11:54 AM · #28 |
| I'm just seeing the thread, would like to be included the list. |
|
|
|
04/30/2011 12:03:39 PM · #29 |
got room for one more, Judi?
(You have more energy than any other three people)
Alice |
|
|
|
04/30/2011 12:49:04 PM · #30 |
Here is my Childs Play Edit:
 |
|
|
|
04/30/2011 05:56:58 PM · #31 |
 Hot_Pixel - good work. a hint to get crisper edges is to zoom in and use a small brush. I only ever use soft edge brushes...not hard edge. This sounds contracdictory but you get a better result and if you zoom in and use smaller brushes it is even better. Hot_Pixel - good work. a hint to get crisper edges is to zoom in and use a small brush. I only ever use soft edge brushes...not hard edge. This sounds contracdictory but you get a better result and if you zoom in and use smaller brushes it is even better.
|
|
|
|
04/30/2011 06:06:25 PM · #32 |
| WOW Judi, want a nice thing to do,put me down if theres still room on the bus |
|
|
|
04/30/2011 06:10:47 PM · #33 |
Do we have any more lesson results from anyone so I can start moving on? My concern is that you reallllllllly need to know layers and masks to be able to go further otherwise you are going to get really confused. I don't mind if you struggle with layers and masks, just tell me so I can help you.
|
|
|
|
04/30/2011 06:11:21 PM · #34 |
this was worth the cost of admission!! |
|
|
|
04/30/2011 06:18:31 PM · #35 |
Yayyy...that's great to hear  vawendy. I will be including loads of tips as we go. I will also be taking you through blend layers and other filters. But one step at a time. vawendy. I will be including loads of tips as we go. I will also be taking you through blend layers and other filters. But one step at a time.
|
|
|
|
04/30/2011 06:21:08 PM · #36 |
Lesson 1 complete.


Im using PSE8 and couldn't figure out the drop shadow. |
|
|
|
04/30/2011 06:37:03 PM · #37 |
| Is it too late for my to join? |
|
|
|
04/30/2011 06:40:54 PM · #38 |
Okay for the ones who are ready to move on, I have uploaded all my images that I used for the I've been framed' image. Now most people wonder how I get to the final result, idea and all. I thought of the most obvious pun in my eyes and then I decided how I wanted it to look in my head. I then researched other ideas on Google. Unfortunately there was nothing like it. Plenty of images within a frame but not like my idea. Initially I didn't have the little characters in the idea. I do the research to give me inspiration of what did and didn't work as well as other ideas. As this search brought up nothing it was a free for all for me. I could do what I wanted.
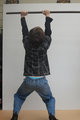
Now as you can see by the photos I was really slack with my setup. Purely because I knew I would be cutting them all out, I didn't need to worry about backgrounds, but I did need to ensure I could easily cut them out. On my front patio I do a lot of my shooting because I have laserlight roofing. This is the best type of lighting setup as there are almost no shadows. The light is amazing. So I leant one of my whiteboards (get them made to your size at a kitchen cabinet maker) up against our shoerack. I then placed a plain wood board on the ground for my son to stand on. This makes it easier to cut around his shoes. He is only small so I didn't worry too much about overlap outside the boards. I didn't use any flashes for the shots and photographed the poses and items I needed for the image. I knew with him jumping there would be some blur so I got him to do poses on different body parts so I can build the characters later. As you can see.
Main character -
And then all the little characters -
 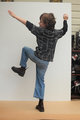 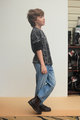 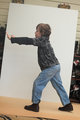 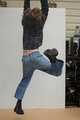 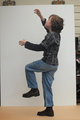 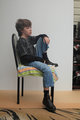 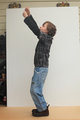 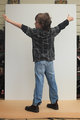 
Then the frames -
 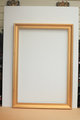 
The ladder was made from the broom in this image -
The image background was made from the inner part of the frame of this image -
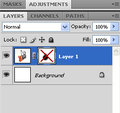
My first job was cut all the items out. I used a combination of Select/Colour Range and magic wand to pick up the background and then added that as a mask. I placed a coloured background behind each image layer so I can see where I need to zoom in and mask out more. Then I did Alt+click on the mask so I can see where I had missed areas.

Once I had my image looking like the image above I Alt+click on the mask in the layer palette to take it back to normal view and then control+click on the mask in the layer palette to give me the selection. I inverted the selection, deleted the mask (this makes all the image come back) and then add a new mask. This will make your character show and none of the background. This was then saved as a PSD so I can later drag them all one by one onto my main image to start building. But this process needs to be done to all your images first. Do all the fiddly work before you start building. The building is the fun part.
So for the ones that are ready to progress, I want you to cut out the three main characters, as many small characters as you like and the three frames. The next lesson will I will show you how to build the main character and the ladder.
For the ones having trouble saving the images for the 'Ive been framed' image, I have uploaded a zip file for you to download. They are all in there.
Images for ive been framed image.
Message edited by author 2011-05-02 07:50:24.
|
|
|
|
04/30/2011 06:41:35 PM · #39 |
Here's my ball lesson try
 |
|
|
|
04/30/2011 06:45:59 PM · #40 |
Originally posted by Jon_H:
Lesson 1 complete.
Im using PSE8 and couldn't figure out the drop shadow. |
Your Selective Desat looks good. Try zooming in and with a fine brush bring some of the colour in between her fingers over her shirt. There are so many ways of doing different steps. The way I teach you is only one way. In PSP you can add new layer between your background layer and your image layer. Select an area the same size as your image layer (top layer), fill it with black and then do a gaussian blur of between 10-20 depending on the size of the image. Then drop the opacity of that layer until it looks like a gentle shadow around the image layer. If you are using a black background layer then choose a light colour for the blur...preferrably white.
Maggye - it's never to late. Great to have everyone on board.
Shanny403 - that's looking good. Are you understanding the steps easily enough?
Message edited by author 2011-04-30 18:46:47.
|
|
|
|
04/30/2011 07:39:59 PM · #41 |
Originally posted by Judi:
Shanny403 - that's looking good. Are you understanding the steps easily enough? |
I think so Judi. I'm off to try the most recent "homework". I'll let you know if I run into difficulty.
Ok, so I'm having trouble downloading the images to work on them. The ball one I was able to see the full image size in JPEG, but these ones it's only a 1px by 1px GIF file. Is there a way to download these another way that I don't know about?
Message edited by author 2011-04-30 19:45:36. |
|
|
|
04/30/2011 08:09:38 PM · #42 |
I have learnt a valuable lesson whilst completing the B&W painting (Dont copy the coloured layers or you cant change the opacity afterwards).
The painting took ages and i have still not finished due to the faux pas but i understand the steps now.
Cloning effort.
 |
|
|
|
04/30/2011 08:11:29 PM · #43 |
Originally posted by Shanny403:
Originally posted by Judi:
Shanny403 - that's looking good. Are you understanding the steps easily enough? |
I think so Judi. I'm off to try the most recent "homework". I'll let you know if I run into difficulty.
Ok, so I'm having trouble downloading the images to work on them. The ball one I was able to see the full image size in JPEG, but these ones it's only a 1px by 1px GIF file. Is there a way to download these another way that I don't know about? |
You should be able to right click and save as. If you still have trouble let me know and I will email them toyou.
|
|
|
|
04/30/2011 08:13:18 PM · #44 |
Originally posted by Judi:
Originally posted by Shanny403:
Originally posted by Judi:
Shanny403 - that's looking good. Are you understanding the steps easily enough? |
I think so Judi. I'm off to try the most recent "homework". I'll let you know if I run into difficulty.
Ok, so I'm having trouble downloading the images to work on them. The ball one I was able to see the full image size in JPEG, but these ones it's only a 1px by 1px GIF file. Is there a way to download these another way that I don't know about? |
You should be able to right click and save as. If you still have trouble let me know and I will email them toyou. |
Actually, I was having trouble also. What I figured out is you have to viw at full size before you save it. Hope this helps =) |
|
|
|
04/30/2011 08:23:37 PM · #45 |
Originally posted by Hot_Pixel:
Originally posted by Judi:
Originally posted by Shanny403:
Originally posted by Judi:
Shanny403 - that's looking good. Are you understanding the steps easily enough? |
I think so Judi. I'm off to try the most recent "homework". I'll let you know if I run into difficulty.
Ok, so I'm having trouble downloading the images to work on them. The ball one I was able to see the full image size in JPEG, but these ones it's only a 1px by 1px GIF file. Is there a way to download these another way that I don't know about? |
You should be able to right click and save as. If you still have trouble let me know and I will email them toyou. |
Actually, I was having trouble also. What I figured out is you have to viw at full size before you save it. Hope this helps =) |
Ahh yes...Under the image you will see a 'view as full size' link. Click on that and wait for it to load. Then right click, save as.
|
|
|
|
04/30/2011 08:24:34 PM · #46 |
Originally posted by Jon_H:
I have learnt a valuable lesson whilst completing the B&W painting (Dont copy the coloured layers or you cant change the opacity afterwards).
The painting took ages and i have still not finished due to the faux pas but i understand the steps now.
Cloning effort.
|
Nice work...however at the bottom of the ball it looks a little light. Try moving it to an area where it looks like it would fit in better. That is all a part of montage...make sure where you put things would be realistic looking.
|
|
|
|
04/30/2011 08:40:35 PM · #47 |
| I have just discovered this thread is it too late for me to join? Good on you Judi for the free sharing of your knowledge and expertise :) |
|
|
|
04/30/2011 08:42:41 PM · #48 |
Originally posted by joynim:
I have just discovered this thread is it too late for me to join? Good on you Judi for the free sharing of your knowledge and expertise :) |
It'snever too late.
|
|
|
|
04/30/2011 08:44:59 PM · #49 |
| Thanks Judi ;) Since Im not a member I've just got to figure out a good way to share my images will get onto lessons very soon :D |
|
|
|
04/30/2011 08:45:53 PM · #50 |
| I'm not seeing the view as full size link. It's on the ball one for me, but not on these. You may have to email them to me Judi. Sorry for being a pain. I'll pm you my email address. |
|
Home -
Challenges -
Community -
League -
Photos -
Cameras -
Lenses -
Learn -
Prints! -
Help -
Terms of Use -
Privacy -
Top ^
DPChallenge, and website content and design, Copyright © 2001-2024 Challenging Technologies, LLC.
All digital photo copyrights belong to the photographers and may not be used without permission.
Current Server Time: 04/19/2024 11:42:23 PM EDT.