| Author | Thread |
|
|
08/07/2005 09:39:32 PM · #51 |
Originally posted by suemack:
[thumb]214760[/thumb]
Such serious concentration in the first shot, trying to figure it all out and I hate being infront of the camera!! By the last I'd relaxed a bit ......and there were many many takes in between, the dog got in the act bringing her strange mother toys since she was so obviously playing silly games!
Still not sure I got it right with the lights Dan. |
++++++++++++++++++++++++++++++++++++++++++++++++++++++++++++++++++
Do not be too worried about the lights for now. You did well. Thank you. |
|
|
|
08/10/2005 02:56:26 PM · #52 |
Hey Dan
Busy busy busy ... just bumping this up ... looking forward to the next instalment.
|
|
|
|
08/10/2005 07:24:14 PM · #53 |
|
Next instalment coming soon. Thusday or Friday. |
|
|
|
08/12/2005 07:39:09 PM · #54 |
Okay: Let us conclude this first part and make sure you understand the main principles and I will take the liberty of imparting some more useful information.
To do a double exposure requires some thought as to how the end result should look. You must have some vision of what it is you want to achieve and then you want to control the time allotted to subject and background. If you fail to consider this step then your double exposure will be merely a common effort and this you do not want. Lighting is very important and we have covered the Inverse Square Law. I repeat this to make sure it sinks in because anytime you use artificial light you are under this Law. As an example two lights of equal strength. One is the main light and you can place it at the best possible angle to enhance your image. It does not matter how close or far you place it. The fill light is then place at the same distance if you want what is known as a 1:1 ratio. Of course, the fill light is placed in the opposite side. This is a flat looking effect. Move the fill light back the same distance that the main is from the subject and you attain a 1:4 ratio. Move it back another unit and you have the square again of 3X3 = 9. Here then you have a 1:9 ratio. If you go back another unit then you are 4x4 =16 or 1:16. Please spend time wuth these numbers. Once you understand it you will never forget it.
Why is all this important? Because it decides what you want to superimpose. So let's say you want to do a face and a skull. You have the skull printed and you observe the light and shadow in the print. You want to mimic this set up with your lights. If the shadows have detail galore then you are probably at a 1:4 ratio. If the shadows are very dark then you will consider a 1:9. Then you need to allow more time for the subjects face and less for the skull. Sometimes it is essential that you use two different lights. For example, have your main and fill lights ready and then a secondary light to shine on the skull. Suppose you use say a set of lights with 200 watt bulbs for main and fill. Then you use a 100 watt at about 7 to 8 feet for the skull. You need switches and electrical strips are great. You place the skull mask on your face and you switch on the 100 watt. Switch off thre light and remove mask and then switch on the main lights.
The art of lighting is mastered first by the use of a single light source. You can set up camera in front of a mirror and observe how the movement of the light help delineate the form and mood. Again, be careful with the single light to make sure the image makes sense.
At one point you may consider buying a set of lights. They have all kind of different light kits. The important thing is to buy all lights the same value. Do not fall for those kits that have a main light and then fill lights. You want all lights the same value because you know how to apply the Inverse square. Not only that, the lights will serve a bigger purpose. Eventually steer yourself away from your cameras' built in flash. This is totally flat lighting and has a terrible definition for artistic efforts.
In the next session we will have each of you who have submitted the first exercise create a useful artistic double exposure that you can show off in your port. I will work one on one to assist you realize this end. I ask that you consider an image you would prefer to do. Take you time and try to visualize an end result. Keep in mind the initial exercise you did and think about the black and the white or zone one and nine. If you can not come up with an idea then I will come up with one for you. Like I said we will work this together.
However, do not feel rushed. Before we do this, I will cover a series of images and how they are achieved. We will use some of my images and some from other photographers here at DPC. All the time, keep thinking about the image that you want to do.
*** If you have any questions regarding this first part please ask them before we move on.***
Message edited by author 2005-08-12 19:46:53. |
|
|
|
08/13/2005 01:37:55 PM · #55 |
Thanks Dan
Please put the guy stuck in the tree on your list of pics to analyse for us!!! I just love that shot.
|
|
|
|
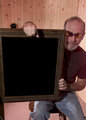
08/13/2005 07:39:48 PM · #56 |
Exposing the lens one half at a time. There are several ways to go about this. My suggestion is to first learn the basics because when you try any special effect the amount of problems multiply and they require immediate resolution. Of course, I am talking about creating a good image. More general knowledge is required because you are employing techniques way past what is needed for a regular image.
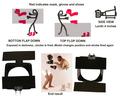
Let us discuss how we can make our camera expose half the sensor independently of the other half. A simple way is to insert a piece of circle, that is cut in half, right inside the filter. You expose one half and then you turn it 180 degrees. Now, this position covers what you just exposed and frees the second half. Certainly clumsy. Another way is to cut out a circle and then a strip of 1/4 cardboard. Mount the circle on a filter holder and then wrap the strip around and secure with tape. This is nothing more than a cover at this time. Now, you use an exacto knife and cut out half. Another option is to get a lens cover and with a heated knife cut out half of a circle, leaving the lens cover intact around the perimeter. Personally, I do not like any contact with my lens or filters. However, there is a bigger problem that awaits you while you experiment with all of the above. The apparant seam becomes wider as you get nearer the sensor. My solution to this is my flip box. The further away you are from the lens the thinner this division becomes.
Yes, the flip box is a pain to build. You must be handy with craft like skills and you must be accurate. It is not for everyone and my suggestion is to look and read about it as I present it. Allow the info to sink in and do nothing until you get the urge. If the urge is strong you will build it. So, lets take a look at this contraption. There is nothing like it in the market. Even if you obtain a bellows you will find that lacking the flippers, it will all be very awkward. My flip box is lightning quick and how else can you operate? I will bore you with details of how to build it at the end.
[thumb]217427[/thumb][thumb]217428[/thumb][thumb]217429[/thumb]
 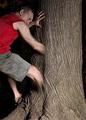

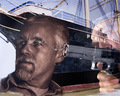
The chair coming out of the tree was my first attempt, yet it was because it was easier then me coming out of the tree or tearing myself away. I decided the chair looked boring. As you can see, the chair and then me ripping myself off the tree were done outside. The object of any time exposure is to keep it as short as possible. Here is where stronger lights are needed. Here is the set up: three medium sized strobes. I want the tree texture strong so two lights are ganged up against an unbrella from the right. I need a very weak fill on the left of the tree and if placed in the proper place it would have caught my body or that of the chair and casted very strong 2nd zone shadows. Well, this means the third light is placed almost as a backlight, just enought to keep the last third of the tree going to dark. I prefocus. Anything that has color and form will do. Anything with strong graphics such as detergent boxes etc. You must remember that when you use strobes you simply determine the flash exposure and set only the aperture. You need to fire the strobes manually. Any flash meter is able to fire them. You need the time exposure to allow you the time needed. Here the flip box is in the first position: Basically 2/3 of the trunk. I fire the strobe right by the camera and then I open the closed flap and close the open then run and place myself or chair in position.
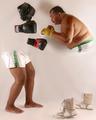
What you need to observe is the seam line I mentioned earlier. This line was left unedited. You can make it perfect if you like, but I rather leave it as is. There is also another problem when using strobes. As you may know a capacitor needs a specific charging time, so it is not smart to trigger the strobes too fast after the first. Most units require about 6 seconds. If you fire too quick back to back then one half of the sensor does not get enough light and you have an effort that must be aborted. A black background is the most forgiving. I did the boxer with a white because it is much more difficult than black. I did the water to wine image, "Miracle in Basic Editing" in both black and white but white won because the wine color is more visible. However, I spent a lot of time doing curve corrections to match the background. There is a thread somewhere about how this was done.
I show you this only as food for thought. I have presented many illusions and yet for the "Illusion" challenge I refrained from using the flip box. The main point is that the flip box is not the answer to all special effects, it is simply another tool and one you can do without until you are ready. The flip box is good for displacement shots and shots like the tree and most important to change one continuous form into another such as the water to wine.
Like I said, I will explain the construction of the flip box later. My next post will treat double exposures with out the box.
++++++++++++++++++++++++++++++++++++++++++++++++++++++++++++++++++++++
In most cases you can simply make a mask and cover all or part of your face. Observe "weeping maple," "Wasting away in Margaritaville" Another similar effort is one made by hughletheren: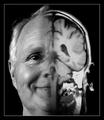
As you can see you are limited only by your imagination.
++++++++++++++++++++++++++++++++++++++++++++++++++++++++++++++++++++++
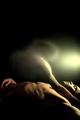
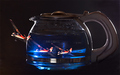
The next series consist of the time exposure like the metronome. One of the most exciting is the time exposure with an initial light or flash for the main exposure and then a secondary light source. Look at "Electric Horeseman" here the exposure is made for the image, I left a weaker light on through to show sime hand blur. Once the main light goes off a second party has to pass the sparkler. To avoid any trace of the expose hand use a black glove with the hand holding the secondary light source. Another simple effect is the toilet in the beer. Simply photograph the item and print it. I placed it right behind the beer glass and used the stronger lights for the glass. You can not see the toilet through it. After the initial exposure I had a 100 watt ready 7 feet away for one second or on and off. You simply remove the beer glass and expose the toilet. The image is a true double exposure.
Black Sabbath was strictly a solo image. Read the steps involved. This image is closer to the electric horseman because the main light captures the subject and then the effect is added.
Here is creative time exposure/double exposure similar to my OBE (out of body experience) but done with an extra touch to fool the viewer. The image is by artist sonda: 
Message edited by author 2005-08-14 19:34:18. |
|
|
|
08/14/2005 07:51:52 PM · #57 |
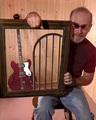
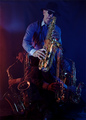
Make sure to catch up on the above post. Here we turn to JPR. At the time of this image he owned nothing elaborate in the way of lights. I believe his camera is capable of a true double exposure. However, you can accomplish same as discussed. It is an exciting image filled with great color and certainly a good accomplishment in the double exposure realm. His portfolio is very interesting and he has some truly outstanding images.
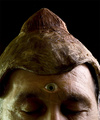
Earlier I spoke about the importance of lighting and how you can get started by simply employing a single light to learn proper light placement. Well, allow me to introduce you to the artistry of Nico_blue. Note how that this effect requires only a hint of the second exposure to represent a spirit. Above all observe the lighting and the overall effect. Study his port, he is like the consumate artist.
Message edited by author 2005-08-28 20:19:51. |
|
|
|
08/14/2005 11:57:54 PM · #58 |
Great explanations and lessons, Dan. Thanks.
(I've been busy all weekend and just had a chance to check back in.)
|
|
|
|
08/16/2005 11:29:04 AM · #59 |
Thanks Dan, I am still here too, just trying to absorb all of this. Great tutorials, thanks a stack.
|
|
|
|
08/16/2005 04:32:10 PM · #60 |
|
Yeah dan this is going great :-) |
|
|
|
08/16/2005 04:55:55 PM · #61 |
Wow... I just stumbled across this thread (yeah, I'm a little slow, but I'm blonde, okay?!?!). This really is VERY helpful and it seems like most of your "students" Dan, are really getting it. Thank you for providing some sage advice and sharing it with everyone. :-) I've learned something today!
|
|
|
|
08/19/2005 12:11:02 AM · #62 |
Playing with my new sail boat. Taking a couple days off and will be back soon. Start thinking of an image. I will be more than happy to work one on one to fine tune a concept and determine the best execution with whatever equipment you have. Let us break down the main avenues:
a) one strong exposure like in "Black Sabbath" to this you can add a light, a flame. You can do much more.
b} working with a mask. This not only entails a face mask but also general masking like the effect on "Plays itself" Think, you can put on some black material that will cover your head. here you can cut holes for the eyes or the lips. You then make multiple exposures in different areas of the image all against a black background. You can even make a single hole for one eye, then you find a suitable counterpiece that is very light in which you can place a similar oval painted in black or a black material oval. For demostration imagine a filled quart of milk glass bottle. Near the belly of the bottle you place a black cardboard oval. Your head is covered with this black material but one eye is exposed with a similar cut oval. Now you place the bottle right in front of your face and align your eye with the oval on the bottle. The first exposure will display the bottle, now remove bottle and expose the eye: end result will be an eye peering out of the bottle.
c) Multiple exposures such as in "OEB", the image by Nico_blue etc. Also check the image by Wicketpete.
I will also spend some time showing you how to use curves to get a nice end result. The important thing is to get your mind rolling to come up with something that you want to do. Even by posting your desire or concept it will serve as a learning exercise for all of us. So, while I sail for two days you can think, think and think. It will come to you. be back saturday. |
|
|
|
08/23/2005 01:11:30 AM · #63 |
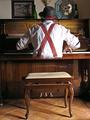
Dan, I hope that the high seas have treated you well.
I fooled around with various ideas for this assignment for about 2 hours, and I think that this is the best executed shot of the evening.
Things I learned while completing this assignment:
- They're called hot lights for a very good reason
- It doesn't take very long for 2 60 watt bulbs to influence the temperature of the room |
|
|
|
08/24/2005 11:17:02 AM · #64 |
Hi Dan
Havent had a whole lot of time to devote to this but I did try to make a gadget like you have that screens off half the frame at a time and found out the hard way that the distance that it is from the lens is VERY important LOL i.e. the further away it is from the lens the less visible is the dividing line. Mine was too far away (I used one of the silver reflector dishes that goes around the studio flash, sheesh I am getting old can't for the life of me remember what it is called),and the dividing line was almost non existant! Also discovered that a second pair of hands in a pitch dark room is always a good thing! Oh well looking forward to the specifics of how you created this wonder gadget and will keep on truckin with ideas.
Hope you sailing went well, I am totally jealous.
|
|
|
|
08/28/2005 12:44:05 PM · #65 |
Originally posted by metoecus:
Dan, I hope that the high seas have treated you well.
I fooled around with various ideas for this assignment for about 2 hours, and I think that this is the best executed shot of the evening.
Things I learned while completing this assignment:
- They're called hot lights for a very good reason
- It doesn't take very long for 2 60 watt bulbs to influence the temperature of the room |
+++++++++++++++++++++++++++++++++++++++++++++++++++++++++++++++++++++++
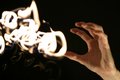
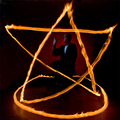
Now, this is a very nice effort. The next step is to simplify the light painting so as to give the image a unique look. You may consider creating a spiral leading or emanating from one finger tip. You need a marker of some sort. The idea is great, only you want to avoid the scribble. |
|
|
|
08/28/2005 12:47:06 PM · #66 |
:
Message edited by author 2005-08-28 12:48:23. |
|
|
|
08/28/2005 12:51:49 PM · #67 |
Originally posted by loriprophoto:
Hi Dan
Havent had a whole lot of time to devote to this but I did try to make a gadget like you have that screens off half the frame at a time and found out the hard way that the distance that it is from the lens is VERY important LOL i.e. the further away it is from the lens the less visible is the dividing line. Mine was too far away (I used one of the silver reflector dishes that goes around the studio flash, sheesh I am getting old can't for the life of me remember what it is called),and the dividing line was almost non existant! Also discovered that a second pair of hands in a pitch dark room is always a good thing! Oh well looking forward to the specifics of how you created this wonder gadget and will keep on truckin with ideas.
Hope you sailing went well, I am totally jealous. |
++++++++++++++++++++++++++++++++++++++++++++++++++++++++++++++++++
You are correct in your observation. A good answer is to use a bellows. However, even a bellows has distance limitations. I have done all my images using between 3 3/4" amd 5". In basic editing you can take advantage of curves and of course in advamce editing you can go further.
My most difficult image to clean up is:

Message edited by author 2005-08-28 13:05:03. |
|
|
|
08/28/2005 01:02:37 PM · #68 |
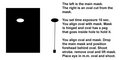
Okay: I am back from sailing and what a lovely experience. Now it is time to buckle down. Let us tackle the flip box so as to clear the way. Its construction is not for everybody so feel free to skip this posting and concentrate on more important things.
The first image is using paper as a placeholder for a piece of metal. Metal cuts and you must be careful. So the first requirement is a piece of metal about 5 inches square. I will leave it up to you to find it. It must be light metal such as that used in cookie or canister cans. The cookie can usually has a nice flat top and bottom. The next problem is how to get the piece you want out. You need a resourceful person to show you how to extract it. One way, if you can, is to use a can opener on the bottom. This will yield a nice circular piece. There are other types of metal that can be purchased in places like Home depot and hardware but these may be more difficult to work with because of the heavier gauge.
Once you have the metal the next item is a plastic container like those made to hold food. The shape must be small and the top must have a rectangular shape, but a square is more desirable. The bottom must be large enough to fit over the lens of your camera. Too big and it will be too clumsy.
You need one heavy metal clothes hanger. The thin ones won't do.
You will also need some thin flat piece of plastic for the actual doors. This plastic must have some weight to it. It should be brittle.
Last item: 5 minute epoxy.
So now you have your 5 inch square piece of metal and you place it atop the container. You want to cut the metal about 1/8" smaller then the opening. This will now give you something that looks like a frame. Now we need to make some cuts and bends and place a hole in these ears to hold the hanger wire. The above can be done by using metal cutters and a nail and hammer to make the hole.
Next we carefully cut two pieces of hanger wire from the bottom which is nice and straight. Here you must be careful not to bend the wire. You can use metal clippers but then you may need to render any bends true with a hammer. Safest way is to hack saw. The length is determine by the face of the metal frame and the bends you made. It needs 1/4" clearance on both sides. So, in the event that your dogears bend with the hole measure say 4 and 1/4" than you need wire measuring 4 3/4"
Now you employ the plastic. It is best to use two pieces and butt them together side by side, just where they will open and close and then use masking tape to hold them together. Where they meet is the center of the flip flop doors. You want the doors to exceed only a hair past the wire. One easy way to do this is to shape the plastic to fit over the frame and feel free to shape it so that it covers the opening and clears the dog ear bends. All you are doing here is cutting the excess so that the plastic fits the face of the unit. You will need a center line marking so you can position the center of the doors.
Once you have it in place remove the tape and use the epoxy to secure the top flap door. It is important that the plastic is no more than 1/16" past the wire. You should be as close to the wire as possible. Mix eposy and secure the plastic and wire and allow to dry. Do not glue the lower half. When dried insert one end of the wire into the hole at the top. You will need to bend the folded part out to fit the other end of the wire. It is out and once you get the wire through bend it back. Test to make sure the door opens and closes.
If not check that the plastic is not extending too far past the wire or check to make sure the holes are not obstructing the freedom of the wire.
For the other flap, first insert the wire into the other side and then butt the two centers together. Tape them again. Now get cardboard to lift the flap to the wire. Once you are secure in position, remove cardboard, place epoxy and reinsert cardboard making sure alignment is complete.
The next task is to take a lens filter and trace it in back of the plastic container. Make the cut out as snug as possible. An exacto knife is ideal for this task otherwise a single edge blade will do with great care.
Next: fit the filter on the camera and when it is tight, place the container around the filter and turn the container until it is aligned with the camera. That is, you want the top of the container parallel with the top of the camera. Mark the position on bothe filter and camera and then glue filter to plastic box.
The next step is to epoxy the face of the unit, that with the flip/flop doors unto the container and you are finished.
For what is worth here are some dimensions from one of my units. They differ because we are not all able to get identical parts.
The rop of the plastic food container is 3 1/4" the bottom is 2 3/4" and the length is 3 1/2"
The tin face measures 4 1/2 in height and 5 1/4 in width. I made the width longer so that I have enough room when I bend the ears to hold the hanger wire. The bend of the ears is 5/8" The holes are approximately a 1/4" from the bottom.The width of the barn doors from end to end( measuring top to bottom) is 3 3/4"
I used an old scratched uv filter from which I removed the glass and used epoxy to secure it. Of course once finished you must seal and spray paint the container. Acrylic paint is best. It can also be applied with brush.
[thumb]217427[/thumb][thumb]217430[/thumb][thumb]217429[/thumb][thumb]217428[/thumb]
the first is paper used for demostrating how it needs to be cut to make the bends which get a hole to hold the wire hanger (hinged) door. You will also need to cut out a squareabout an 1/8" smaller all around then the plastic container.
+++++++++++++++++++++++++++++++++++++++++++++++++++++++++++++++++++++
Message edited by author 2005-08-29 22:01:33. |
|
|
|
10/01/2005 11:00:49 PM · #69 |
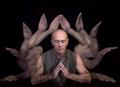
Shortly after I lost my audience after explaining the cumbersome flip box and then suggesting an assignment to the participants to create a creative double exposure image...I was forced to think of my own image to contribute. The challenge, "destinations" triggered this image.
This image is just like the "Black Sabbath" in principle. In short, the exercise you did with the black and white mask tells you that all shot with black (the 1st zone) is like money in the bank or in reserve. That is, whatever has black can be revisited for a double exposure. This is exactly what I did here.
As you know, if you were to shoot the arm positions while remaining still, quite a feat, and then assuming the prayer position, the entire body would be overexposed beyond redemption. It is here that we employ the 1st and 9th zone principle. We cover the body with black and leave the hands exposed. I made an incident reading shooting a single strobe for the hands and then another reading for shooting the three strobes on the body. With experience you can easily hit on the proper exposure. Once all of this was worked out it was a simple matter to allow a small recharging time of 3 seconds. My system is archaic and needs a full 6 seconds. I never use professional equipment(except camera) to compete in DPC. So 5 hands positions equal 15 seconds and then 5 seconds to activate the other two strobes which are bounced of a white reflector. In this interval the black cloth is removed and the prayer position assumed and right before the shutter closes, snap. The strobes are fired to captured the body.
The camera is set for 20 seconds. One strobe is activated. This single raw light will be used to fire at three seconds apart while the arm positions change. After the last hand position the other two strobes are activated and then the black cloth is removed and thrown on floor and quickly into prayer position and then we fire all three strobes at once for the final capture. As you can surmise, the black protects the head and chest from being exposed.
Even if you do nothing else but have completed the initial double exposure as set out at the start of this thread, you are in a much stronger position to take advantage of the opportunities for a double exposure. The initial exrecise packs a lot of information. Good luck with your entries. And realize that the "destination" image was triggered by this thread and your participation. |
|
|
|
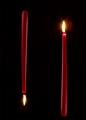
10/26/2005 11:10:32 PM · #70 |
This image is not added to bump this thread but rather to add another image. I simply want as much as possible to illustrate the possibilities. Another beauty and very artistic effort was recently added by JPR. Here is his entry for "What".
The instructions for the candle shot are on the image.
Message edited by author 2005-10-26 23:28:01. |
|
|
|
12/08/2005 11:04:49 AM · #71 |
For those interested please read description on image on the details.
This info is being added to complete this thread.
Message edited by author 2006-01-04 14:15:59. |
|
|
|
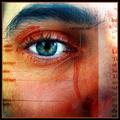
01/03/2006 07:43:50 AM · #72 |
Hey Dan
Thought you had given up on us. I havent checked this thread for a while but did after your challenge entry with the eye in forehead and saw you linked to this. May be an idea to let the people who started participating know that you are still with us and I am sure we will pick up from where we left off.
I will be trying to digest all this in the next few days. Dont want this thread to die.
|
|
|
|
01/04/2006 02:12:00 PM · #73 |
Originally posted by loriprophoto:
Hey Dan
Thought you had given up on us. I havent checked this thread for a while but did after your challenge entry with the eye in forehead and saw you linked to this. May be an idea to let the people who started participating know that you are still with us and I am sure we will pick up from where we left off.
I will be trying to digest all this in the next few days. Dont want this thread to die. |
+++++++++++++++++++++++++++++++++++++++++++++++++++++++++++++++++++++++
No, no. I have not given up but I do realize that the flip box has presented a serious problem for many. However, not all effects require the flip box. It is only a principle, along with the 1st and 9th zone, whose employment can yield many interesting images.
When I gave the second assignment the response was zero. In this case, I decided to make this thread more of a reference wherein I will add more as time goes. Interesting, after this thread I produced more double exposure entries. I still need to update. However, I encourage any of you to post your experiments to make it more complete.
Message edited by author 2006-01-04 14:19:39. |
|
|
|
05/25/2007 11:53:40 PM · #74 |
To continue the march of double exposure here are more images: Each one has the explanation in the comment section of the image.
Message edited by author 2007-05-26 00:02:48. |
|
|
|
02/14/2014 09:30:59 PM · #75 |
On the subject of ancient threads being reopened:
Back in early 2007, a group of DPCers decided to start mentoring groups on various subjects.
One of them was how to make a double exposure. Mentored by  Graphicfunk, who is still a member, but inactive, Graphicfunk, who is still a member, but inactive,
this one still makes good reading. It also has good information on lighting, in lesson one.
Happy reading! |
|
Home -
Challenges -
Community -
League -
Photos -
Cameras -
Lenses -
Learn -
Help -
Terms of Use -
Privacy -
Top ^
DPChallenge, and website content and design, Copyright © 2001-2026 Challenging Technologies, LLC.
All digital photo copyrights belong to the photographers and may not be used without permission.
Current Server Time: 07/26/2026 05:18:10 AM EDT.


