| Author | Thread |
|
|
05/21/2011 05:16:56 AM · #251 |
Originally posted by thrumyiis:
Ok Im still stuck back at the start of lesson 3. I have been trying to figure it out for a week but cant get it. I'm sorry but this is my introduction to photoshop, I know absolutely nothing.(but in between all of this Im trying to learn the basics from books.) So I'm not understanding how I'm to "cut out the figure". Ive been going around it with the magnetic lasoo but I just cant figure out the select/colour range and what im supposed to do with it.? I invert the image and press the mask icon and it looks like your silhouette image in my layer pallet. But apart from that the main image all looks the same?? Could you PLEASE help me further, Judi. Many many thanks.. |
I put up a Select/Colour Range Tutorial earlier (you will also find it in my original post on this thread). Go through that and if you are still having trouble, post a screenshot of your layer palette so I can see where you are going wrong. I have an idea what the problem is, but we will work through a process of elimination first.
|
|
|
|
05/21/2011 05:59:02 AM · #252 |
|
Thanks Judi, missed that one, sorry. I'll read up and give it another go as soon as I can. Cheers |
|
|
|
05/21/2011 11:44:24 PM · #253 |
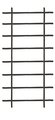
Okay now for the ladder.
Using image 9223 clone the hands out and replace them with more broom. Cut the broom out and copy to a new layer. Put a new white layer beneath your broom to hide everything else in the previous layer. Zoom into your broom and make sure your edges are neat. Now using the free transform tool (Ctrl+T) rotate the broom 90 degrees. Duplicate the broom layer and flip the broom and move it down to join onto the bottom of the other broom. This gives you two round ends on the broom. You made need to increase your canvas size to accommodate the size of the broom. Mask out the hard edge of the broom where it overlays the other broom. You want a nice blend between the two brooms. When you are happy that it looks like one stick with two round ends, merge the two broom layers. Duplicate this layer and flip the new layer horizontally and move across to make the second upright of the broom. Duplicate this layer and royate 90 degrees and slide it into place to make the first ladder rung. I put the end of my ladder run to slightly overlap the ladder uprights. Don't worry about the excess of the ladder rung sticking out to one side. We will remove them later. Duplicate this layer and move the new layer down to make the second rung. Repeat until you have enough ladder rungs. Merge the ladder rungs ONLY into one layer. Mask out the excess. Duplicate this layer and flip horizontally and nudge over to make the round ends stick out the other side of the ladder. When happy merge all ladder layers and save as PSD. Post a screen shot to this thread.
|
|
|
|
05/22/2011 06:12:13 AM · #254 |
Hi Judi, this looks like a ladder even i would be brave enough to climb ;-)
 |
|
|
|
05/22/2011 05:33:15 PM · #255 |
Hi Judi,
Hopefully this will do.
 |
|
|
|
05/23/2011 02:27:39 AM · #256 |
|
|
|
05/23/2011 05:25:59 AM · #257 |
All of your ladders look good. Now drag your ladder and small people into the image and start placing them where you want. Don't forget to add shadows and mask out any overlap areas.
|
|
|
|
05/23/2011 04:41:25 PM · #258 |
|
|
|
05/23/2011 05:00:29 PM · #259 |
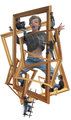
my first try |
|
|
|
05/23/2011 05:04:43 PM · #260 |
 Maggye - Well done. Now all you need to do is treat the image as an entire image and do your standard edit that you would do to any image...ie, Shadow/Highlight, levels, etc. Maggye - Well done. Now all you need to do is treat the image as an entire image and do your standard edit that you would do to any image...ie, Shadow/Highlight, levels, etc.
 amnon - Looking good but the little person up the top needs a bit more masking down his back to get rid of the white edge. amnon - Looking good but the little person up the top needs a bit more masking down his back to get rid of the white edge.
|
|
|
|
05/23/2011 08:16:40 PM · #261 |
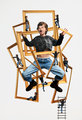
So, what do you think Judi? |
|
|
|
05/23/2011 08:20:12 PM · #262 |
Maggye - Job well done maggye. The only pick up I can find is in the bottom character there is a white line around the back of his head. But overall, good work. It wasn't that hard was it? Take a break and let the others catch up as next week I will be starting you on the dragon smoke image.
|
|
|
|
05/23/2011 08:46:57 PM · #263 |
Originally posted by Judi:
Maggye - Job well done maggye. The only pick up I can find is in the bottom character there is a white line around the back of his head. But overall, good work. It wasn't that hard was it? Take a break and let the others catch up as next week I will be starting you on the dragon smoke image. |
Thanks Judi and LOL, it wasn't easy, but I'm learning A LOT, I'll be looking forward to the next image, and thanks again for doing this, we really appreciate it! |
|
|
|
05/24/2011 01:49:10 AM · #264 |
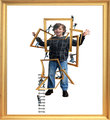
Hi Judi, Here is my final effort, and great fun it was too.
Thanks for your help.
Craig
|
|
|
|
05/24/2011 05:08:57 PM · #265 |
Originally posted by dianapf1:
"We are now going to add a Border. There are a few ways we can do this. But I am going to show you a
way that gives you much more flexibility, especially in changing the border colours without having to
undo your steps."
Can we use this on DPC advanced editing challenge entries? |
I just checked with SC and the they say you should be fine using that method in basic or advanced. Just like anything though...if you are still unsure send it to them prior to the challenge.
|
|
|
|
05/24/2011 05:09:59 PM · #266 |
Lad - It looks like you had fun with this image...that's what I like to see.
|
|
|
|
05/26/2011 04:40:30 PM · #267 |
Hi Judy,
Here is my final image:

I too had fun doing this and I learned so much. Thanks for everything and I look forward to the dragon smoke image! |
|
|
|
05/26/2011 05:10:45 PM · #268 |
 dianapf1 - You've also done well. I hope it has helped you all learn a few skills. dianapf1 - You've also done well. I hope it has helped you all learn a few skills.
|
|
|
|
06/07/2011 12:28:06 PM · #269 |
|
hi Judi, I think we are all ready for the next assignment and excited to keep learning! |
|
|
|
06/07/2011 02:51:18 PM · #270 |
Originally posted by Maggye:
hi Judi, I think we are all ready for the next assignment and excited to keep learning! |
Awesome. Can you bear with me as I have had some significant shoots with enormous pressure this week. I had planned to have the dragon started by now but I didn't expect this much pressure from these clients. Give me a few days if that is ok.
|
|
|
|
06/07/2011 05:30:58 PM · #271 |
Originally posted by Judi:
Awesome. Can you bear with me as I have had some significant shoots with enormous pressure this week. I had planned to have the dragon started by now but I didn't expect this much pressure from these clients. Give me a few days if that is ok. |
Sure thing, take your time, as it is you are doing me a huge favor and I really appreciate it. So, when you can get to it, I'll be here. |
|
Home -
Challenges -
Community -
League -
Photos -
Cameras -
Lenses -
Learn -
Help -
Terms of Use -
Privacy -
Top ^
DPChallenge, and website content and design, Copyright © 2001-2026 Challenging Technologies, LLC.
All digital photo copyrights belong to the photographers and may not be used without permission.
Current Server Time: 07/21/2026 05:52:51 PM EDT.


