| Author | Thread |
|
|
01/02/2010 01:53:36 PM · #101 |
Yeah, I do the action as well. I do have two set up - once changes the last blend to exclusion, but I will also go back to the history and try a few different blends along the way. I have one I like without the last flip - may go back to that one if I can remember which folder it was in.... :-)
Really very addicting... And I do like your idea of step actions - maybe put in a stop and continue? Anyone remember how to do that? |
|
|
|
01/02/2010 01:54:35 PM · #102 |
Originally posted by cpanaioti:
Originally posted by pwm6:
These patterns really make interesting tilings. Here is a tiling of the last one I did, and its negative which sort of looks like ceramic tiles:
  |
Could you please post your steps for tiling. When I think about it it seems tedious but it may be easier than I think. |
When I made my tiles I just increased the canvas size to 10x/5x the original size, selected the fliped/blended photo, and copied, pasted, and repositioned it until the tiles were laid out. Doesnt take too long. |
|
|
|
01/02/2010 01:57:23 PM · #103 |
Originally posted by Melethia:
Originally posted by krnodil:
These things are like potato chips - I've got 40 in the hopper already and it's only January 2nd! |
Yes. :-) (I don't have that many - I've DONE that many but I delete a lot of 'em.) |
Well, I should qualify I have 40 keepers - I've run the steps on scores more, but discarded them because they didn't catch my eye that much... :) |
|
|
|
01/02/2010 01:59:54 PM · #104 |
Originally posted by Melethia:
Yeah, I do the action as well. I do have two set up - once changes the last blend to exclusion, but I will also go back to the history and try a few different blends along the way. I have one I like without the last flip - may go back to that one if I can remember which folder it was in.... :-)
Really very addicting... And I do like your idea of step actions - maybe put in a stop and continue? Anyone remember how to do that? |
Not sure a stop/continue would add much... although at least it would allow a look-see at each step. I think I'll just create another action to "Re-do one flip step" so that I can step backward/forward one flip step at a time with just two clicks. |
|
|
|
01/02/2010 02:11:23 PM · #105 |
You know me - always keen to slip in a wildlife shot . .
In this case I would like to present you with a small male Kestrel :- )
 |
|
|
|
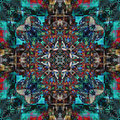
01/02/2010 02:15:21 PM · #106 |
|
|
|
01/02/2010 02:41:08 PM · #107 |
Stars and Struipes forever ... 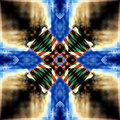 original: original: 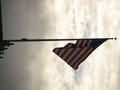
Used Multiply mode for first two transformations and Difference for the third blend, with a couple of RGB Curves to switch around the colors. |
|
|
|
01/02/2010 02:43:51 PM · #108 |
Originally posted by GeneralE:
Stars and Struipes forever ... |
Very cool! Your dedication is unflagging! |
|
|
|
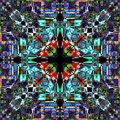
01/02/2010 02:48:11 PM · #109 |
A re-work of my last one from yesterday...
I deleted the last flip altogether from the process. The *only* things I did to it after processing wereAuto Contrast, a slight Curves adjustment and moved one side a couple px to cover up the central vertical dark line a little. I upsampled the original to 8000px wide prior to processing, the detail in the final image is incredible.
|
|
|
|
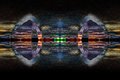
01/02/2010 03:02:45 PM · #110 |
Geesh...
 from from 
Here's a 100% detail of center of same: 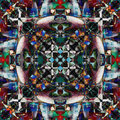
This is addicting, for a guy that used to create Julia and Mandelbrot fractals with a little program in his computer's spare time...
R. |
|
|
|
01/02/2010 03:28:26 PM · #111 |
|
|
|
01/02/2010 03:35:45 PM · #112 |
|
LOL Alice! If you haven't learned by the time I come visit, I'll show you how. :-) Nice bright productions you have there! The 2nd variation repeated would make wonderful wrapping paper, don't you think? |
|
|
|
01/02/2010 03:46:39 PM · #113 |
Originally posted by sfalice:
Of course the other reason I don't use Actions is because I never learned how to do that little trick. |
Well, creating an action is REALLY easy. You open the actions palette, click the little fly-out arrow upper right, and select "new". Then you name your action in the pop-up box and proceed to do whatever the heck it is you want to make an action of. When you're done, you click the flyout and stop the action. Easy peasy.
That said, I'm with you on this one; what would be the *point* of doing these with actions? The fun, and the beauty a lot of the times, is in the details, the messing around to see what works and what doesn't. They are SO unpredictable :-)
R. |
|
|
|
01/02/2010 04:09:24 PM · #114 |
Originally posted by Bear_Music:
That said, I'm with you on this one; what would be the *point* of doing these with actions? The fun, and the beauty a lot of the times, is in the details, the messing around to see what works and what doesn't. They are SO unpredictable :-)
R. |
Ah, precisely my friend!
And that is why a well-considered set of actions is invaluable. It's such a pain to click click click endlessly (12 times at least) do do one. It's soooo much more fun when you just ask "what happens if I..." and *click* it's done. Don't like it? one *click* and that part is undone; try another path!
A single "start to finish" action does stifle the creativity, but a set of selectable actions takes out the drudgery so I can focus on the creative part! I'm all for eliminating drudgery! |
|
|
|
01/02/2010 04:40:42 PM · #115 |
 original: original: 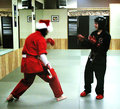
Cropped original to square before starting. I'd like to try Alice's idea of the 45° rotation as well -- that looks great! |
|
|
|
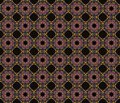
01/02/2010 04:55:32 PM · #116 |
How to do the tiling thing...
(1) First get your original image at the size you posted it, say 800 x 800 px. into PS.
(2) Select the entire image with ctrl-A.
(3) On the PS menu click on Edit.
(4) In the drop-down menu click on Define Pattern...
(5) In the Pattern Name Dialog box which appears give the pattern a name or accept the suggestion. Click OK.
(6) Create a new document: Click on File -> New
(7) Create a really big document, say 4800 x 6000 px.
(8) In the new document, select the whole thing with Ctrl-A.
(9) Click on Edit.
(10) In the Drop Down, click on Fill.
(11) In the dialog for Use, pick Pattern
(12) Pick "Custom Pattern" by clicking on the little down arrow. Pick your pattern from the thumbnails. Click OK.
That sounds like a lot but it's very easy. Once you make the patterns you can use them over and over. You could also superimpose them by using different blending modes in the same Fill dialog, I guess, but I haven't tried that yet.
Originally posted by VitaminB:
Originally posted by cpanaioti:
Originally posted by pwm6:
These patterns really make interesting tilings. Here is a tiling of the last one I did, and its negative which sort of looks like ceramic tiles:
|
Could you please post your steps for tiling. When I think about it it seems tedious but it may be easier than I think. |
When I made my tiles I just increased the canvas size to 10x/5x the original size, selected the fliped/blended photo, and copied, pasted, and repositioned it until the tiles were laid out. Doesnt take too long. |
|
|
|
|
01/02/2010 05:03:16 PM · #117 |
I have to say that an action would be too constraining, because the possibilities are so endless,
 from this from this
these 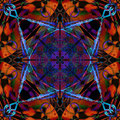 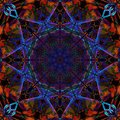 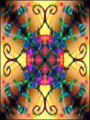 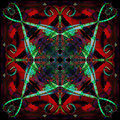
and this from an original not much different 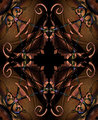 |
|
|
|
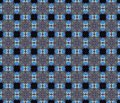
01/02/2010 05:03:57 PM · #118 |
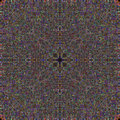
OK, I tried it... Here is the result of tiling TWICE using a different pattern each time. Both patterns are the same size (800x800 in this case so they line up.) I used the Difference blending mode for the second one and 100% opacity, but I guess there are a zillion variations on this one could explore. What a time sink!
 |
|
|
|
01/02/2010 05:05:42 PM · #119 |
Message edited by author 2010-01-02 17:37:52.
|
|
|
|
01/02/2010 05:07:43 PM · #120 |
Such wonderful images here. I just had to try this for myself.
 from a square crop taken from the center of this OOF pic from a square crop taken from the center of this OOF pic  |
|
|
|
01/02/2010 05:18:36 PM · #121 |
Some further tips on using actions while maintaining creativity... after creating an action, click on the turn-down arrow next to the action, and once it is expanded, click on the turn-down arrow for a "Set current layer" step. Notice that the purpose of this step is to set the blend mode. Now, look directly to the left, in the right portion of the gray bar; notice a little box with dots at the bottom. Clicking on this box turns on the display of the dialog box for that step. Do this for each "Set current layer" step, and your action now pauses and lets you select the blend mode at each flip!
Now create a separate action for each of the flip/blend steps instead of one continuous action, and set the option to ask for blend mode at the end of the step. Further, create two more actions, one to back up four steps, and another to move forward four steps. You now have a set of actions that allow *complete* artistic control, while eliminating the vast majority of the clicks, and also limiting the clicks to one small area - no repeated cross screen mouse travel! Try it, you'll like it! |
|
|
|
01/02/2010 05:35:54 PM · #122 |
|
|
|
01/02/2010 06:11:51 PM · #123 |
Originally posted by kirbic:
Some further tips on using actions while maintaining creativity... after creating an action, click on the turn-down arrow next to the action, and once it is expanded, click on the turn-down arrow for a "Set current layer" step. Notice that the purpose of this step is to set the blend mode. Now, look directly to the left, in the right portion of the gray bar; notice a little box with dots at the bottom. Clicking on this box turns on the display of the dialog box for that step. Do this for each "Set current layer" step, and your action now pauses and lets you select the blend mode at each flip!
Now create a separate action for each of the flip/blend steps instead of one continuous action, and set the option to ask for blend mode at the end of the step. Further, create two more actions, one to back up four steps, and another to move forward four steps. You now have a set of actions that allow *complete* artistic control, while eliminating the vast majority of the clicks, and also limiting the clicks to one small area - no repeated cross screen mouse travel! Try it, you'll like it! |
I will read this again in the morning and see if I can get it to make sense... :-) |
|
|
|
01/02/2010 06:19:49 PM · #124 |
Originally posted by cpanaioti:
For anyone interested in printing on fabric, here's a site to check out.
//www.cjenkinscompany.com/
I've got the pre-treated fabric from this site just haven't printed anything yet. |
Thanks for posting this Colette. I think I'll try some of that fabric myself...I keep think these flip & blends would make a killer quilt. |
|
|
|
01/02/2010 06:25:11 PM · #125 |
|
Home -
Challenges -
Community -
League -
Photos -
Cameras -
Lenses -
Learn -
Help -
Terms of Use -
Privacy -
Top ^
DPChallenge, and website content and design, Copyright © 2001-2026 Challenging Technologies, LLC.
All digital photo copyrights belong to the photographers and may not be used without permission.
Current Server Time: 05/25/2026 03:35:04 AM EDT.


