| Author | Thread |
|
|
06/22/2008 01:41:23 PM · #326 |
Jun 17: Before 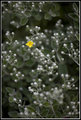 After After 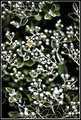
Jun 18: Before  After After 
Jun 19: Before  After After 
Jun 20: Before  After After 
Jun 21: Before  After After 
|
|
|
|
06/22/2008 02:54:00 PM · #327 |
before

after
 |
|
|
|
06/22/2008 05:10:11 PM · #328 |
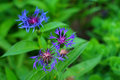
Here is a shot of a corn flower I took in my front yard today. I have been very concerned about my camera focus using my Pentax SMC-A 50mm F1:2. I had set my camera to manual focus because the lens is a manual focus.
As the camera will still determine correct focus, I thought I would let the camera determine when the shot was in focus. I turned on auto focus in the single mode, adjusted the focus close, but wrong, squeezed the shutter. I then very slowly and carefully turned the focus ring and waited for the shot to happen. It worked great. Here is one of the images and a full sized crop of the area in focus.
Before ................... After
  |
|
|
|
06/23/2008 11:38:43 AM · #329 |
Before:
[thumb]691181[/thumb]
After:
[thumb]691182[/thumb] |
|
|
|
06/23/2008 01:19:27 PM · #330 |
Jun 22: Before  After After 
Jun 23: Before  After After 
|
|
|
|
06/23/2008 07:30:35 PM · #331 |
Before:
[thumb]691255[/thumb]
After:
[thumb]691256[/thumb] |
|
|
|
06/23/2008 09:09:10 PM · #332 |
Originally posted by Mr_Pants:
Originally posted by love:
Originally posted by sfalice:
...
So, for the rest of the month, I'll look forward to commenting just on those images whose makers tell us how they got there... |
I guess we're all different. I don't read anyone's steps - only comment on what I see. I honestly don't have the time to put most of the steps in except for general stuff. I am in the middle of moving and my work keeps me way too busy, so I'm lucky enough just to get something up (and I have every day so far!!) |
I'm sure that no-one is interested in the steps I've taken, just as much as they're not interested in my pictures anyway. |
Gee,  Mr_Pants I'm interested in your images. And I asked you, nicely, several times how you did some stuff. Sure wish you would answer... You have good images and a great deal of knowledge on how to do them that would help us all. Mr_Pants I'm interested in your images. And I asked you, nicely, several times how you did some stuff. Sure wish you would answer... You have good images and a great deal of knowledge on how to do them that would help us all.
I'm enjoying your latest crop.
Alice |
|
|
|
06/24/2008 07:38:19 AM · #333 |
I'm really sorry guys. It rained all weekend, spoiling not only my idea for the single line challenge, but any opportunity to get some new photos for this side challenge. So for now, here's yet another sufing pic. I'll be in and out today commenting on some of the cool images that have been posted over the last few days!
before [thumb]691370[/thumb] after  |
|
|
|
06/24/2008 07:57:51 AM · #334 |
DAY 24 - Propaganda
 before before  after after
This was going to be my entry in the recent female portrait challenge - kind of a spoof of pedro's entry in the self-portrait challenge a while back .. and then the angel of creativity appeared - Samandiriel. The rest is history..
Message edited by author 2008-06-24 08:03:28. |
|
|
|
06/24/2008 09:35:15 AM · #335 |
Been away for a bit enjoying summer with the family so I am posting a before & after of my Cowboy entry along with editing steps.
 |
|
|
|
06/24/2008 11:03:41 PM · #336 |
Still rainy and gross today, so here's another oldie re edited.
before [thumb]691624[/thumb] after  |
|
|
|
06/25/2008 01:41:53 AM · #337 |
Before  After After 
Message edited by author 2008-06-25 01:42:44.
|
|
|
|
06/25/2008 03:50:13 AM · #338 |
Before  After After 
|
|
|
|
06/25/2008 07:55:59 PM · #339 |
Before:
[thumb]691786[/thumb]
After:
[thumb]691787[/thumb] |
|
|
|
06/26/2008 05:33:13 PM · #340 |
Before  After After 
Before  After After  |
|
|
|
06/27/2008 07:58:43 AM · #341 |
Still raining...still gross. Checked the 10 day forecast and apparently it will be rainy and gross from now until forever.
Here's some more old pics that I've tried editing again. All three were taken about a year and a half ago on my first digital P&S. I didn't post editing steps because all three were very basic edits. Levels, hue and sat, brightness and contrast.
before [thumb]692117[/thumb] after  before [thumb]692121[/thumb] after before [thumb]692121[/thumb] after  before [thumb]692123[/thumb] after before [thumb]692123[/thumb] after 
I forgot! I did close out a couple of pieces of junk in the water on the forst shot. :-)
Message edited by author 2008-06-27 08:00:15. |
|
|
|
06/27/2008 03:13:59 PM · #342 |
Okay, I'm back... leart sum stuffage:
Before:  Before: Before:  After: After: 
Message edited by author 2008-06-27 15:16:15. |
|
|
|
06/27/2008 09:47:14 PM · #343 |
My apologies for not being more active in this thread. Between computer woes, telephone line problems, and stuff that needed to be done far away from my cameras, June's been a crazy month. Still,
there's a little time left in this month to play.
This is my latest offering. Notes are on the images.
original final edit final edit  |
|
|
|
06/28/2008 02:47:34 AM · #344 |
Haha!! This was FUN!! :P
B: 
A:  |
|
|
|
06/28/2008 09:24:22 AM · #345 |
sorry i havent been very committed to this side challenge .. there's been a lot going on so its been hard to keep up with the commenting and posting etc .. :)
i processed this for greg who looks heaps better in real life than in photographs .. because it was processed i decided to put it in here so at least i'd be up to day 17 which means i've only got to do another 12 in the next two days .. lol .. !!.:)
before ..

after ..
|
|
|
|
06/28/2008 06:51:55 PM · #346 |
 patio127 asked me to elaborate on my background methods. At first, I thought "well, you just put down a few colors", and then I realized that I have had years of practice in laying down watercolor washes and that has influenced this technique no end. So, here goes. Questions cheerfully answered if I don't get everything straight, or comprehensible. patio127 asked me to elaborate on my background methods. At first, I thought "well, you just put down a few colors", and then I realized that I have had years of practice in laying down watercolor washes and that has influenced this technique no end. So, here goes. Questions cheerfully answered if I don't get everything straight, or comprehensible.
Before:  After: After: 
Isolate the flowers and place them on their own layer
Make a new layer and activate it. I like to put it UNDER the flower layer so I can ckeck every once in a while to see how it's working.
Original is on the bottom to keep handy for selection of colors
On your blank, transparent layer, with a large, soft brush, set to the blending mode "hard light"
draw some random strokes using colors that are in the flowers. Unless you want really vivid colors, I suggest fading them anywhere from 30-65 percent as you go. Add more colors, fading after each stroke until you have something you like. I almost never remove a color once it's down, as it will probably add another shadow dimension to the finished piece.
I generally like to place darker colors at the bottom of my imaginary backgrounds but it depends on the scene.
Here are some intermediary background steps:
 ... ... ... ...
|
|
|
|
06/28/2008 10:12:33 PM · #347 |
Am sorry have not kept up as much as i would of liked in this side challenge.. I have very much enjoyed everyone's photography, notes with step, notes w/o steps, kindness, & company during the month of June..
[thumb]692646[/thumb] |
|
|
|
06/29/2008 03:21:32 AM · #348 |
i dont know if i even like this now after processing it ..
i spose its not very flattering to poor little katee .. !!
before ..
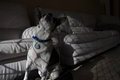
after ..

|
|
|
|
06/29/2008 04:20:12 AM · #349 |
this is katee immediately after 'the stretch' ..
before ..
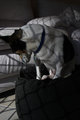
after ..
|
|
|
|
06/29/2008 09:00:33 AM · #350 |
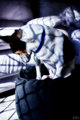
katee finally comfortable ..
before ..

after ..
|
|
Home -
Challenges -
Community -
League -
Photos -
Cameras -
Lenses -
Learn -
Help -
Terms of Use -
Privacy -
Top ^
DPChallenge, and website content and design, Copyright © 2001-2026 Challenging Technologies, LLC.
All digital photo copyrights belong to the photographers and may not be used without permission.
Current Server Time: 04/28/2026 12:29:42 AM EDT.


