| Author | Thread |
|
|
01/09/2013 01:28:34 PM · #26 |
ok, well most importrant was that i had no idea there was a cross there to see. Use PP to help draw your eye to what you want me to see.
What i would try to do that picture:
1. try B/W, the color is very distracting, at pull back the orange.
2. use noise removal on the walls only to rid your self of the graininess, use the brushes.
3. add a vignette and a bit tighter crop to help force my eye to what you want me to see.
4. pump the clarity and highlights to help bump the reflection. if you post the original RAW i can give it a shot tonight.
Lightroom is laid out the way you should use it, i.e. work you way "down" the editing menu, slider by slider.
|
|
|
|
01/09/2013 01:29:23 PM · #27 |
Originally posted by GeneralE:
Have you tried looking through the Tutorials and How-To articles here (under the Learn menu)? Most of the basic PP techniques you need for DPC are covered there.
As mentioned, the most important contributors to the score will be choice of subject (and relevance to the topic) and composition.
In order to find anything to help you, you will need to figure out what you want to "fix" in PP in order to determine which (maybe of several) technique(s) will address the issue.
If you want to improve contrast and "pop" in most of your pictures, then two things you can try are applying an "S"-shaped Curve (improved contrast and detail in middle tones) and applying "high-radius unsharp mask" — for a DPC Entry-sized image try applying the UnSharp Mask filter with settings something like (Photoshop terms):
Amount: 15%
Radius: 50 pixels
Threashold: 0
I still have (and sometimes shoot with) my old Olympus D490 — do you still have yours? |
Thanks! The D490 is in the hands of my youngest daughter (9) and she's getting quite good with it. I'll likely give here my old Sony F717 soon and see what she does with more manual control.
I'll take a look through the tutorials tonight after work... |
|
|
|
01/09/2013 01:33:15 PM · #28 |
Originally posted by mike_311:
ok, well most importrant was that i had no idea there was a cross there to see. Use PP to help draw your eye to what you want me to see.
What i would try to do that picture:
1. try B/W, the color is very distracting, at pull back the orange.
2. use noise removal on the walls only to rid your self of the graininess, use the brushes.
3. add a vignette and a bit tighter crop to help force my eye to what you want me to see.
4. pump the clarity and highlights to help bump the reflection. if you post the original RAW i can give it a shot tonight.
Lightroom is laid out the way you should use it, i.e. work you way "down" the editing menu, slider by slider. |
Thanks for the offer... Unfortunately I'm on the road for 2 weeks (NYC and Houston) and I think the original of that might be in Seattle. If it's on my laptop I'll post it up tonight when I get back to the hotel, otherwise it'll be a while. I'd be very interested in seeing what can be done (and how ;-) ) |
|
|
|
01/09/2013 01:34:49 PM · #29 |
I've never seen that book, so I have no idea. Looking through your portfolio, though, I agree with what others have said. Your perspective/framing/composition is really okay, but you get let down by lighting over and over. Post processing can *really* help an image that's already mostly pretty well lit, but it won't really help an image that starts with poor lighting. You might try a book like "Understanding Exposure" first, then move into learning post processing later. I might also suggest "Light, Science and Magic," but I don't know if you want to be dealing with a lot of heavy lights, and that book is primarily about studio lighting.
From my experience, the quickest and easiest way to get above a 6 is:
- Take pictures of interesting things. A picture of something ordinary is going to give you an ordinary score. But, for example,  , while technically pretty 5.5, got 6+ because of the subject matter. Not that I'm suggesting hauling your living room furniture out to the beach at dawn anytime soon. We were cleaning piles of sand from under that chair for the next six months. , while technically pretty 5.5, got 6+ because of the subject matter. Not that I'm suggesting hauling your living room furniture out to the beach at dawn anytime soon. We were cleaning piles of sand from under that chair for the next six months.
- Take a well lit, technically solid shot. Good technicals can get you over 6, even for an ordinary subject. Another example: 
One specific thing I saw in your portfolio several times was night shots that were taken at....night. Most of the best "nighttime" photography is actually taken at twilight, when there's still enough light in the sky that the sky has color, and the man-made lights and the light from the sky are more balanced. (Not talking about things like star trails, just ordinary cityscapes and such) |
|
|
|
01/09/2013 01:39:13 PM · #30 |
|
Another thing that has helped me in post processing and the learnings of them (layers, USM, terminology and so on) was on Youtube. Here I have also learned how to clean my camera, how to waterproof it, how to change the back ground colors and all kinds of stuff. watching the videos feels like I have a 1 on 1 class lesson. |
|
|
|
01/09/2013 01:41:27 PM · #31 |
i concur with Ann, if you are trying to take a bunch or test shots to see which setting work best, you arent understanding exposure and how your image should be shot.
IMO, you should be dialing in either the aperture you want or the shutter speed you require and let the camera choose the other value to expose the image properly at the lowest ISO possible, if the second value the camera selects isn't acceptable then you bump the ISO until it is.
That is the approach I take for natural lighting, flash is an entirely different animal with a different approach that am still trying to grasp.
Message edited by author 2013-01-09 13:42:00. |
|
|
|
01/09/2013 02:13:42 PM · #32 |
Originally posted by Ann:
Post processing can *really* help an image that's already mostly pretty well lit, but it won't really help an image that starts with poor lighting. |
Well, I doubt you can make a bad image score well here, but it is sometime possible to "rescue" a useable image when circumstances don't allow ideal exposures. I took this image from a moving train on an mostly overcast day, so there was a single instant available to shoot and not enough light (my camera is horrible at high ISO settings) for a shutter speed fast enough to maintain even a little detail.
River Bend how-to ... pretty much all done with Curves through Layer Masks ...
Before: 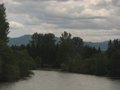 After: After: 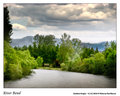
Originally posted by Ann:
One specific thing I saw in your portfolio several times was night shots that were taken at....night. Most of the best "nighttime" photography is actually taken at twilight, when there's still enough light in the sky that the sky has color, and the man-made lights and the light from the sky are more balanced. |
I figured that one out about a year ago ... :-)
 |
|
|
|
01/09/2013 03:00:13 PM · #33 |
Originally posted by myqyl:
Has anyone seen this and have an opinion? Money well spent? Or money, well.... spent...
Or an alternative you think is better? |
A couple of points.
Editing primer books come in two types; They take a picture and edit it and you follow their workflow and see how they got what they got. Or they take a tool (contrast, saturation, selective color) and use it to change various images. The first has a more natural flow, but I find by jumping around, people tend to only learn one way to do things. I prefer the method that steps through the menus rather than step through various images, and hope they cover all the important stuff.
Anything that gets you more comfortable in editing is time well spent, so where ever you start is fine. I would go to the photo section of your local book store and look at the books there. You can compare approaches side by side and see what works best for your way of seeing things. Look in the magazine section too and look for Photoshop User Magazine which has some nice tutorials for all skill levels, but throws a lot of people because much of the articles are looking at layout and graphics problems which are only tangential to photo editing.
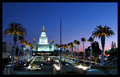
Think of how a good cook shops. They know what they want when they go to the store. What they can find that is fresh that week, or is on special, and they know what those different ingredients would do to the recipe in their head, and they make changes to what they are going to make for dinner, and they shop based on knowing what they are going to do with the ingredients. It is a feedback loop between what they want, what they can find, and their knowledge of how they plan to cook. Same logic applies to editing. Once you know how you can edit, it really helps your shooting because you can shoot with a certain edit in mind. You know you have a certain tool (like wide area unsharp mask) and you shoot as if that tool is already applied. WAUSM gets rid of haze, the sort that plagues your Avenue of the America's shot. It also gets rid of smudgy aquarium glass.
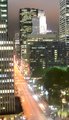 Hit this with WAUSM and shift the hues toward the blues, bring down the oranges in selective color, and get some true black in there through curves, and it is a much happier image. Hit this with WAUSM and shift the hues toward the blues, bring down the oranges in selective color, and get some true black in there through curves, and it is a much happier image.
Message edited by author 2013-01-09 15:30:31. |
|
|
|
01/09/2013 03:19:22 PM · #34 |
Originally posted by BrennanOB:
Once you know how you can edit, it really helps your shooting because you can shoot with a certain edit in mind. You know you have a certain tool (like wide area unsharp mask) and you shoot as if that tool is already applied. WAUSM gets rid of haze, the sort that plagues your Avenue of the America's shot. |
This is the same thing I referred-to earlier as "high-radius unsharp mask" — I highly recommend using it, especially on landscapes. Check out the article ...
Be careful if you have subtle gradations in the far highlights or shadows -- it can blow out/block up some areas, but it's often "worth it" to enhance the midtones. You can also make a mask/selection/alpha channel and "protect" any sensitive areas from the filter's effect.
FWIW I keep the Amount setting under 20%, and sometimes as low as 8%, if I'm applying the high-radius method. For ordinary sharpening my Amount setting is much higher, but the radius between 1/2-2 pixels. (These settings are for DPC-sized images — high-res print images may need different values.)
I also find that using the UnSharp Mask filter (for either type of effect) with lower settings and applying it twice is sometimes more effective at sharpening details without creating halos than applying it once at higher settings. |
|
|
|
01/09/2013 04:05:47 PM · #35 |
Originally posted by GeneralE:
Originally posted by Ann:
One specific thing I saw in your portfolio several times was night shots that were taken at....night. Most of the best "nighttime" photography is actually taken at twilight, when there's still enough light in the sky that the sky has color, and the man-made lights and the light from the sky are more balanced. |
I figured that one out about a year ago ... :-)
|
My point, exactly. Nice shot, Paul. |
|
|
|
01/10/2013 01:49:44 PM · #36 |
I guess this should really move to the "Help Me!" forum, but I have no clue how to do that so I'll just keep going here...
I took this today when i saw an absolutely fantastic orange sky. The image gave me a pale, dingy white sheet where that fantastic sky was...
I know that I'm letting in too much light here... What I don't know is if the best solution is to close up the aperature (current f/3.5) or speed up the shutter (current 1/160)... And how much less light I need...
Opinions?
|
|
|
|
01/10/2013 01:55:05 PM · #37 |
Originally posted by myqyl:
I guess this should really move to the "Help Me!" forum, but I have no clue how to do that so I'll just keep going here...
I took this today when i saw an absolutely fantastic orange sky. The image gave me a pale, dingy white sheet where that fantastic sky was...
I know that I'm letting in too much light here... What I don't know is if the best solution is to close up the aperature (current f/3.5) or speed up the shutter (current 1/160)... And how much less light I need...
Opinions? |
What are you trying to achieve? Knowing your goal is extremely important in giving you feedback.
Message edited by author 2013-01-10 13:55:40. |
|
|
|
01/10/2013 02:09:03 PM · #38 |
Originally posted by myqyl:
I know that I'm letting in too much light here... What I don't know is if the best solution is to close up the aperature (current f/3.5) or speed up the shutter (current 1/160)... And how much less light I need...
Opinions? |
I'd do a little of both, depending on the focal length you're using. Closing up the aperture 2-3 stops will give you a better DOF (you're including both near and far objects) and a faster speed will minimize camera-shake.
You need to let in enough less light such that the main subject - the sky you say -- is properly exposed. The rest you'll have to deal with in PP. You may or may not be able to pull details out of the underexposed shadows. This is the type of situation that HDR processing is built for.
Check your manual to see how to shoot in "bracket" mode while changing the shutter-speed 1-2 stops/exposure. Most cameras can capture 3 or more images in this fashion. It's better if you can use a tripod, but with faster exposures you can probably get away with doing it handheld.
You can then use (free) software to combine the best parts of each image to capture more detail through a wider range of tonal values than is possible with any single exposure.
You can also modify your expectations -- with a beautiful sky, consider making the foreground into B&W silhouettes (think old woodcuts). Right now you can try fabricating a sky into the image you have, and play around with it. Use Curves (or Levels) Adjustment layers and play around with them (a lot!); combine them and see what you get.
I'll move the thread, and adjust the title a bit |
|
|
|
01/10/2013 02:12:45 PM · #39 |
Originally posted by Venser:
Originally posted by myqyl:
I guess this should really move to the "Help Me!" forum, but I have no clue how to do that so I'll just keep going here...
I took this today when i saw an absolutely fantastic orange sky. The image gave me a pale, dingy white sheet where that fantastic sky was...
I know that I'm letting in too much light here... What I don't know is if the best solution is to close up the aperature (current f/3.5) or speed up the shutter (current 1/160)... And how much less light I need...
Opinions? |
What are you trying to achieve? Knowing your goal is extremely important in giving you feedback. |
Opps, good point... I wanted the Orange sky with a dark city street at least still slightly visible... Kind of a "It's sunrise up here, but not in this artifical valley" kinda thing. |
|
|
|
01/10/2013 02:20:11 PM · #40 |
Originally posted by myqyl:
I took this today when i saw an absolutely fantastic orange sky. The image gave me a pale, dingy white sheet where that fantastic sky was...
|
Since you shot that with a Coolpix, JPG was your only option. Best single shot option with what you had may have been to expose for the sky and hope you could pull out some foreground detail from the shadows. If you had a tripod, you could do several exposures at different levels and then merge them later.
Better option would be if you had your DSLR and had shot in RAW. I did that with this photo, shot under very similar conditions. I was shooting RAW+JPG, as we had a minimal editing challenge going on at the time. The JPG version had a nearly blown sky and too-dark forground. I did two conversions of the RAW to a JPG. One with the exposure adjusted for the foreground and one for the sky. Then layered them and masked.

Then slathered on a fair amount of additional post processing, including some tonemapping to the foreground.
Message edited by author 2013-01-10 14:22:02.
|
|
|
|
01/10/2013 02:57:02 PM · #41 |
Given your response,  Yo_Spiff summed it up nicely. Yo_Spiff summed it up nicely.
Message edited by author 2013-01-10 14:57:15. |
|
|
|
01/10/2013 03:25:44 PM · #42 |
Originally posted by Yo_Spiff:
Originally posted by myqyl:
I took this today when i saw an absolutely fantastic orange sky. The image gave me a pale, dingy white sheet where that fantastic sky was...
|
Since you shot that with a Coolpix, JPG was your only option. Best single shot option with what you had may have been to expose for the sky and hope you could pull out some foreground detail from the shadows. If you had a tripod, you could do several exposures at different levels and then merge them later.
Better option would be if you had your DSLR and had shot in RAW. I did that with this photo, shot under very similar conditions. I was shooting RAW+JPG, as we had a minimal editing challenge going on at the time. The JPG version had a nearly blown sky and too-dark forground. I did two conversions of the RAW to a JPG. One with the exposure adjusted for the foreground and one for the sky. Then layered them and masked.
Then slathered on a fair amount of additional post processing, including some tonemapping to the foreground. |
Actually the 7100 Coolpix can (and I always do) shoot RAW and JPG... When you say "Then layered them and masked", that's where I lost it... I understood the rest (fairly well)... I haven't seen the RAW for this image yet since my work laptop has nothing fun on it, but will be able to see if there's anything in the RAW to salvage when I get back to the hotel.
Is it safe to assume if i search youtube for photo layer and mask, that I'll find something demistifying that part?
Thanks everyone! As always DPC rocks... I was talking to my students on a break about this thread and I think we might see 3 folks at least come and have a look :) They all wrote down the URL... |
|
|
|
01/10/2013 03:52:42 PM · #43 |
Originally posted by myqyl:
Is it safe to assume if i search youtube for photo layer and mask, that I'll find something demistifying that part? |
I didn't realize that model shot RAW. I guess that one is Nikon's equivalent to the Powershot G's and S's. I'll bet you can do much better once you can manipulate the RAW.
Layers and masking was a tough concept for me to wrap my head around, but once I grasped it, it became one of my most useful tools. Since I use Corel PaintShop Pro, it does layers a little differently and tutorials for Photoshop didn't totally apply. Concepts are the same but the implementation is not. If you use Photoshop, you'll find plenty online to learn from.
|
|
|
|
01/10/2013 06:20:54 PM · #44 |
As I undersatnd it Layering and Masking and merging/blending the results is the same as HDR (High Dynamic Range) processing, the former done maunally and the latter using a program (free or commercial) which automates the process.
See this how-to article (last two sections) for an example of how this works.
//www.dpchallenge.com/how.php?HOW_ID=57 |
|
|
|
01/10/2013 08:21:30 PM · #45 |
|
Four Tips for Better Sunrise Photos in today's NY Times. They seem to publish one of these "photo hints"articles by a noted photographer every 4-6 weeks ... |
|
|
|
01/10/2013 08:53:53 PM · #46 |
hope you dont mind, i took a quick edit at it. there is actually quite a bit of detail in the shadows.

|
|
|
|
01/10/2013 09:15:44 PM · #47 |
Originally posted by mike_311:
hope you dont mind, i took a quick edit at it. there is actually quite a bit of detail in the shadows.
|
I think the issue is whether there would have been any shadow detail had the original been properly-exposed to retain color/detail in the sky (the nominal subject). |
|
|
|
01/10/2013 09:33:20 PM · #48 |
who needs proper sky exposure when you can make it yourself in photoshop?
:P
Message edited by author 2013-01-10 21:33:28. |
|
|
|
01/10/2013 11:42:42 PM · #49 |
Originally posted by mike_311:
hope you dont mind, i took a quick edit at it. there is actually quite a bit of detail in the shadows.
|
Thanks! not sure how you pulled any of the orange from the sky... I have the RAW and it seemed to be completely burned out. I like what you've done with it, but the street detail wasn't what I was looking for. I was actually thinking of darking the shadows in the street. No offense to any New Yorkers, but this city never makes me feel very bright and sunny... For NYC I've always seen the shadows more than the detail (if that makes any sense).
Thanks for the edit!
|
|
|
|
01/10/2013 11:53:49 PM · #50 |
Originally posted by GeneralE:
Four Tips for Better Sunrise Photos in today's NY Times. They seem to publish one of these "photo hints"articles by a noted photographer every 4-6 weeks ... |
That was a great article... Good common sense advice given straight without flowers and fluff... Thanks!!!
|
|


