| Author | Thread |
|
|
01/25/2011 09:07:27 AM · #1 |
SO after a reading a few threads recently, I realized that I am terrible at writing descriptions of how or where I set up my shots and the post processing steps I used to get the final image. I also think that I am not good enough or that anyone would be interested in how I do things, so don't bother.
So I thought, a thread might be a good place to start.
So, here is how it will work (hopefully)
Everyone take at least one shot out of their port that is their favorite/highest score/most fav's etc etc etc/ or if someone points one out and then we post it and tell our descriptions.
(((( In theory I think this is a good idea, we shall see!)))
So any thoughts? any takers? this a good/bad idea?? |
|
|
|
01/25/2011 09:17:08 AM · #2 |
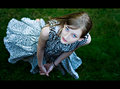
Sofia stood in the back yard, I stood on the deck and shot downwardly. ;)
*the grass is not a gradient
Message edited by author 2011-01-25 09:17:50. |
|
|
|
01/25/2011 09:17:13 AM · #3 |
Sounds like a good idea. If there is any curiosity about any of mine, I'll be happy to try and recall what I did to achieve it.
I've only recently started keeping notes on my PP steps for challenge entries. Previously, I just had to recall about what I did if it got a validation request.
Message edited by author 2011-01-25 09:18:47.
|
|
|
|
01/25/2011 09:26:54 AM · #4 |
ROFL, Smardaz,, I think you need an R in your az!! lol
Yo, I think it is a good idea too, not sure how practical it is or how it will shake out in real life, but I think it will work if we can (as you say) remember the steps! |
|
|
|
01/25/2011 09:29:37 AM · #5 |
Sometimes even general instructions are big help. I've seen some images that leave me absolutely clueless as to how they were done.
(Come to think of it, a lot of life does that to me... ;-) |
|
|
|
01/25/2011 09:31:16 AM · #6 |
Cool idea.
Most of my shots are taken in a similar manner to smardaz's description though :) I'll have my eye on this thread.
|
|
|
|
01/25/2011 09:38:01 AM · #7 |
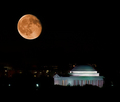
Actually, wouldn't mind knowing about this one, The clarity is amazingly sharp, 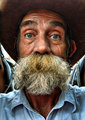 |
|
|
|
01/25/2011 09:40:47 AM · #8 |
If anyone wants the low-down on any of my shots, now's the time to ask. I'm housebound with a bum knee and frigid weather today :-)
R. |
|
|
|
01/25/2011 09:44:08 AM · #9 |
Originally posted by Bear_Music:
If anyone wants the low-down on any of my shots, now's the time to ask. I'm housebound with a bum knee and frigid weather today :-)
R. |
You mentioned about tonemapping this one
Can you describe the steps that were taken to do that? And what software was employed? :)
|
|
|
|
01/25/2011 10:07:38 AM · #10 |
Originally posted by JulietNN:
Actually, wouldn't mind knowing about this one, The clarity is amazingly sharp, |
Interesting choice. That one started with my favorite lens, the Tamron 10-24. Though a longer lens is usually considered traditional for portraits, I've found that I really like using the wideangle for that purpose (while my 50mm rarely gets touched).
This one was shot at the 24mm long end. The sun was to my back, but where we were standing was in the shadows of the surrounding buildings, so I got some good but nicely diffuse evening light on Doug's face. Having such great light to start with was a major element of this shot.
With the post processing, I was trying to achieve a similar look to some of the portraits from  BNilesh that I have admired, but with my own local flavor to it. Even if it hadn't ribboned, I achieved my goal. BNilesh that I have admired, but with my own local flavor to it. Even if it hadn't ribboned, I achieved my goal.
RAW conversion in Canon DPP. Main editing done in Corel PaintShop Pro X2.
The the look was achieved with a modest usage of Topaz adjust and PSP's own clarify adjustment. I find that using both together in smaller amounts is far more effective and natural looking than a larger amount of just one. I believe I used a modified "photo pop" preset in Topaz adjust. I did some selective editing with layers and masks to bring out some of the detail under his hat brim. Brightened the eyes with layers and masking, using curves to lighten the lower layer. Some high radius unsharp mask for contrast. Some late feedback (I think it was  VaWendy) suggested his skin tones were slightly too pink, so I desaturated the reds just a touch a few hours before voting started. I'm sure there were a few other minor selective tweaks, but that's the major part of it above. VaWendy) suggested his skin tones were slightly too pink, so I desaturated the reds just a touch a few hours before voting started. I'm sure there were a few other minor selective tweaks, but that's the major part of it above.
BTW, Doug looks and sounds like someone born and raised here in Texas, but he tells me he was born in Ireland and his family came here when he was a child.
|
|
|
|
01/25/2011 10:18:00 AM · #11 |
|
Mine are all pretty much straight forward. But if anyone wants info on a particular photo, let me know. :) |
|
|
|
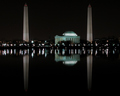
01/25/2011 10:25:49 AM · #12 |
How did you get such whites in this, was it a new background???
 |
|
|
|
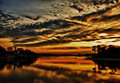
01/25/2011 11:10:56 AM · #13 |
Originally posted by NiallOTuama:
Originally posted by Bear_Music:
If anyone wants the low-down on any of my shots, now's the time to ask. I'm housebound with a bum knee and frigid weather today :-)
R. |
You mentioned about tonemapping this one
Can you describe the steps that were taken to do that? And what software was employed? :) |
This was mostly done with Nik's HDR Efex Pro. White balance and saturation were set in ACR (Adobe Camera Raw) during the RAW conversion stage. The image was exported to CS3 as a 16-bit image, cloned for dust, then converted to a 32-bit image and opened in HDR Efex Pro from within CS3.
The "HDR Method" was "natural" and the strength about 25%. Whites were around -25% and blacks were around +25%. Warmth and saturation both were amped up a little bit, and curves were added by preset "photographic 1" with a little detuning from that level. Exposure was adjusted to make the image look right.
If the challenge had been advanced editing I would have used the control points for local adjustments but that was not an option in basic editing.
Back in CS3, a hue/saturation layer was created to mute the blue shine on the bright shadowed house and buoy. While I had that up, I tweaked the balance of red and yellow.
32-bit image was then converted to 8-bit and resized to 1600 pixels. I then hit filters>sharpen twice, fading the second pass with edit>fade sharpen to 25%. Finally, image was resized to 800 pixels and saved for web.
R. |
|
|
|
01/25/2011 11:11:18 AM · #14 |
|
Juliet, I might add that if there is an image someone wants to discuss, they should notify the photographer that it's in this thread. Otherwise, they might not know and contribute. |
|
|
|
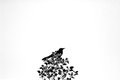
01/25/2011 11:58:29 AM · #15 |
Originally posted by JulietNN:
How did you get such whites in this, was it a new background???
|
I'm at the doctors office waiting, so I can't check exactly what I did, but this is what i'm remembering...
When changing the photo to black and white, you get the sliders that show the color channels. Since it was a blue sky, it showed up grey in the picture. I believe I adjusted the blue and cyan sliders until the sky was white. I may have had to go into the color channels and change the brightness of those colors as well. I'll double check when I get home. |
|
|
|
01/25/2011 12:57:29 PM · #16 |
|
|
|
01/25/2011 01:47:22 PM · #17 |
Simple solutions to a easy thing.
Brilliant, thanks! |
|
|
|
01/25/2011 02:33:03 PM · #18 |
|
I am not in the threads much and I have been a slacker with my details on most of my shots lately, but if anyone is interested in details, how to or viewing the original on any of my entries I am happy to oblige. I came to DPC not having a clue about my camera or photography and have learned an amazing amount from the people here. I have nothing to hide and I am glad to give back when I can. |
|
|
|
01/25/2011 05:01:20 PM · #19 |
Originally posted by timfythetoo:
I am not in the threads much and I have been a slacker with my details on most of my shots lately, but if anyone is interested in details, how to or viewing the original on any of my entries I am happy to oblige. I came to DPC not having a clue about my camera or photography and have learned an amazing amount from the people here. I have nothing to hide and I am glad to give back when I can. |
perfect.
I read your tutorial on this shot:

and tried it with images that were single shots. Is it necessary to do a large stitched shot for this to work properly. on the images of mine that i tried i lost lots of detail and trees and taller things seemed to get all stretched beyond recognition.
|
|
|
|
01/25/2011 05:37:15 PM · #20 |
Originally posted by timfythetoo:
I am not in the threads much and I have been a slacker with my details on most of my shots lately, but if anyone is interested in details, how to or viewing the original on any of my entries I am happy to oblige. I came to DPC not having a clue about my camera or photography and have learned an amazing amount from the people here. I have nothing to hide and I am glad to give back when I can. |
I've always been curious about your high key shots. How much of the high key is done in camera, and how much in processing? For instance: Could we see the original of this? And how did you do the processing?
thanks!!!

|
|
|
|
01/25/2011 05:40:27 PM · #21 |
Originally posted by briantammy:
I read your tutorial on this shot:
and tried it with images that were single shots. Is it necessary to do a large stitched shot for this to work properly. on the images of mine that i tried i lost lots of detail and trees and taller things seemed to get all stretched beyond recognition. |
You know that was one of my first attempts at that type of image and I really only tried a couple of more afterward so my experience is limited. I would imagine that the more images you used the better the detail would be. Certainly getting images all the way around a full 360' would be the key - be it with 5 images or 500 - to get a proper looking globe. tate's similar image in the same challenge only used 9 images I think to get his mini world. My guess is that the wider the initial panorama the less radical the distortion and loss of detail in the final image. |
|
|
|
01/25/2011 05:50:11 PM · #22 |
Originally posted by vawendy:
I've always been curious about your high key shots. How much of the high key is done in camera, and how much in processing? For instance: Could we see the original of this? And how did you do the processing?
thanks!!!
|

That is a RAW conversion with no tweaks. To be honest this is actually a bit more high key from camera than I normally do. Here is a link to a thread I did on my recent ribbon winner. Between tweaks in RAW conversion and some minor curves in PS I get my whites right and then I tend to do most of the rest of the work with dodge and burn. I personally prefer my high key images with minimal but strong blacks and smooth shadows. I have no issues with skin getting blown out and unseeable as in the pic of Aidan. I think it just adds to the impact. I have been using a wacom tablet for years now and I love the control that the pen gives me when editing. It was always a frustration with a mouse - but the pen lets me edit as though I was drawing or painting. And with images like these it is wonderful. |
|
|
|
01/25/2011 06:10:14 PM · #23 |
Originally posted by timfythetoo:
Originally posted by vawendy:
I've always been curious about your high key shots. How much of the high key is done in camera, and how much in processing? For instance: Could we see the original of this? And how did you do the processing?
thanks!!!
|
That is a RAW conversion with no tweaks. To be honest this is actually a bit more high key from camera than I normally do. Here is a link to a thread I did on my recent ribbon winner. Between tweaks in RAW conversion and some minor curves in PS I get my whites right and then I tend to do most of the rest of the work with dodge and burn. I personally prefer my high key images with minimal but strong blacks and smooth shadows. I have no issues with skin getting blown out and unseeable as in the pic of Aidan. I think it just adds to the impact. I have been using a wacom tablet for years now and I love the control that the pen gives me when editing. It was always a frustration with a mouse - but the pen lets me edit as though I was drawing or painting. And with images like these it is wonderful. |
awesome! I had missed that thread. thanks. :D
|
|
|
|
01/25/2011 08:03:58 PM · #24 |
Originally posted by timfythetoo:
Originally posted by briantammy:
I read your tutorial on this shot:
and tried it with images that were single shots. Is it necessary to do a large stitched shot for this to work properly. on the images of mine that i tried i lost lots of detail and trees and taller things seemed to get all stretched beyond recognition. |
You know that was one of my first attempts at that type of image and I really only tried a couple of more afterward so my experience is limited. I would imagine that the more images you used the better the detail would be. Certainly getting images all the way around a full 360' would be the key - be it with 5 images or 500 - to get a proper looking globe. tate's similar image in the same challenge only used 9 images I think to get his mini world. My guess is that the wider the initial panorama the less radical the distortion and loss of detail in the final image. |
thanks. i just got back from shooting a short sequence for the image I want to make. unfortunately there are lots of obstacles in my foreground that will mess with the center portion of the image. i'll download them and have a look. |
|
|
|
01/25/2011 10:32:28 PM · #25 |
Hey, didja know about the "How'd They Do That" page under the Learn menu?
Here are a few I did for that:

Tutorial
Tutorial
Tutorial
There's also some detail and unedited versions on these:
Maybe that's too much ...
|
|
Home -
Challenges -
Community -
League -
Photos -
Cameras -
Lenses -
Learn -
Help -
Terms of Use -
Privacy -
Top ^
DPChallenge, and website content and design, Copyright © 2001-2026 Challenging Technologies, LLC.
All digital photo copyrights belong to the photographers and may not be used without permission.
Current Server Time: 07/29/2026 04:25:08 PM EDT.


