| This Tutorial |
Tutorial Viewed: 71506 times
Discussion: Click Here |
Tutorials Home
|
An Astrophotography Primer by strangeghost
Astrophotography is a highly specialized branch of photography that involves
capturing interesting and beautiful images of the night sky. As the title
above indicates, this is not really a tutorial. It is more of a primer,
and introduction to the methods of astrophotography for DPC members. Astrophotos
occasionally appear in challenges or in the forums, and people frequently
say, "How did you do that," "Can I do that with my telescope?"
or similar queries. This is my attempt to answer those questions, and provide
a starting point for aspiring DPC astrophotographers.
Contrary to what you might think, it is possible to create beautiful
images of the night sky without any specialized equipment. In this tutorial,
I will introduce you to four primary types of astrophotography:
1. Simple fixed tripod shots
2. Piggyback tracked shots
3. Through the scope via prime focus
4. Through the scope via eyepiece projection
These four methods are given in ascending order of difficulty and expense.
Only numbers 3 and 4 require a telescope, though number 2 requires
some type of moving mount to "track" the stars by canceling the
earth's rotation. A telescope is the most common method used to accomplish
this, but there are other ways, as we'll see below.
Before we get started, a word about cameras. While it is certainly possible
to capture astrophotos with conventional point-and-shoot digital cameras,
dSLRs are highly recommended for the following reasons: A) the range of control
they allow over settings, B) their generally superior performance in low light
situations, and C) the availability of high quality lenses to maximize optical
performance.
Now, the four methods
1.
Simple fixed tripod |
 |
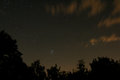
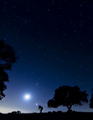
"24 second tripod shot"
This method is the most popular means of creating beginner astrophotos.
Almost everybody already owns a tripod, but even if you don't, any method
of immobilizing your camera in a secure way while pointing is just fine. I've
taken astrophotos by setting my camera on a picnic table with a coat bunched
up under it to aim at the sky. The shot at right, a 24 second exposure, was
taken with a tripod, using an ISO of 800, I was able to capture a very satisfying
shot of the night sky with the Pleiades and some silhouetted trees. This shot
is straight from the camera with no processing at all other than resizing
for web. By boosting the ISO even higher (and perhaps using a little noise
reduction in post), it's even possible to capture the Milky Way with brief
shots like this. Depending on your focal length, you can expose up to 30 seconds
without the stars starting to trail. The shorter focal length, the wider your
field of view, and thus the longer your exposures can be, but 30 seconds is
a good general rule for how long you can expose a shot without stars trailing.
Fixed tripod method: Cost of additional accessories?
None.
But wait! Don't discount star trails. This is actually one of the
most popular type of astrophotos, and the first method tried by many beginners.
Aim your camera at the starry sky and open the shutter for as long as you
can. Depending on your focal length, stars will start to "trail"
in as little as 30 seconds, as the earth rotates. The longer the exposure,
the longer the trails. By using a smaller aperture (around f/8 or so) and
lower ISO, you can shoot for as long as your batteries will hold out. Note
that any ambient light (streetlights, cars, etc.) will really start to spoil
your image the longer the shutter is open, so darker locations are better.
Also, most cameras will require some type of remote shutter release
or remote control to achieve shutter speeds longer than about 30 seconds.
A star-trail shot with some interesting compositional elements (nice landscape,
interesting foreground objects, etc.) can become a favorite shot very quickly.
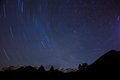
"CW Spin 2057 seconds" |
Richard
Hahn's shot is a great example of a star trail. His
34 minute exposure captured the concentric rotation around Polaris and
includes an interesting foreground composition with the mountains. The
longer your exposure, the longer and more satisfying the circular trails
will be. However, with digital cameras, the longer exposures create more
problems with ambient light, sensor noise, and battery limitations. This
is the single shot-style where film cameras (especially old fully mechanical
SLR bodies) still excel - you can literally leave the shutter open for
hours without worrying about anything but dawn.
|
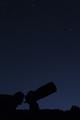
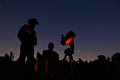
"Stargazer" |
Once you begin to experience some success with the star
trail style, you can try for more static shots, with landscape elements
or interesting foreground compositions. In the tripod-based style, you
must accomplish your shot in about 30 seconds or less to avoid visible
trailing of stars.
Scalvert's
"stargazer" is a great example of creative use of composition
to achieve a very pleasing and interesting astronomy shot. Though he doesn't
give the technical details, it's pretty clear that this was a short (<30
second) exposure after carefully framing up his shot get his telescope
and observer silhouette in place. |
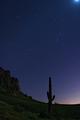
"Sonoran Starlight" |
Kirbic's"Sonoran
Starlight" takes the genre to a whole new level. Note again in his
photographer's comments his use of the 30 second exposure (the "sweet
spot" for such non-tracked images) to obtain this gem. Fritz shot
this on a night with a bright moon, which is how the landscape was so
pleasingly illuminated. You can also see the bright glow of the moon just
off the upper right corner of the photo. |
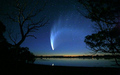
"Exit the solar system. Comet McNaught. To return in 300,000 years"
|
I include John
White's photo of Comet McNaught here because it is simply one of the
finest examples of opportunity, skill, and execution you'll ever find.
Note again his use of the sweet-spot 30 second exposure. |
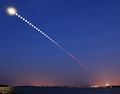
"The Mortal Moon" |
And finally, my own "Mortal Moon" shows what
can be done with the fixed tripod method and a whole bunch of exposures
assembled in Photoshop to create a true "time lapse" image,
in this case, of a lunar eclipse in progress. Though it looks quite sophisticated,
it's really just a camera on a tripod with an image shot every four minutes.
Quite a lot of planning and post-processing went into the creation of
this shot. Read the photographer's comment for the whole story. |
2.
Piggyback tracked shots |
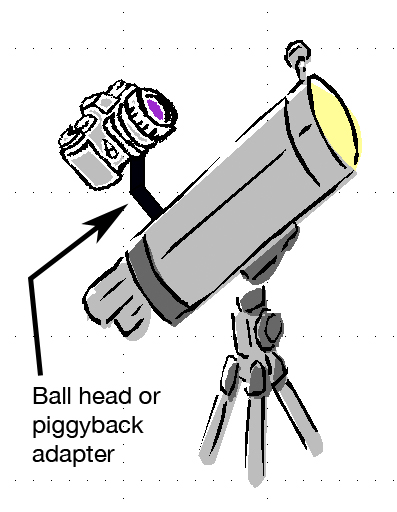 |

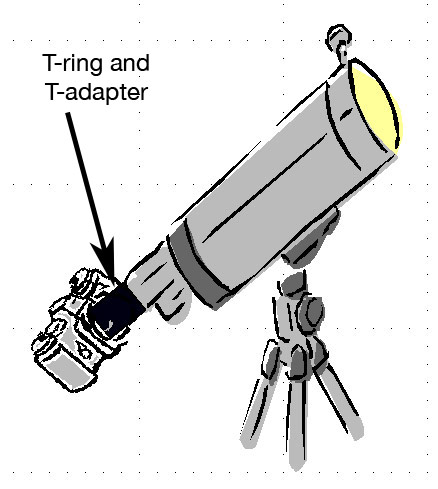
"Piggyback illustrated"
"Piggyback Camera"
The term "piggyback" refers to the fact that your camera
is now mounted on top of something - usually a tracking telescope - to achieve
the task of tracking the moving sky (or canceling the Earth's rotation). This
allows you to achieve sharp, longer exposure shots of the sky without the
stars being allowed to trail at all. Most people solve the tracking problem
by piggybacking their cameras on telescopes equipped with sidereal
drives. However, it is possible to build a device to do this without a telescope
(see this Wikipedia article on Barn
Door Mounts). Barn Door Mounts can be built for as little as $20-$30 in
materials and a little work-shop ingenuity. In the heyday of astronomical
do-it-yourselfness, nearly every aspiring astrophotographer had one of these.
They are much less common now, but do a Google search on those terms, and
you'll find loads of examples, with budgets and instructions (lazy? here,
I'll do it for
you).
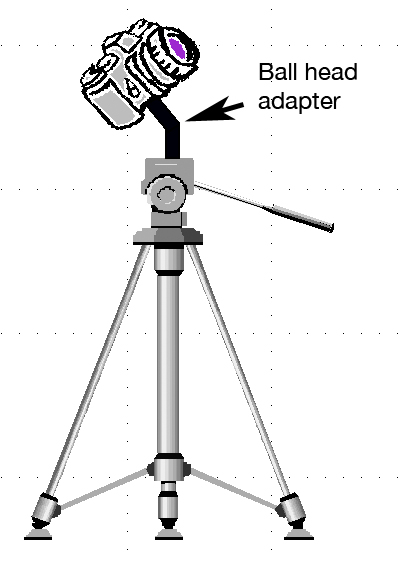
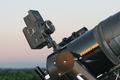
I own a telescope with a sidereal drive so I use the telescope
piggyback method when I do this type of photography. (see this
pic of my scope with piggyback mount and ball-head attached and ready
for a camera.)
Piggyback method: Cost of accessories? $100
to several thousand.
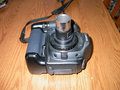
The first picture at right shows my friend's medium format film
camera mounted piggyback on my telescope ready for an evening of Astrophotography.
The second shot is three views of my Canon 10D mounted piggyback on a 12"
telescope. Note again that the camera and lens are on top of the
telescope (e.g., piggybacked) and not looking through the telescope.
This is where most people misunderstand this method. The camera is using the
telescope only to hitch a ride and make use of its ability to move; it is
not making any use of the telescope's optics whatsoever.
Whether using a barn-door mount or a tracking telescope, it is
vital that the mount be properly polar
aligned (Wikipedia link) to achieve accurate tracking of the sky. When
accurately polar aligned, your camera will stay pointed at your celestial
target as the Earth rotates beneath you.
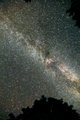
"Summer Milky Way" |
As with the fixed tripod method, the piggyback method
can be generally split into two methods: First, the wide-field shot. Using
a lens of very short focal-length, you can capture huge expanses of the
night sky - entire constellations or more. My favorite target in the wide-field
category is the Milky Way itself, our home galaxy. Seen with the naked
eye from a very dark site, the Milky Way is a faint, hazy band of light
that seems to span the sky. Seen with the long-exposure eye of a piggybacked
camera, it is simply beyond belief.
This shot, with a 12mm wide-field lens, captures the beauty of the summer
Milky Way as seen from a very dark location in northern Wisconsin. Note
the sheer number of stars visible in this shot. This was a four-minute
exposure. |
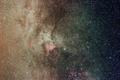
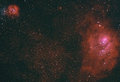
"North American Nebula" |
In the center of the above image you'll recall seeing
a faint reddish nebula - the North American Nebula. This shot, taken with
a 50mm lens, zooms in a bit on that same region. This nicely illustrates
how you can achieve different fields of view - or different levels of
magnification - by changing lenses on your dSLR. This was a three-minute
exposure. |
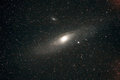
"The Andromeda Galaxy" |
By using longer and longer focal length lenses, you can
achieve significant magnification and some stunning and nearly unbelievable
shots. This shot of the Andromeda Galaxy was done using my 400mm
prime, mounted on my camera, with my camera mounted piggyback on a
tracking telescope. Most people, on seeing an image like this, assume
that it must have been taken with a powerful telescope. Not at all. A
good, sharp lens and a properly aligned tracking mount is all that is
required.
I don't intend to make this sound simple. By upping the focal-length
of the lens, the difficulty level of this type of photography increases
exponentially. Any errors in polar alignment are magnified (stars will
trail in long exposures if the polar alignment is not very close to perfect)
and achieving perfect focus can be a source of extreme frustration. However,
the rewards are significant, as illustrated by my final example. |
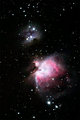
"M42 (Orion Nebula)" |
I consider this shot one of my crowning achievements in
astrophotography. Again, shot with the 400mm lens, this shot of the Orion
Nebula was a combination of several shots of varying exposures (from 60
seconds up to three minutes) to achieve proper exposures over the size
of the nebula (it's relatively bright at the center and dimmer around
the edges). Since Orion is a winter constellation (in the northern hemisphere),
this shot also required braving brutally cold temperatures for several
hours to finish the job. |
3. Through
the scope via
prime focus
|
 |
Prime focus method: Cost of additional
accessories? $1000 and up.Prime focus astrophotography
is what most novices think of when they think of sky shots. I include it here
mostly for completeness' sake. It is listed third because this type astro-shooting
is where difficulty and cost of necessary equipment are truly maximized. I
simply cannot state this strongly enough: prime focus astrophotography
is hard. And expensive. Did I mention that it is hard? OK, I think
my point is made.
The expense of this method comes primarily because prime focus
requires the use of a telescope. And not just any telescope, but a good, well
built, optically excellent telescope. Cheap department store scopes like the
ones you'll find in Sears or Walmart will simply not work. I'm not going to
make this tutorial a lecture on what telescope to buy, but basically you need
a suitable telescope and a very heavy, very stable mount (what is essentially
a tripod for telescopes). These mounts must be sturdy enough to carry the
weight of the telescope and camera gear, must be equipped with a drive to
track the stars, and must be very resistant to vibration and wobble. It is
not unusual for a serious amateur astronomer to spend a thousand dollars or
more on a good mount, and that much or more for the telescope. We're starting
to talk serious money now.
"Camera ready for prime focus"
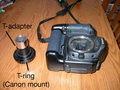
"Prime focus accessories"
Prime focus astrophotography requires an SLR because to do it,
you must remove your SLR's lens and attaching the camera directly to the telescope,
effectively using your telescope as the lens. All that's required to do this
is a ring adapter designed to fit your camera's mount (Canon, Nikon, etc.)
and a "T-Adapter" which includes an eyepiece barrel that slides
into your telescope's eyepiece opening. Having achieved this setup, aim your
telescope, set the exposure, and fire away. My telescope is a 2000mm focal
length Celestron C8. When configured like this, it effectively becomes a 2000mm
long lens!
"Prime focus moon" |
The moon, shot with my 30D mounted at prime focus on my
Celestron C8. Note the slightly soft focus. I include my own pathetic
image here only to highlight the skill of the two photographers whose
work appears below. This type of astrophotography is hard (have I mentioned
that?), and as a result, this is my least practiced and least utilized
method. If I want to shoot the moon, I can achieve better results with
other methods (see eyepiece projection below). True prime focus astrophotography
is a deep well of time, money, and sweat. Those who practice this method
are the most dedicated of souls and they have earned my full respect.
See the next two pictures. |

"The Andromeda Galaxy" |
John
Lanoue's photo of the Andromeda galaxy is a superb example of long-exposure
photography with the camera at the telescope's prime focus. Taking a shot
like this requires that the tracking of the telescope be guided for razor-sharp
precision. Without going into too much detail for this tutorial, that
involves using a secondary scope to watch a star on the cross hairs of
an eyepiece, and use a hand-controller to manually keep the scope directly
on target for the duration of the exposure (or multiple exposures). See
next example. |
"M8, M20 - Lagoon and Trifid nebulae in Sagittarius" |
This image, by Paschalis
Bartzoudis, is another stunning example of deep sky photography via
prime focus. I just can't emphasize enough how skilled these guys are,
and how much patience, dedication, and dollars this approach to astrophotography
takes. My hat is off guys. Thanks for letting me use your pics in this
tutorial. |
4. Through
the scope via
eyepiece projection
|
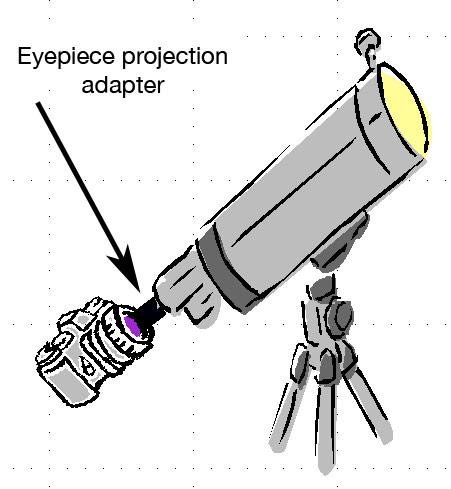 |
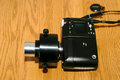
"eyepiece projection assembly"
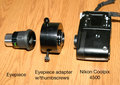
"eyepiece projection accessories"
The final method is similar to prime focus in that the camera is
actually looking through the telescope, but this time, you leave the eyepiece
on the telescope, and the camera looks through the eyepiece. The setup is
pictured at right shows my Nikon Coolpix 4500 camera and the necessary adapters
to attach the camera to the eyepiece. There are as many ways to do this as
their are cameras to do it with. The adapter shown here has three thumbscrews
allowing you to clamp it to the barrel of the eyepiece. The other side has
threads that match the lens assembly of the Coolpix 4500. Any eyepiece inserted
in this way will be held snugly in front of the camera's lens, allowing the
camera to see - and photograph - what the eye would normally look at through
the eyepiece. As with the prime focus method, this method is very hard to
master, but very rewarding. This method is most useful for obtaining images
of bright objects like the sun, moon and planets. Many birders also use this
method with spotting scopes, and call it digiscoping.
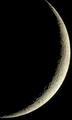
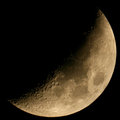
"Crescent Moon - eyepiece adaptor" |
A shot of the moon using the eyepiece projection setup.
This is the method I use most often when shooting through-the-scope.
I can achieve wonderful shots of the moon, the sun, and other
solar system objects. Because my targets for this type of shooting are
bright objects like planets, the sun and moon, they don't require long
exposures and are thus not as difficult as shooting faint objects like
nebulae, galaxies and star clusters. For those objects, I prefer method
#2 as discussed above. |

"Jupiter" |
An example of my planetary efforts. Again, shot with
the Nikon 4500 through eyepiece/scope, this type of astrophotography
adds yet another layer, that of multiple image post-processing. As
I've written elsewhere, this method utilizes dozens, hundreds, or
even thousands of separate exposures of your target, which are then
stacked or combined using specialized software, to achieve stunningly
sharp and detailed images of the moon, planets or other objects. Shooting
the planets in this method is again, one of the hardest to master methods
of astrophotography. |
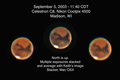
"Mars" |
Another of my planet shots, this time Mars during its
close opposition of 2003. This type of astrophotography allows you to
capture more detail than can been seen with the naked eye by virtue
of stacking and averaging multiple images in post processing. |
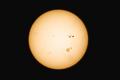
"The Sun" |
Same type of capture, but this time the sun, with the
aid of a proper solar filter. |
Astrophotography
and DPC
As a rule, astrophotos do not do especially well in DPC challenges,
unless they're spectacularly well done with considerable artistic "wow"
factor. The average DPC voter is not going to recognize how hard you worked
to obtain a fuzzy image of a galaxy, and shots of the moon are a dime a dozen.
To get the voters' attention with an astro shot, as with any challenge, you
need to hit them upside the head with a drop-dead gorgeous shot. That means
thoughtful and artistic composition, emotional impact, and nailing the technicals
(sharpness, color, etc.). Below are a few examples of some DPC shots (both
challenge and non-challenge) that I have been extremely impressed with over
the years, and that have been received well by other members too. All images
are credited to the original photographers unless they're by me.
"the Moon and Me" |
A blue ribbon for Mark
Peters in the Negative Space III challenge, and why not?
Simply stunning. Note the use of the 30-second sweet spot again. |
"Exit the solar system. Comet McNaught. To return in 300,000 years."
|
I've already referred to John
White's outstanding comet shot above, but I just have to come back
to it here. This one earned him a blue in the Exit challenge,
and it's not hard to understand why. This photo has everything: a stunning
subject well placed, excellent landscape and foreground objects of interest,
deeply saturated colors; it's just a feast for the eye in every regard.
If a this comet is only going to return every 300,000 years, you've got
to take advantage of it, and John sure did! |
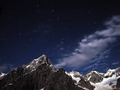
"Starry, Starry Night in the Italian Alps" |
I can't resist including Jeffrey
Levy's outstanding Alps shot here. Not only did it place very respectably
in a Free Study, it was also taken with a point and shoot camera!
Simply an outstanding result from the hand of an excellent photographer
with modest equipment. |
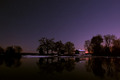
"Absolute Still" |
Skip
Rowland's"Absolute Still" earned him a blue, but more than
that, as of this writing, it's the 7th highest rated image in DPC history.
That's saying something. Look up "great picture" in the dictionary
and this photo will appear beside whatever definition there is. Scary
good. |
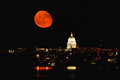
"Madison Moonrise" |
I include this one of mine, not only because I am totally
ego-involved in this subject, but because I have also gotten some pretty
good feedback on this shot. It's part of a series I've been working on
for years to get the definitive moonrise shot over the Madison skyline.
|
"And dusk becomes night..." |
And another one of mine. I have to say, on this one I
was robbed! 5.79 in a basic editing challenge? What were the voters thinking??
<grumble, grumble>
The thing about the six shots listed here? They were all shot
using method #1, a camera and a tripod. No fancy equipment, no piggybacking
on a telescope, no nothing. Just good photographers with good imagination
and execution. This stuff ain't rocket science folks. Get out there and
shoot the sky! |
DPC's various rulesets create some interesting opportunities for
astrophotographers. Basic Editing is, of course, limited to a single exposure.
However, the new revision of Advanced (December 2007) now allows for up to
10 exposures of the same scene to be integrated in post-processing, opening
the door for many traditional astrophotography post-processing tricks to be
used legally for challenges. The Expert Editing (trial) rules have always
been "astro friendly," allowing extensive post-processing modifications
and the inclusion of potentially as many exposures to created stacked composites
- a common astrophotographer's trick.
So what are you waiting for? Get your tripod and remote shutter
release and get out there and shoot some stars!
Home -
Challenges -
Community -
League -
Photos -
Cameras -
Lenses -
Learn -
Help -
Terms of Use -
Privacy -
Top ^
DPChallenge, and website content and design, Copyright © 2001-2026 Challenging Technologies, LLC.
All digital photo copyrights belong to the photographers and may not be used without permission.
Current Server Time: 06/18/2026 06:26:33 PM EDT.
|


