| Author | Thread |
|
|
06/02/2009 09:29:57 PM · #26 |
I was PM'ing with  JA-9 a little earlier, in response to a comment she left on one of my entries. She suggested applying a gradient to the image, but her explanation was in Photoshop elements terminology. I was trying to figure out what the equivalent procedure would be in PSP: JA-9 a little earlier, in response to a comment she left on one of my entries. She suggested applying a gradient to the image, but her explanation was in Photoshop elements terminology. I was trying to figure out what the equivalent procedure would be in PSP:
by gradient (on PSE7) look on the lower right where Layers is a little "circle" (half moon) under that drop menu is a choice for gradient...by applying that you can "richen" the appearance of your subject...and it is acceptable for challenges, both basic and advanced. I am not talking about an overlay
let me see if I can get this right...
when you have your photo open ~ go to Layers in the lower right corner ~ there is a little ball/sun icon (looks like a half moon) ~ click on that...your drop menu should have the choice of gradient ~ second from the top (not the gradient map at the bottom)
you will see some choices "pop" up...linear, reflective, angle, radial, diamond...etc. in this case I would use radial (circle) pumping up the scale to 140 or more to "widen" the circle. (note you can reverse/invert your choice of gradient or and you can change the "angle" by moving the "dial" around and you can move the center by placing your curser on the center, click and moving/draging it around.
now you will notice that you can "see" your subject in the little window that says gradient. well click on the little drop menu and choose the "black to white" choice...press ok...now when your picture comes "up" again you will not be able to see it...here is where I play with soft light, overlay or multiply (or anything else on the list) then playing with opacity...it has an instant effect on your photo... |
|
|
|
06/02/2009 09:49:28 PM · #27 |
Originally posted by bvy:

I know you don't care for this shot, Steve, but this is actually a first on two levels for me. It's my first HDR attempt -- pseudo-HDR attempt. In the original RAW, the subjects are underexposed and the background overexposed. I developed at EC0 and EC+2 and combined them in PSP using HDR photo merge. The results weren't as good as I expected, but I got something decent adjusting the brightness and curves.
Also, it's my first 16 bit image. Don't know that anything dramatic happened as a result -- except that I got a huge file. I'm having trouble knowing what does and doesn't work in 16 bit in PSP. For instance, it seems I can't use blend modes. |
My question would be (cause I don't think I've ever this right) is how are you doing your pseudo raw files?
I've tried Over/Under Exposing RAW shots in Canon DPP and then Save As... to save to new RAW file. They look good in DPP; Dark, Exposed and Over Exposed (and EXIF proper at -2 0 +2) but when I bring in to PSP HDR Merge they all look the same (dark) and the little indicator under each shot is 0.0 which makes me beleive it isn't reading the Exposure Properly from EXIF.
I have never seen this do much but beleive it is because it isn't reading proper info in the first place.
EDIT: As I was, I compared the merged shot to the original RAW and there is a subtle difference between them. So it is doing something but not with a whole lot of punch. It is giving us best guest for an exposed shot...nothing more.
Message edited by author 2009-06-02 21:56:55. |
|
|
|
06/02/2009 10:04:57 PM · #28 |
Originally posted by awpollard:
My question would be (cause I don't think I've ever this right) is how are you doing your pseudo raw files? |
In the Olympus Master software, I save one with EC0 and another with EC2 -- both as 16 bit TIFF's. PSP's photo merge finds and shows the exposure correctly in the indicator you mention. The highlights and overexposed areas seemed to be better corrected than the underexposed areas. But that could just be perception. I'll keep experimenting with it. |
|
|
|
06/02/2009 10:13:14 PM · #29 |
|
I've been using the freeware version of Photomatix to do a psuedo HDR, whether from one RAW or from multiple exposure adjustments from that RAW. Then I bring it into PSP for additional editing. |
|
|
|
06/02/2009 10:15:04 PM · #30 |
Originally posted by Yo_Spiff:
I was PM'ing with JA-9 a little earlier, in response to a comment she left on one of my entries. She suggested applying a gradient to the image, but her explanation was in Photoshop elements terminology. I was trying to figure out what the equivalent procedure would be in PSP:
by gradient (on PSE7) look on the lower right where Layers is a little "circle" (half moon) under that drop menu is a choice for gradient...by applying that you can "richen" the appearance of your subject...and it is acceptable for challenges, both basic and advanced. I am not talking about an overlay
let me see if I can get this right...
when you have your photo open ~ go to Layers in the lower right corner ~ there is a little ball/sun icon (looks like a half moon) ~ click on that...your drop menu should have the choice of gradient ~ second from the top (not the gradient map at the bottom)
you will see some choices "pop" up...linear, reflective, angle, radial, diamond...etc. in this case I would use radial (circle) pumping up the scale to 140 or more to "widen" the circle. (note you can reverse/invert your choice of gradient or and you can change the "angle" by moving the "dial" around and you can move the center by placing your curser on the center, click and moving/draging it around.
now you will notice that you can "see" your subject in the little window that says gradient. well click on the little drop menu and choose the "black to white" choice...press ok...now when your picture comes "up" again you will not be able to see it...here is where I play with soft light, overlay or multiply (or anything else on the list) then playing with opacity...it has an instant effect on your photo... |
First thought that came to mind on this one was.
Dup your background or Working Layer
Right click on that Layer and choose New Mask > Show All
From the Materials Palette select gradient, click your Foreground color then pick a gray scale gradient adjust the direction to your liking.
Use the Flood Fill tool to fill the Mask with the gradient.
Merge Group and you have a gradient of your image.
Mess with your blend mode to taste.
Prolly an easier way but that is what came to mind |
|
|
|
06/02/2009 10:21:05 PM · #31 |
Originally posted by Yo_Spiff:
I've been using the freeware version of Photomatix to do a psuedo HDR, whether from one RAW or from multiple exposure adjustments from that RAW. Then I bring it into PSP for additional editing. |
Yup I don't even think of PSP when it comes to HDR, I got on board with the Media Chance People when they first started out (Introductory Price), I really like some of the beyond HDR features of Dynamic Photo HDR. The Light Tuner is insanely cool.
I think PSP's HDR is really a shot at getting exposure right for Light and Dark area photos. |
|
|
|
06/02/2009 11:55:14 PM · #32 |
Originally posted by awpollard:
I think PSP's HDR is really a shot at getting exposure right for Light and Dark area photos. |
Well, 12 is the first version for that feature.
The other day I got an e-mail from Corel with a request to do a survey. I went ahead with it and was pleased with the blunt answers they were asking for. Most of these "satisfaction surveys" from others are filled only with radio buttons that I can rate them on, but in this survey, any radio button answers were followed up by a text box asking for specific feedback on what they needed to improve or fix.
The two biggest things I told them was that they needed to improve the reliability of the program and make all the tools work in 16 bit mode. I also suggested improved RAW conversion would be welcomed. I should have mentioned HDR, but it was not in my mind at the time. |
|
|
|
06/02/2009 11:59:48 PM · #33 |
Originally posted by awpollard:
I really like some of the beyond HDR features of Dynamic Photo HDR. The Light Tuner is insanely cool. |
Looks promising. I downloaded the trial. Is it limited time for the demo, or crippled features? |
|
|
|
06/03/2009 01:09:31 AM · #34 |
Originally posted by Yo_Spiff:
Originally posted by awpollard:
I think PSP's HDR is really a shot at getting exposure right for Light and Dark area photos. |
Well, 12 is the first version for that feature.
The other day I got an e-mail from Corel with a request to do a survey. I went ahead with it and was pleased with the blunt answers they were asking for. Most of these "satisfaction surveys" from others are filled only with radio buttons that I can rate them on, but in this survey, any radio button answers were followed up by a text box asking for specific feedback on what they needed to improve or fix.
The two biggest things I told them was that they needed to improve the reliability of the program and make all the tools work in 16 bit mode. I also suggested improved RAW conversion would be welcomed. I should have mentioned HDR, but it was not in my mind at the time. |
I think my biggest beef is still the cropping tool. |
|
|
|
06/03/2009 01:11:51 AM · #35 |
What kind of problem do you have with the cropping tool? In my case it sometimes fails to maintain the proper aspect ratio as I make it larger.

Message edited by author 2009-06-03 01:12:15. |
|
|
|
06/03/2009 01:25:36 AM · #36 |
Originally posted by Yo_Spiff:
What kind of problem do you have with the cropping tool? In my case it sometimes fails to maintain the proper aspect ratio as I make it larger.
|
Exactly, happens most often when you rotate the crop with the marquee up near the top or side. Almost like it gets stupid if it touches an edge during the rotation. If I move the box to the center of the shot and rotate it doesn't happen. Crop tool just needs all kinds of work. Don't drag it right and it goes to freeform. Wish they would adopt the thirds rule crop guide like Microsoft Digital Image pro had. |
|
|
|
06/03/2009 09:56:29 AM · #37 |
Originally posted by awpollard:
If I move the box to the center of the shot and rotate it doesn't happen. |
At least I now know the workaround and why it does not always behave that way. Thanks. I did mention the crop tool problem in the survey they asked me to do. |
|
|
|
06/05/2009 10:31:10 AM · #38 |
How does everyone handle noise reduction in PSP? I was looking at some plugins for a while (the usual NoiseNinja and Neatimage) but I find as time goes on, I seem to be able to be getting improved results with the built in NR.
I find starting with an amount of 35 seems to be a good staring point and it usually removes the worst of the noise without being aggressive enough to kill details. I've also been using the protect image tab to selectively apply it to the worst color areas, and using layers to totally keep it off of areas where I don't want it. I almost always use it before applying clarify, as clarify enhances noise. I'm not sure about some of the other options in the dialog however...

Message edited by author 2009-06-05 10:32:00. |
|
|
|
06/05/2009 10:58:37 AM · #39 |
Originally posted by Yo_Spiff:
How does everyone handle noise reduction in PSP? I was looking at some plugins for a while (the usual NoiseNinja and Neatimage) but I find as time goes on, I seem to be able to be getting improved results with the built in NR.
I find starting with an amount of 35 seems to be a good staring point and it usually removes the worst of the noise without being aggressive enough to kill details. I've also been using the protect image tab to selectively apply it to the worst color areas, and using layers to totally keep it off of areas where I don't want it. I almost always use it before applying clarify, as clarify enhances noise. I'm not sure about some of the other options in the dialog however...
|
Wow... I have found 35 to be my happy medium as well. I haven't played with the protect image tab as much as I should. I will try that. I do find the more we process shots with a filter like Topaz Adjust, Lucis Arts, CEP3 -> Tonal Contrast that some specks will be orphaned even after a light NR.
I will run Adjust > Digital Camera Noise Removal at 35 (default of 50, if you are pixel peeper, you will see the strange textures (artifacts) start). I have played with the Sharpen setting, hoping I could avoid a step (USM) later, but found that I have more control with USM so now just leave it at 0.
Usually the auto detect won't find the noisey area(s) I'm looking for so I will marquee the area(s) in the left window of the dialog.
After the DCNR is run against the layer I will try a Adjust > Add/Remove Noise > Salt and Pepper filter (defaults of 3, 4 and Include all lower specks - Checked) to calm down any orphaned specks.
I have had a lot of luck with Adjust > Add/Remove Noise > Edge preserving smooth as well.
I have Noiseware, Noise Ninja and the Perfectum plug-in, all of which I find I don't use anymore (If any I use Perfectum every once in a while but with Topaz Clean 2...I'll prolly stop using it as well).
Message edited by author 2009-06-05 11:01:30. |
|
|
|
06/05/2009 11:20:34 PM · #40 |
This will be anticlimactic, but I usually get good results (to my own taste anyway) using the automatic, one-click setting. That said, I've about given up the battle against digital noise, and I'm seeking out gear that gives more natural, even attractive looking noise. To me, the noise reduced artifacts are worse than the noise itself a lot of times.
In any case, one alternative I have tried is using Gaussian blur to control noise. It's much more natural looking than the built in algorithms, but works best when applied selectively. I don't have an example, but I was working on an image at one point where I applied it to just the shadows of a black and white image, and got better results than noise reducing. I think a smiliar approach is used to control chroma noise in astrophotography (Google "SGBNR"). Pop Photo covered a similar technique in an issue last year, I think, but I can't find it right now. |
|
|
|
06/05/2009 11:50:36 PM · #41 |
 Yo_Spiff I looked into the Photomatix Pro free trial from their website. It notes that several options leave watermarks on the final result. Is there another freeware version of this software somewhere, or do you just remove the watermarks from the final product? Yo_Spiff I looked into the Photomatix Pro free trial from their website. It notes that several options leave watermarks on the final result. Is there another freeware version of this software somewhere, or do you just remove the watermarks from the final product?
Thanks, Kyle
Message edited by author 2009-06-05 23:51:01. |
|
|
|
06/06/2009 12:15:07 AM · #42 |
Originally posted by kallison:
Is there another freeware version of this software somewhere, or do you just remove the watermarks from the final product? |
It is on the download page, labeled as "Photomatix basic 1.2..........freeware"
Here is a direct link to the download file |
|
|
|
06/06/2009 12:15:22 AM · #43 |
Another question. I don't know if this is a PSP peculiarity or just the way these things work.
It would be nice if my finished JPG retained the EXIF data from the original (usually ) TIF. Does PS and more "serious" photo editing software also lose that information as you take the image through post-processing? What am I missing? |
|
|
|
06/06/2009 12:20:34 AM · #44 |
In PS you lose the EXIF data only when you use the save for web functionality. If you save it as a jpeg under the save as option, then EXIF is retained. Hope that helps.
Message edited by author 2009-06-06 00:21:14. |
|
|
|
06/06/2009 12:26:56 AM · #45 |
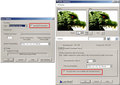
Originally posted by bvy:
What am I missing? |
I think you are missing these checkboxes in the save dialog and JPEG optimizer. If you have unset them by accident, then they default to the last state used the next time the dialog is opened.
 |
|
|
|
06/06/2009 12:54:12 AM · #46 |
Originally posted by bvy:
Another question. I don't know if this is a PSP peculiarity or just the way these things work.
It would be nice if my finished JPG retained the EXIF data from the original (usually ) TIF. Does PS and more "serious" photo editing software also lose that information as you take the image through post-processing? What am I missing? |
What Sarah said is correct... Save for Web strips EXIF, Save As... does not UNLESS you click the options button and mess with the settings.
I did a thing for my Local Group: Saving for web viewing near the end of my post is screen cap of the Options... dialog.
Sometimes you do need to go into options... to get the right file size when uploading to DPC... My Promote your zoo entry was weighing in at 250K @ 720 so I had to take my Quality (compression) to 14 and turn off EXIF to get it under 200k.
Message edited by author 2009-06-06 00:55:11. |
|
|
|
06/06/2009 12:58:17 AM · #47 |
Originally posted by Yo_Spiff:
Originally posted by bvy:
What am I missing? |
I think you are missing these checkboxes in the save dialog and JPEG optimizer. If you have unset them by accident, then they default to the last state used the next time the dialog is opened.
|
Yo Spiff (I like saying that) if your color profile is sRGB you really don't need to embed that in the photo as the Web assumes sRGB if none is embedded. (noticed that on your screen cap) |
|
|
|
06/06/2009 02:13:30 AM · #48 |
Originally posted by awpollard:
you really don't need to embed that in the photo as the Web assumes sRGB if none is embedded. |
Another way of shaving off a few bytes if I really need to. Thanks.
A compression setting of 14 isn't too bad. I usually save at a setting of 12-15 for most web images on here and Flickr. I aim for a file size that is an average about 150k. Of course, for challenges I always scrape in as close as I can get to the ceiling. If my compression gets above an amount of 15, then I start leaving out EXIF data and now color profiles will join the list. |
|
|
|
06/06/2009 02:22:43 AM · #49 |
Originally posted by awpollard:
So everyone here knows all the Hidden Tools in PSP, Right? Lot's of tools palettes from previous versions of PSP are there but not easily accessible.
If you don't and want to see what is available:
Right click on the Enhance Photo drop down, on the Toolbar, and choose Customize.
Scroll down the list on the left and click on Unused Commands.
Near the Bottom of the List on the right you will see all kinds of cool things like Auto Color Balance, Gamma Adjust, and lots of Auto Enhancement Stuff. Some are useful, some are built in to other applets like Set White Point/Black Point but one thing I found with the Set White/Black point palette is the built in presets do some cool things.
You can drag anything from the list and drop it on Enhance Photo to use it.
Show Hidden Toolbars is evil though... if you run that you will have like 30 toolbars open up... don't try that one. |
.
To get to the "Hidden Tools" on my version of PSP, 12.5, you have to go through View>Customize>Unused Commands.
|
|
|
|
06/06/2009 02:55:36 AM · #50 |
Originally posted by awpollard:
Originally posted by Yo_Spiff:
I've been using the freeware version of Photomatix to do a psuedo HDR, whether from one RAW or from multiple exposure adjustments from that RAW. Then I bring it into PSP for additional editing. |
I think PSP's HDR is really a shot at getting exposure right for Light and Dark area photos. |
I have had some luck using PSP layers as explained in Flickr's "Tutorial Corel Paint Shop Pro Photo X - X2.5 + JASC PSP / Discuss"
//www.flickr.com/groups/tutorial_corel_pspp_x-x2/discuss/72157613154500427/
I had a hard time following his "tutorial", even after filtering out the second language spelling and grammar problems, but the result was quite good. |
|
Home -
Challenges -
Community -
League -
Photos -
Cameras -
Lenses -
Learn -
Help -
Terms of Use -
Privacy -
Top ^
DPChallenge, and website content and design, Copyright © 2001-2026 Challenging Technologies, LLC.
All digital photo copyrights belong to the photographers and may not be used without permission.
Current Server Time: 07/17/2026 04:12:25 PM EDT.


