| Author | Thread |
|
|
06/06/2009 03:42:31 AM · #51 |
Thanks  Yo_Spiff I just didn't scroll down the page far enough. Yo_Spiff I just didn't scroll down the page far enough. |
|
|
|
06/09/2009 09:53:25 PM · #52 |
Okay, still trying to get EXIF data to show up for me using Export to JPG. Apparently, EXIF TIFF's produced from RAW with the award winning Olympus Master software have it deeply embedded somewhere, and I guess PSP can't find it.
Meantime, dutones challenge is coming up. Any thoughts on doing this with PSP? If I remember, Photoshop makes it much easier. I recall a confusing tutorial somewhere that used blend ranges in PSP to accomplish this. |
|
|
|
06/09/2009 10:01:33 PM · #53 |
My usual method is simply to go into the adjustment menu and select colorize. I always convert to B/W first in order to get the tonal range right before slapping color over it. Perhaps converting to b/w first and then applying a solid color as a blended layer could give some other looks. Maybe... Not sure. The B/W conversion plugin I use also has a toning function.
Interesting thing I notices about TIFF's, at least with the Canon DPP software, is that the Exif TIFF is only 8 bits, but I discovered the 16 bit TIFF's also include the Exif data.
Message edited by author 2009-06-09 22:03:49. |
|
|
|
06/09/2009 10:05:56 PM · #54 |
Originally posted by Yo_Spiff:
Interesting thing I notices about TIFF's, at least with the Canon DPP software, is that the Exif TIFF is only 8 bits, but I discovered the 16 bit TIFF's also include the Exif data. |
If you take either of those and post-process it in PSP, then use the Export | JPG function, does the EXIF data stick? -- i.e. can you view it in Windows if you right click on the file and look at Properties? |
|
|
|
06/09/2009 10:06:51 PM · #55 |
Originally posted by bvy:
Meantime, dutones challenge is coming up. Any thoughts on doing this with PSP? If I remember, Photoshop makes it much easier. I recall a confusing tutorial somewhere that used blend ranges in PSP to accomplish this. |
Silly me. I saw it right here:
//www.dpchallenge.com/tutorial.php?TUTORIAL_ID=37 |
|
|
|
06/09/2009 10:10:14 PM · #56 |
| The tritone effect looks interesting, but does this do anything for duotoning that cannot be accomplished more easily other ways? |
|
|
|
06/09/2009 10:16:53 PM · #57 |
Originally posted by Yo_Spiff:
The tritone effect looks interesting, but does this do anything for duotoning that cannot be accomplished more easily other ways? |
I think you're right. I'm probably overthinking it. HSL layer with colorize selected is duotone enough for me. |
|
|
|
06/13/2009 07:09:44 PM · #58 |
| I've finally learned how to use layer masks, to an extent. I've been now using them as a way of erasing through layers and I made a mask from an image last night in order to knock out a figure. However, I had a white background to start with. I know there are lots of other things I can do with masks, but don't know what or where to start. Any suggestions for what I can do with masks? |
|
|
|
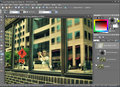
06/13/2009 08:41:12 PM · #59 |
I use mask layers primarily for vignetting -- i.e. darkening the corners. Hopefully the screen shot is self explanatory.
|
|
|
|
06/13/2009 11:55:15 PM · #60 |
Originally posted by bvy:
Hopefully the screen shot is self explanatory. |
Yes, that makes sense. Vignetting in that manner was something I have not known how to do. Thanks. |
|
|
|
06/14/2009 12:39:30 AM · #61 |
Originally posted by Yo_Spiff:
Originally posted by bvy:
Hopefully the screen shot is self explanatory. |
Yes, that makes sense. Vignetting in that manner was something I have not known how to do. Thanks. |
This works, but it's not terribly easy to get the area that you want to vignette (or highlight). Remember my question about feathering a selection beyond the 200 pixel limit? It was related to this. It would be much easier to copy the background, take a big elliptical, feathered chunk out of the image, exactly where you want it, and then multiply the framed area that was left behind. But when you're working with large images, 200 pixels isn't enough to get a nice full faded effect. The 200 pixel area works fine post-resize (to say 720 or 800 on a side), but I normally don't like to alter images after I resize them; I like to keep a full size TIFF that has all my edits.
This image has the effect using the gradient fill. You can see it more clearly in the thumb.

Anyway...
|
|
|
|
06/21/2009 06:30:35 PM · #62 |
How to install Photoshop plugins to Paintshop Pro, for any who may not have already figured it out:
 |
|
Home -
Challenges -
Community -
League -
Photos -
Cameras -
Lenses -
Learn -
Prints! -
Help -
Terms of Use -
Privacy -
Top ^
DPChallenge, and website content and design, Copyright © 2001-2024 Challenging Technologies, LLC.
All digital photo copyrights belong to the photographers and may not be used without permission.
Current Server Time: 04/19/2024 07:28:13 PM EDT.


