| Author | Thread |
|
|
06/21/2009 06:30:35 PM · #1 |
How to install Photoshop plugins to Paintshop Pro, for any who may not have already figured it out:
 |
|
|
|
06/14/2009 12:39:30 AM · #2 |
Originally posted by Yo_Spiff:
Originally posted by bvy:
Hopefully the screen shot is self explanatory. |
Yes, that makes sense. Vignetting in that manner was something I have not known how to do. Thanks. |
This works, but it's not terribly easy to get the area that you want to vignette (or highlight). Remember my question about feathering a selection beyond the 200 pixel limit? It was related to this. It would be much easier to copy the background, take a big elliptical, feathered chunk out of the image, exactly where you want it, and then multiply the framed area that was left behind. But when you're working with large images, 200 pixels isn't enough to get a nice full faded effect. The 200 pixel area works fine post-resize (to say 720 or 800 on a side), but I normally don't like to alter images after I resize them; I like to keep a full size TIFF that has all my edits.
This image has the effect using the gradient fill. You can see it more clearly in the thumb.

Anyway...
|
|
|
|
06/13/2009 11:55:15 PM · #3 |
Originally posted by bvy:
Hopefully the screen shot is self explanatory. |
Yes, that makes sense. Vignetting in that manner was something I have not known how to do. Thanks. |
|
|
|
06/13/2009 08:41:12 PM · #4 |
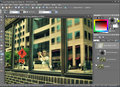
I use mask layers primarily for vignetting -- i.e. darkening the corners. Hopefully the screen shot is self explanatory.
|
|
|
|
06/13/2009 07:09:44 PM · #5 |
| I've finally learned how to use layer masks, to an extent. I've been now using them as a way of erasing through layers and I made a mask from an image last night in order to knock out a figure. However, I had a white background to start with. I know there are lots of other things I can do with masks, but don't know what or where to start. Any suggestions for what I can do with masks? |
|
|
|
06/09/2009 10:16:53 PM · #6 |
Originally posted by Yo_Spiff:
The tritone effect looks interesting, but does this do anything for duotoning that cannot be accomplished more easily other ways? |
I think you're right. I'm probably overthinking it. HSL layer with colorize selected is duotone enough for me. |
|
|
|
06/09/2009 10:10:14 PM · #7 |
| The tritone effect looks interesting, but does this do anything for duotoning that cannot be accomplished more easily other ways? |
|
|
|
06/09/2009 10:06:51 PM · #8 |
Originally posted by bvy:
Meantime, dutones challenge is coming up. Any thoughts on doing this with PSP? If I remember, Photoshop makes it much easier. I recall a confusing tutorial somewhere that used blend ranges in PSP to accomplish this. |
Silly me. I saw it right here:
//www.dpchallenge.com/tutorial.php?TUTORIAL_ID=37 |
|
|
|
06/09/2009 10:05:56 PM · #9 |
Originally posted by Yo_Spiff:
Interesting thing I notices about TIFF's, at least with the Canon DPP software, is that the Exif TIFF is only 8 bits, but I discovered the 16 bit TIFF's also include the Exif data. |
If you take either of those and post-process it in PSP, then use the Export | JPG function, does the EXIF data stick? -- i.e. can you view it in Windows if you right click on the file and look at Properties? |
|
|
|
06/09/2009 10:01:33 PM · #10 |
My usual method is simply to go into the adjustment menu and select colorize. I always convert to B/W first in order to get the tonal range right before slapping color over it. Perhaps converting to b/w first and then applying a solid color as a blended layer could give some other looks. Maybe... Not sure. The B/W conversion plugin I use also has a toning function.
Interesting thing I notices about TIFF's, at least with the Canon DPP software, is that the Exif TIFF is only 8 bits, but I discovered the 16 bit TIFF's also include the Exif data.
Message edited by author 2009-06-09 22:03:49. |
|
|
|
06/09/2009 09:53:25 PM · #11 |
Okay, still trying to get EXIF data to show up for me using Export to JPG. Apparently, EXIF TIFF's produced from RAW with the award winning Olympus Master software have it deeply embedded somewhere, and I guess PSP can't find it.
Meantime, dutones challenge is coming up. Any thoughts on doing this with PSP? If I remember, Photoshop makes it much easier. I recall a confusing tutorial somewhere that used blend ranges in PSP to accomplish this. |
|
|
|
06/06/2009 03:42:31 AM · #12 |
Thanks  Yo_Spiff I just didn't scroll down the page far enough. Yo_Spiff I just didn't scroll down the page far enough. |
|
|
|
06/06/2009 02:55:36 AM · #13 |
Originally posted by awpollard:
Originally posted by Yo_Spiff:
I've been using the freeware version of Photomatix to do a psuedo HDR, whether from one RAW or from multiple exposure adjustments from that RAW. Then I bring it into PSP for additional editing. |
I think PSP's HDR is really a shot at getting exposure right for Light and Dark area photos. |
I have had some luck using PSP layers as explained in Flickr's "Tutorial Corel Paint Shop Pro Photo X - X2.5 + JASC PSP / Discuss"
//www.flickr.com/groups/tutorial_corel_pspp_x-x2/discuss/72157613154500427/
I had a hard time following his "tutorial", even after filtering out the second language spelling and grammar problems, but the result was quite good. |
|
|
|
06/06/2009 02:22:43 AM · #14 |
Originally posted by awpollard:
So everyone here knows all the Hidden Tools in PSP, Right? Lot's of tools palettes from previous versions of PSP are there but not easily accessible.
If you don't and want to see what is available:
Right click on the Enhance Photo drop down, on the Toolbar, and choose Customize.
Scroll down the list on the left and click on Unused Commands.
Near the Bottom of the List on the right you will see all kinds of cool things like Auto Color Balance, Gamma Adjust, and lots of Auto Enhancement Stuff. Some are useful, some are built in to other applets like Set White Point/Black Point but one thing I found with the Set White/Black point palette is the built in presets do some cool things.
You can drag anything from the list and drop it on Enhance Photo to use it.
Show Hidden Toolbars is evil though... if you run that you will have like 30 toolbars open up... don't try that one. |
.
To get to the "Hidden Tools" on my version of PSP, 12.5, you have to go through View>Customize>Unused Commands.
|
|
|
|
06/06/2009 02:13:30 AM · #15 |
Originally posted by awpollard:
you really don't need to embed that in the photo as the Web assumes sRGB if none is embedded. |
Another way of shaving off a few bytes if I really need to. Thanks.
A compression setting of 14 isn't too bad. I usually save at a setting of 12-15 for most web images on here and Flickr. I aim for a file size that is an average about 150k. Of course, for challenges I always scrape in as close as I can get to the ceiling. If my compression gets above an amount of 15, then I start leaving out EXIF data and now color profiles will join the list. |
|
|
|
06/06/2009 12:58:17 AM · #16 |
Originally posted by Yo_Spiff:
Originally posted by bvy:
What am I missing? |
I think you are missing these checkboxes in the save dialog and JPEG optimizer. If you have unset them by accident, then they default to the last state used the next time the dialog is opened.
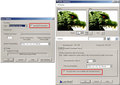 |
Yo Spiff (I like saying that) if your color profile is sRGB you really don't need to embed that in the photo as the Web assumes sRGB if none is embedded. (noticed that on your screen cap) |
|
|
|
06/06/2009 12:54:12 AM · #17 |
Originally posted by bvy:
Another question. I don't know if this is a PSP peculiarity or just the way these things work.
It would be nice if my finished JPG retained the EXIF data from the original (usually ) TIF. Does PS and more "serious" photo editing software also lose that information as you take the image through post-processing? What am I missing? |
What Sarah said is correct... Save for Web strips EXIF, Save As... does not UNLESS you click the options button and mess with the settings.
I did a thing for my Local Group: Saving for web viewing near the end of my post is screen cap of the Options... dialog.
Sometimes you do need to go into options... to get the right file size when uploading to DPC... My Promote your zoo entry was weighing in at 250K @ 720 so I had to take my Quality (compression) to 14 and turn off EXIF to get it under 200k.
Message edited by author 2009-06-06 00:55:11. |
|
|
|
06/06/2009 12:26:56 AM · #18 |
Originally posted by bvy:
What am I missing? |
I think you are missing these checkboxes in the save dialog and JPEG optimizer. If you have unset them by accident, then they default to the last state used the next time the dialog is opened.
|
|
|
|
06/06/2009 12:20:34 AM · #19 |
In PS you lose the EXIF data only when you use the save for web functionality. If you save it as a jpeg under the save as option, then EXIF is retained. Hope that helps.
Message edited by author 2009-06-06 00:21:14. |
|
|
|
06/06/2009 12:15:22 AM · #20 |
Another question. I don't know if this is a PSP peculiarity or just the way these things work.
It would be nice if my finished JPG retained the EXIF data from the original (usually ) TIF. Does PS and more "serious" photo editing software also lose that information as you take the image through post-processing? What am I missing? |
|
|
|
06/06/2009 12:15:07 AM · #21 |
Originally posted by kallison:
Is there another freeware version of this software somewhere, or do you just remove the watermarks from the final product? |
It is on the download page, labeled as "Photomatix basic 1.2..........freeware"
Here is a direct link to the download file |
|
|
|
06/05/2009 11:50:36 PM · #22 |
Yo_Spiff I looked into the Photomatix Pro free trial from their website. It notes that several options leave watermarks on the final result. Is there another freeware version of this software somewhere, or do you just remove the watermarks from the final product?
Thanks, Kyle
Message edited by author 2009-06-05 23:51:01. |
|
|
|
06/05/2009 11:20:34 PM · #23 |
This will be anticlimactic, but I usually get good results (to my own taste anyway) using the automatic, one-click setting. That said, I've about given up the battle against digital noise, and I'm seeking out gear that gives more natural, even attractive looking noise. To me, the noise reduced artifacts are worse than the noise itself a lot of times.
In any case, one alternative I have tried is using Gaussian blur to control noise. It's much more natural looking than the built in algorithms, but works best when applied selectively. I don't have an example, but I was working on an image at one point where I applied it to just the shadows of a black and white image, and got better results than noise reducing. I think a smiliar approach is used to control chroma noise in astrophotography (Google "SGBNR"). Pop Photo covered a similar technique in an issue last year, I think, but I can't find it right now. |
|
|
|
06/05/2009 10:58:37 AM · #24 |
Originally posted by Yo_Spiff:
How does everyone handle noise reduction in PSP? I was looking at some plugins for a while (the usual NoiseNinja and Neatimage) but I find as time goes on, I seem to be able to be getting improved results with the built in NR.
I find starting with an amount of 35 seems to be a good staring point and it usually removes the worst of the noise without being aggressive enough to kill details. I've also been using the protect image tab to selectively apply it to the worst color areas, and using layers to totally keep it off of areas where I don't want it. I almost always use it before applying clarify, as clarify enhances noise. I'm not sure about some of the other options in the dialog however...
 |
Wow... I have found 35 to be my happy medium as well. I haven't played with the protect image tab as much as I should. I will try that. I do find the more we process shots with a filter like Topaz Adjust, Lucis Arts, CEP3 -> Tonal Contrast that some specks will be orphaned even after a light NR.
I will run Adjust > Digital Camera Noise Removal at 35 (default of 50, if you are pixel peeper, you will see the strange textures (artifacts) start). I have played with the Sharpen setting, hoping I could avoid a step (USM) later, but found that I have more control with USM so now just leave it at 0.
Usually the auto detect won't find the noisey area(s) I'm looking for so I will marquee the area(s) in the left window of the dialog.
After the DCNR is run against the layer I will try a Adjust > Add/Remove Noise > Salt and Pepper filter (defaults of 3, 4 and Include all lower specks - Checked) to calm down any orphaned specks.
I have had a lot of luck with Adjust > Add/Remove Noise > Edge preserving smooth as well.
I have Noiseware, Noise Ninja and the Perfectum plug-in, all of which I find I don't use anymore (If any I use Perfectum every once in a while but with Topaz Clean 2...I'll prolly stop using it as well).
Message edited by author 2009-06-05 11:01:30. |
|
|
|
06/05/2009 10:31:10 AM · #25 |
How does everyone handle noise reduction in PSP? I was looking at some plugins for a while (the usual NoiseNinja and Neatimage) but I find as time goes on, I seem to be able to be getting improved results with the built in NR.
I find starting with an amount of 35 seems to be a good staring point and it usually removes the worst of the noise without being aggressive enough to kill details. I've also been using the protect image tab to selectively apply it to the worst color areas, and using layers to totally keep it off of areas where I don't want it. I almost always use it before applying clarify, as clarify enhances noise. I'm not sure about some of the other options in the dialog however...
Message edited by author 2009-06-05 10:32:00. |
|
Home -
Challenges -
Community -
League -
Photos -
Cameras -
Lenses -
Learn -
Prints! -
Help -
Terms of Use -
Privacy -
Top ^
DPChallenge, and website content and design, Copyright © 2001-2024 Challenging Technologies, LLC.
All digital photo copyrights belong to the photographers and may not be used without permission.
Current Server Time: 04/24/2024 08:54:34 AM EDT.


