| Author | Thread |
|
|
04/28/2009 06:44:22 AM · #1 |
Hi guys,
I am doing a final project for my class and my topic is "textures and patterns in nature". I have an idea what I will be shooting, but any examples and tips you could give me would be greatly appreciated.
Thanks a lot |
|
|
|
04/28/2009 07:24:36 AM · #2 |
Even though this didn't do very well in the challenge I still quite like it, and it is very much a pattern and texture in nature as I see it
|
|
|
|
04/28/2009 07:26:28 AM · #3 |
And this one

|
|
|
|
04/28/2009 10:30:36 AM · #4 |
|
|
|
04/28/2009 10:46:22 AM · #5 |
|
|
|
04/28/2009 11:52:55 AM · #6 |
|
|
|
04/28/2009 12:22:11 PM · #7 |
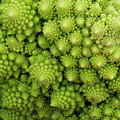
Fibonacci spirals are a great subject for studying patterns in nature - you can find them for example in sunflower flower and in flowers of other plants - the above picture of cauliflower is another example. Fibonnaci numbers are found also in various patterns in plants and animals, check google.
 
|
|
|
|
04/28/2009 04:15:27 PM · #8 |
Thank you guys.
What is the best way to separate objects in a field. I've seen some people bring their backgrounds, or someone printed just colors on a paper and used that as a background creating cool blurry backgrounds.
|
|
|
|
04/28/2009 08:22:32 PM · #9 |
Originally posted by maggieddd:
Thank you guys.
What is the best way to separate objects in a field. I've seen some people bring their backgrounds, or someone printed just colors on a paper and used that as a background creating cool blurry backgrounds. |
Careful position of camera to highlight our subject against a somewhat uncomplicated background is a good first step.
Then, use a lens that can open to a very wide aperture (f/1.4 or f/1.8 often do well), focus very precisely on your subject, and adjust shutter speed for exposure (tripod may help a lot). The wide aperture generally results in a shallow depth of field with the backgroudn blurry. But it depends on how close you are to your subject (e.g.: how deep into the field of view you are focusing) and how much further back the background is in relation to that. Lots of information available, much rather mathematical and technical.
Some people use photoshop techniques to approximate these results, but getting close in the camera first yileds much higer quality. |
|
|
|
04/29/2009 07:19:44 AM · #10 |
Thanks Bob.
Here is where I always have a problem with when shooting macros. I always get the foreground and the background blurry and somewhere in the middle that's where the image is sharp. How do I minimize that? I don't want the foreground to be blurry. I don't have any lens that is f1.4 or f1.8. I have Canon 180mm f3.5 macro and Canon 100mm f2.8 macro. I do have 90mm f2.8 tilt shift which has been good for relatively small objects.
Any more tips?
Thanks |
|
|
|
04/29/2009 07:43:27 AM · #11 |
Originally posted by maggieddd:
Thanks Bob.
Here is where I always have a problem with when shooting macros. I always get the foreground and the background blurry and somewhere in the middle that's where the image is sharp. How do I minimize that? I don't want the foreground to be blurry. I don't have any lens that is f1.4 or f1.8. I have Canon 180mm f3.5 macro and Canon 100mm f2.8 macro. I do have 90mm f2.8 tilt shift which has been good for relatively small objects.
Any more tips?
Thanks |
It sounds like you are wanting more depth of field, which would be accomplished by stopping down your aperture. Don't stop down too far (generally around f/11 or so) or you will start to lose a tad bit of sharpness due to diffraction. Doing this, however, will have the opposite effect of what you initially asked (improved bokeh/blurring of the background).
ETA: If you wanted to know more about diffraction limits I found this site explained things well.
Also just thought of something.... another way to combat narrow depth of field is called photostacking. Depending upon what software you have, this may be an automated or very tedious task. Essentially you take a series of photos, focusing on slightly closer and further elements of your subject and then combine them in post processing. Obviously, this is only applicable for pretty still objects.
Message edited by author 2009-04-29 07:59:45. |
|
|
|
04/29/2009 09:52:51 AM · #12 |
Originally posted by spiritualspatula:
Originally posted by maggieddd:
Thanks Bob.
Here is where I always have a problem with when shooting macros. I always get the foreground and the background blurry and somewhere in the middle that's where the image is sharp. How do I minimize that? I don't want the foreground to be blurry. I don't have any lens that is f1.4 or f1.8. I have Canon 180mm f3.5 macro and Canon 100mm f2.8 macro. I do have 90mm f2.8 tilt shift which has been good for relatively small objects.
Any more tips?
Thanks |
It sounds like you are wanting more depth of field, which would be accomplished by stopping down your aperture. Don't stop down too far (generally around f/11 or so) or you will start to lose a tad bit of sharpness due to diffraction. Doing this, however, will have the opposite effect of what you initially asked (improved bokeh/blurring of the background).
ETA: If you wanted to know more about diffraction limits I found this site explained things well.
Also just thought of something.... another way to combat narrow depth of field is called photostacking. Depending upon what software you have, this may be an automated or very tedious task. Essentially you take a series of photos, focusing on slightly closer and further elements of your subject and then combine them in post processing. Obviously, this is only applicable for pretty still objects. |
All I want is for the subject to be sharp from the front and then progressively get blurrier or the whole object sharp and background blurry. I don't want to have the front of the subject blurry, middle sharp and the rest blurry again. |
|
|
|
04/29/2009 10:34:22 PM · #13 |
Okay. Stopping down your aperture will increase your depth of field to some extent, but this may not always be enough. If you don't already, you can utilize the DoF preview button to better ascertain the effects of stopping down. Some other notes on DoF:
Increasing your distance from your subject will increase DoF.
Decreasing the focal length of your lens will increase DoF.
Also, in terms of separating your subject... you can also try to overpower the ambient light, which would cause the background to be very dark or black, thus causing separation. |
|
|
|
04/30/2009 01:29:31 AM · #14 |
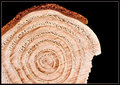
Texture is revealed by light and shadow. See how the texture of the rock is revealed here.

Message edited by author 2009-04-30 01:31:41. |
|
|
|
04/30/2009 03:11:08 PM · #15 |
Originally posted by spiritualspatula:
Okay. Stopping down your aperture will increase your depth of field to some extent, but this may not always be enough. If you don't already, you can utilize the DoF preview button to better ascertain the effects of stopping down. Some other notes on DoF:
Increasing your distance from your subject will increase DoF.
Decreasing the focal length of your lens will increase DoF.
Also, in terms of separating your subject... you can also try to overpower the ambient light, which would cause the background to be very dark or black, thus causing separation. |
thanks.
I will try some soon and post to see what people think |
|
|
|
04/30/2009 03:12:06 PM · #16 |
Originally posted by Dr.Confuser:
Texture is revealed by light and shadow. See how the texture of the rock is revealed here.
|
Now, this is funny, for a second I thought you posted my picture as I have almost exactly the same shot. |
|
|
|
04/30/2009 03:26:22 PM · #17 |
Originally posted by maggieddd:
All I want is for the subject to be sharp from the front and then progressively get blurrier or the whole object sharp and background blurry. I don't want to have the front of the subject blurry, middle sharp and the rest blurry again. |
You can lock your focus on the front of the image and then reframe. An open aperture will make it get blurrier quicker ... why not shoot a series of 3 or 4 pregressively stopping down to see what setting gives the best compromise between DOF on the subject and blurring the BG. |
|
|
|
04/30/2009 03:51:35 PM · #18 |
Originally posted by GeneralE:
Originally posted by maggieddd:
All I want is for the subject to be sharp from the front and then progressively get blurrier or the whole object sharp and background blurry. I don't want to have the front of the subject blurry, middle sharp and the rest blurry again. |
You can lock your focus on the front of the image and then reframe. An open aperture will make it get blurrier quicker ... why not shoot a series of 3 or 4 pregressively stopping down to see what setting gives the best compromise between DOF on the subject and blurring the BG. |
thanks, will give it a try |
|
Home -
Challenges -
Community -
League -
Photos -
Cameras -
Lenses -
Learn -
Help -
Terms of Use -
Privacy -
Top ^
DPChallenge, and website content and design, Copyright © 2001-2026 Challenging Technologies, LLC.
All digital photo copyrights belong to the photographers and may not be used without permission.
Current Server Time: 05/03/2026 06:16:07 AM EDT.