| Author | Thread |
|
|
03/08/2009 11:27:19 PM · #26 |
Guidelines are whatever looks good to you. In PSP, I usually start off with an amount of 35. That seems to be the most common setting for me to remove noise without killing detail. I'll take it up and down from there, and see what looks right in the preview window. Sometimes I'll move around the sample zones. It's really a trial and error thing.
Message edited by author 2009-03-08 23:28:10. |
|
|
|
03/08/2009 11:29:49 PM · #27 |

my take for what it's worth. I edit from the seat of my pants so can't be total with what i recall.
conv to bw with selenium tone (75% to ad a touch of color)
curves to S
selective color W-N-B
neat image ( could smoothen a bit more)
pixelimage out put sharpen.
that's all folks |
|
|
|
03/08/2009 11:31:42 PM · #28 |

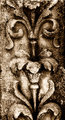
Selective Color - Picked the Blacks and darkened them by moving the black slider to the right
Selective Color - Picked the Whites and made them grey by moving the black slider to the left
Bumped the contrast
Made a duplicate layer and threw a gradient over it to darken the left side. Changed that layer to Overlay mode. From there I erased what didn't need to be darkened, mainly bringing out the fountain detail in the stone.
Desaturate
Dodged highlights
Burned shadows
Neat Image - Noise levels: Lum -35%, Chrom +10%, Noise Reduction: Lum 55%, Chrom 50%
Selectively sharpened edges of the fountain detail
|
|
|
|
03/09/2009 12:59:22 AM · #29 |
One of my favorite ways to deal with black and white is to realize that black and white will be my objective when I shoot the photo initially. IF you can realize this in advance, it will broaden your opportunities with the final image. Most digital photographers will teach you to expose to the right or slightly overexpose some photographs, but when you know you are going to want a rich high contrast black and white image, exposing to the left or underexposing the image will give you a little more latitude for contrast. Contrast is one element of digital photography that you have little or no control over when making the photo with the camera. If you are shooting film, you can buy certain films that provide higher or lower levels of contrast, but post processing is the key in either situation. When you underexpose a digital image, modifying the histogram with the levels or curves tools in Photoshop will allow you easier access to the final product you are looking for.
|
|
|
|
03/09/2009 10:18:50 AM · #30 |
I really need to find out about this Neat Image...it seems to really be the difference between what I can do with PSE7 and taking it a step further...
thanks to all and  jmsetzler thanks for your words of wisdom...I had started with an "underexposed" shot to begin with (it was taken in the shade)...I just really like B&W and have tried several things...but haven't been able to get the look I am looking for..I will pay more attention to my settings in the future...because I do like to convert alot, therefore I have taken it to our forum to ask advice and tap into there creative juices... jmsetzler thanks for your words of wisdom...I had started with an "underexposed" shot to begin with (it was taken in the shade)...I just really like B&W and have tried several things...but haven't been able to get the look I am looking for..I will pay more attention to my settings in the future...because I do like to convert alot, therefore I have taken it to our forum to ask advice and tap into there creative juices...
Thank you again...I have been given several tips that I didn't know before and they are very helpful...now if I can just get that "smoother" look...I will have to play some more... |
|
|
|
03/09/2009 10:52:50 AM · #31 |
| I think B/W is tough to do if you don't have an appropriate image to start with. If all of your tones are in color differences, the mono conversion turns it to mush. I had one I posted in a side challenge recently that I was less than thrilled with. Really liked the shapes, but there was just not much else to work with |
|
|
|
03/09/2009 10:57:27 AM · #32 |
Originally posted by jmsetzler:
One of my favorite ways to deal with black and white is to realize that black and white will be my objective when I shoot the photo initially. IF you can realize this in advance, it will broaden your opportunities with the final image. Most digital photographers will teach you to expose to the right or slightly overexpose some photographs, but when you know you are going to want a rich high contrast black and white image, exposing to the left or underexposing the image will give you a little more latitude for contrast. Contrast is one element of digital photography that you have little or no control over when making the photo with the camera. If you are shooting film, you can buy certain films that provide higher or lower levels of contrast, but post processing is the key in either situation. When you underexpose a digital image, modifying the histogram with the levels or curves tools in Photoshop will allow you easier access to the final product you are looking for. |
Welcome back! And good to know there's a reason I prefer to under rather than overexpose (when I'm paying attention.) |
|
|
|
03/09/2009 11:51:18 AM · #33 |
ok, now I am high-jacking my own thread...hmmm
Can anyone help me step through the process of doing Plug-ins...do you have any "secret" tips or is it just "follow" the directions...I want to add Quadtones and Neat Image to my PSE7...so I am hoping they work with it...any pointers would be appreciated (and as you can tell I have never done a plugin before...so be gentle and assume that I know nothing...as that would be quite accurate...) |
|
|
|
03/09/2009 12:06:03 PM · #34 |
Originally posted by Melethia:
...When you underexpose a digital image, modifying the histogram with the levels or curves tools in Photoshop will allow you easier access to the final product you are looking for. |
Welcome back! And good to know there's a reason I prefer to under rather than overexpose (when I'm paying attention.) [/quote]
Hey John, glad to see you kicking about again... even though I'm going to disagree with you! ;-)
Although I agree that under-exposing, for some images, gives a result that requires less work to get to the intended result, I will usually underexpose with digital unless doing so is the only way to get the shot (low light, moving subjects, need to keep shutter speed up...). Doing so just gives up data that you'd otherwise have available. Since I always shoot RAW, I also have "virtual" control of exposure in development.
One final caveat to the "expose to the right" theory; If there are strong highlights (e.g. point light sources) and it is important to the final image to retain as much detail into those highlights as possible, and the final intent of the image is a lower-key look (excepting the highlights) then reducing the exposure makes sense. An example would be a candle-lit candid with the candles in frame.
For the vast majority of images, I find it better to "expose to the right" and make required adjustments in development. |
|
|
|
03/09/2009 01:14:57 PM · #35 |
You will always get a cleaner image with a more 'right leaning' exposure. This is also partly due to the amount of real information (from what the camera sees) compared with the amount of error information (from the sensor just naturally).
It's not all that difficult to bring things back down a stop in most cases. I don't tend to 'lean right' more than half a stop by intent though since this can easily be overdone.
Regarding plug-ins, you will probably need to buy the program first. NI isn't very expensive.
You can still use the program as a stand-alone without buying just to see what it looks like, but after a few images, you will want to just buy it and get it streamlined as a plug-in.
Message edited by author 2009-03-09 13:15:16. |
|
|
|
03/09/2009 01:39:00 PM · #36 |
Originally posted by eschelar:
Regarding plug-ins, you will probably need to buy the program first. NI isn't very expensive.
You can still use the program as a stand-alone without buying just to see what it looks like, but after a few images, you will want to just buy it and get it streamlined as a plug-in. |
I don't mind purchasing...but I have NEVER done any plug-ins before...and I have no luck getting them "plugged-in"...I hate to resort to asking my kids...(that is demeaning....ha ha, I have even resorted to asking Connor for help and he is so very willing to help me in anyway...(oh to have a younger mind...) |
|
|
|
03/09/2009 01:49:36 PM · #37 |
Not sure about Elements, but in PSP, I install the plugin and then either copy the plugin files to the PSP plugin folder, or add the plugin folder to] he list of places where PSP looks for them.
Just did a Web search and ran across this page which explains clearly where to place the plugin files for various versions of PhotoShop, PaintShop Pro and Gimp. |
|
|
|
03/09/2009 02:06:47 PM · #38 |
Originally posted by Yo_Spiff:
Not sure about Elements, but in PSP, I install the plugin and then either copy the plugin files to the PSP plugin folder, or add the plugin folder to] he list of places where PSP looks for them.
Just did a Web search and ran across this page which explains clearly where to place the plugin files for various versions of PhotoShop, PaintShop Pro and Gimp. |
Thank You!! |
|
|
|
03/09/2009 09:01:45 PM · #39 |
Originally posted by kirbic:
Hey John, glad to see you kicking about again... even though I'm going to disagree with you! ;-)
Although I agree that under-exposing, for some images, gives a result that requires less work to get to the intended result, I will usually underexpose with digital unless doing so is the only way to get the shot (low light, moving subjects, need to keep shutter speed up...). Doing so just gives up data that you'd otherwise have available. |
It's all in preference of method. I shoot so much stuff that ends up in black and white that I have sorta developed a second nature for hitting the exposure where I want it in advance. The available data you speak of is nice to have if you want multiple results from the image. My interest in higher contrast often obliterates possible detail in the shadows that is usually available in my original. My personal interest isn't always in having all the captured detail present. Mood and 'tone' isn't always defined by visible detail... sometimes it's in what you don't see...
|
|
|
|
03/09/2009 11:06:27 PM · #40 |
| I have tried to download the Neat Image...but alas...it eludes me...cked out Yo_Spiff's tip for the download plug-ins...but it won't let me download the program...frustrating...I will try tomorrow to download the quadtones...we will see where that leads me... |
|
|
|
03/09/2009 11:17:43 PM · #41 |
Originally posted by Ja-9:
I have tried to download the Neat Image...but alas...it eludes me. |
Here is the download link for the standalone demo edition.
Really, though, I have tried the demos of Neatimage and NoiseNinja, but I have also been able to get pretty good results using the built in noise reduction in my editor. I can adjust the strength, move the sample zones, protect certain color ranges, and selectively apply the NR by using layers and selections. I find I get more out of aftermarket enhancements once I have mastered the basics of the built in tools.
Message edited by author 2009-03-09 23:22:59. |
|
|
|
03/10/2009 01:12:17 AM · #42 |
heres my try on it :)
adjust b/w with tweaked color levels and a brown tint added
adjusted levels on separate rgb channels
slight s-curve added
levels on highlights selection boosted (feathered 10 pixel)
levels on shadows selection boosted (feathered 10 pixel)
 |
|
|
|
03/10/2009 09:41:18 AM · #43 |
Originally posted by Yo_Spiff:
Originally posted by Ja-9:
I have tried to download the Neat Image...but alas...it eludes me. |
Here is the download link for the standalone demo edition.
Really, though, I have tried the demos of Neatimage and NoiseNinja, but I have also been able to get pretty good results using the built in noise reduction in my editor. I can adjust the strength, move the sample zones, protect certain color ranges, and selectively apply the NR by using layers and selections. I find I get more out of aftermarket enhancements once I have mastered the basics of the built in tools. |
I will go with your advice...and get to know what I already have in my program...hadn't thought about "layering" the NR....I will wait on the neat image...my husband doesn't want me to load it on...(we recently had a boat load of trouble with added software) can't wait for windows 7 to be released... |
|
|
|
03/10/2009 09:49:13 AM · #44 |
Sorry, I meant to get some more info on adding plugins but I had to run to class.
I don't do it very often myself. If memory serves, you can usually just tell your program where to look for plugins. I think there's instructions in the help file too. I keep my instructions to myself in a little text file, but it's on another hard drive buried somewhere I can't quite recall.
I was trying to recommend that you try the free demo first too.
FWIW, I've been using the same version of NeatImage for a few years now over a couple of OS rebuilds and I am pretty adept at wrangling with malware and I've never seen anything even the remotest bit alarming about NeatImage. I'd call them safe in a heartbeat. |
|
|
|
03/10/2009 01:36:31 PM · #45 |
ok, so here was my first attempt at the conversion to B&W

and here is my final try....

did another layer of NR, with a "little" more dodge/burn, also added a sepia filter...worked pretty well...just played around a bit....so now can you give me your "opinion" on the photo?
Thank you one and all for your input on editing this photo, I have learned quite a bit from ya'll, I will probably add the neat image later (I will just purchase it outright)...but for now I agree with Yo_Spiff that I need to learn to wk with what I have...and I did finally get the "smoother" look that I wanted (by total accident) with nice depth of tone
|
|
Home -
Challenges -
Community -
League -
Photos -
Cameras -
Lenses -
Learn -
Help -
Terms of Use -
Privacy -
Top ^
DPChallenge, and website content and design, Copyright © 2001-2026 Challenging Technologies, LLC.
All digital photo copyrights belong to the photographers and may not be used without permission.
Current Server Time: 04/28/2026 06:35:26 AM EDT.


