| Author | Thread |
|
|
05/03/2007 08:49:08 PM · #76 |
these are very very cute!
with that I think that there is a problem in your lighting. just like you said your background is a little off, but I think the lack of light in their eyes is a problem. you needed bigger shade I think
overall they are still cute though, keep it up!
|
|
|
|
05/03/2007 08:53:03 PM · #77 |
Originally posted by taterbug:
Hi all :-) Sorry for posting my homework up so late, silly impediments like work, family and weather and such :-) here it is though, not the greatest, I had a very small window of opportunity, and had to use myself as subject :-(

After actually opening up to work on it, I think I had the sun not really behind me perfectly, a little off to the right. It was kind of late in the day too, just about 6:00. And I just caught a brief moment between clouds.
edit to add: Man, do I SUK as a model! hehehe |
ohh no, I think this is perfect man! great job. you just took it a step farther, you used a shadow side and a light side. When we go over this again remind me to use this as an example
|
|
|
|
05/04/2007 02:14:52 PM · #78 |
new lesson this weekend keep your eyes open
|
|
|
|
05/04/2007 08:31:41 PM · #79 |
I am not sure if I have been offically allowed in this workgroup, but just in case, here is my result from Lesson/Set Up #1 - taken exactly as prescribed - using the enterance of my garage.
 |
|
|
|
05/05/2007 11:01:05 AM · #80 |
Originally posted by tcmartin:
I am not sure if I have been offically allowed in this workgroup, but just in case, here is my result from Lesson/Set Up #1 - taken exactly as prescribed - using the enterance of my garage.
|
I think your a tad underexposed, but the catch lights say you did the lighting portion correctly.
|
|
|
|
05/05/2007 11:03:10 AM · #81 |
I need some feedback guys, I'm debating two different lessons to post tonight, both of them need just a little touch up to be finished. either;
1. Sweet lighting (natural lighting useing sunset/sunrise time
2. Window lighting
what do you guys think you would use more? evently we will cover both but I want to teach what you guys want to learn.
|
|
|
|
05/05/2007 12:37:57 PM · #82 |
Going throuhg my favorites - portraits with natural light I find:
   
and many many more
|
|
|
|
05/05/2007 12:55:03 PM · #83 |
Originally posted by gi_joe05:
I need some feedback guys, I'm debating two different lessons to post tonight, both of them need just a little touch up to be finished. either;
1. Sweet lighting (natural lighting useing sunset/sunrise time
2. Window lighting
what do you guys think you would use more? evently we will cover both but I want to teach what you guys want to learn. |
Window lighting is a great subject to teach to those that don't have access to studios. It's often one of the most used portrait lighting techniques for ambient light photography. I'd say go with that. But, both seem like good ideas.
|
|
|
|
05/05/2007 01:18:39 PM · #84 |
Window Lighting would be my choice.
|
|
|
|
05/05/2007 01:32:01 PM · #85 |
this is a very nice example, and when we touch on this subject again this is what we will be talking about. Now that you know roughly how to do it, how do you use it. this is a great example of how. it looks like this may be a front porch or garage. it's an extreme close up with a shallow dof, and is incorporating the use of lines in the posing. very good example, thanks for sharing.
edit to add the image...duh
Message edited by author 2007-05-05 13:32:28.
|
|
|
|
05/05/2007 02:01:31 PM · #86 |
I would like to mention that if you need any help, advice, critiques, do not hesitate to contact me.
Thank you |
|
|
|
05/05/2007 02:28:42 PM · #87 |
|
I would like window lighting!!!! |
|
|
|
05/05/2007 04:18:25 PM · #88 |
I'm thinking we will go with window light. I have a client coming in at 5, and then we are having a bbq tonight with the sweet new grill! After everyone has gone I'll try to find to post things, if not they will be up by sunday night.
|
|
|
|
05/05/2007 11:00:36 PM · #89 |
Originally posted by fotomann_forever:
Originally posted by gi_joe05:
I need some feedback guys, I'm debating two different lessons to post tonight, both of them need just a little touch up to be finished. either;
1. Sweet lighting (natural lighting useing sunset/sunrise time
2. Window lighting
what do you guys think you would use more? evently we will cover both but I want to teach what you guys want to learn. |
Window lighting is a great subject to teach to those that don't have access to studios. It's often one of the most used portrait lighting techniques for ambient light photography. I'd say go with that. But, both seem like good ideas. |
And window lighting carries into the studio. Softboxes function the same way :)
|
|
|
|
05/06/2007 01:01:34 PM · #90 |
Ok so here it goes,
Window lighting!
This is a very useful and very easy way of lighting. Building on what we already know there isn’t going to be much to teach here. We learned last week about subtractive lighting, so now all we need to do is put a window over our opening. Think of the roof of the house as your overhang. The tricky part of window light isn’t creating direction it’s control the ratio of shadow to highlight. Your looking for the highlights to be one stop brighter then the shadows are, that way you can still see that there are shadows but they aren’t so dark that there is no detail in them. How do you control this? That is also easly done, you just need a reflector to bounce light back into the shadows, this can be many things, you can go and buy a reflector (white is best for this) or you can use a piece of white poster board, a mirror (though this is tougher), really anything that reflects light. In a pinch I have use a white t shirt on a hanger before, though I wouldn’t suggest that as an all the time thing. Keeping in custom with last week here is a little diagram that may help.
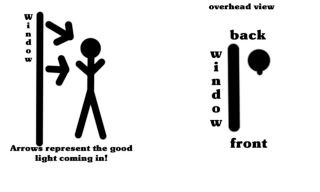
As you can see it’s basicly the same thing, only this time you want them to more of a parallel to the window. The distance you are from the window will vary too, it all depends on how strong the light is coming through the window, the closer you are to the window the stronger the light. You can put them perfectly parallel but that would make a split lighting form on their face, that is only half of their face will be In light the other half in shadow. This is good for some face though. The trick to this is finding good placement of the subject to the window. The farther back in the light from the window they are the more light will wrap around there face. The farther forward they are the less light will wrap around there face. To start of with put them farther back in the light cast from the window, it is much easier to control the ratio here. Just like with subtractive lighting, you want your background to be darker then your subject. There is something to be said for the color of the room, a white wall will bounce more light then a black one, and the color of the room will also reflect in the light, so if you are in a red room, the light is going to be red. This can work to your advantage or your disadvantage depending on the color. I think this is more fun lighting then subtractive lighting simply because your subject can move a bit more and we all know with shooting kids they don’t like to sit still.
This should be pretty easy if you did well last week, and I think with everyone who posted they did well. It’s great to see you guys so eager to learn. Just like last week post your pictures here so we can talk about them. If you have any question please post them here so all can learn.
edit for image size, it was huge the first go around
Message edited by author 2007-05-06 13:03:31.
|
|
|
|
05/06/2007 05:15:31 PM · #91 |
bump to make sure everyone sees the new assignment
|
|
|
|
05/07/2007 02:09:11 AM · #92 |
Ok, I understand this, but I have a couple of questions, or points of discussion on this technique. Is there any difference with the size of the window used, for example a small to medium kitchen type window vs. a sliding glass door or full panel living room window? (other than the obvious, that there is more light in the larger one) Also, what about curtains? Obviously, I'm not referring to heavy, dark ones (they would just block the light), but say if you have thin, light, shears, would you want them, or remove or pull back so you have just the light?
But now after putting my thoughts to writing, I think I already can figure the answer :-) This would be just adding an element to the technique (a diffuser) that probably will come in later topics? So ultimately, it just depends on the lighting, or shot you wish to go for? |
|
|
|
05/07/2007 03:18:28 AM · #93 |
Originally posted by taterbug:
Ok, I understand this, but I have a couple of questions, or points of discussion on this technique. Is there any difference with the size of the window used, for example a small to medium kitchen type window vs. a sliding glass door or full panel living room window? (other than the obvious, that there is more light in the larger one) Also, what about curtains? Obviously, I'm not referring to heavy, dark ones (they would just block the light), but say if you have thin, light, shears, would you want them, or remove or pull back so you have just the light?
But now after putting my thoughts to writing, I think I already can figure the answer :-) This would be just adding an element to the technique (a diffuser) that probably will come in later topics? So ultimately, it just depends on the lighting, or shot you wish to go for? |
Smaller windows are easier to focus with, whereas bigger windows will give you more coverage. Here's an example of a big window made small.

And here's a very big window (ugh really old shot).

|
|
|
|
05/07/2007 03:54:17 AM · #94 |
|
Good examples! Thanks. I really like the lighting you've achieved on that first one. |
|
|
|
05/07/2007 05:10:25 PM · #95 |
Originally posted by taterbug:
Ok, I understand this, but I have a couple of questions, or points of discussion on this technique. Is there any difference with the size of the window used, for example a small to medium kitchen type window vs. a sliding glass door or full panel living room window? (other than the obvious, that there is more light in the larger one) Also, what about curtains? Obviously, I'm not referring to heavy, dark ones (they would just block the light), but say if you have thin, light, shears, would you want them, or remove or pull back so you have just the light?
But now after putting my thoughts to writing, I think I already can figure the answer :-) This would be just adding an element to the technique (a diffuser) that probably will come in later topics? So ultimately, it just depends on the lighting, or shot you wish to go for? |
smaller windows also give a different quality of light, it's a harsher more specular light, creating harsher shadows. that could be good or bad, just depends on what your looking for. the curtians are also a good point. as long as light passes through them they will just act as a diffusion screen, making the lighting softer and the help blend the shadows and highlights. it will also make the light darker so don't skimp on the tripod.
|
|
|
|
05/07/2007 09:55:18 PM · #96 |
Lesson 2: window light

Looking forward to comments. |
|
|
|
05/08/2007 12:14:12 AM · #97 |
This one is better suited for this topic than for the first one.
 |
|
|
|
05/09/2007 10:40:48 AM · #98 |
Originally posted by tcmartin:
Lesson 2: window light
Looking forward to comments. |
this is a great start, I think you missed it a little bit, there is great light on one side of her face but the shadows are a touch to dark. you need to use something to reflect light back into her face. Also, did you use a tripod? there looks to be a bit of motion blur in the image. The catch lights are right though, and the poseing as far as postion to the window looks great. you are almost there, keep it up
|
|
|
|
05/09/2007 11:39:34 AM · #99 |
Originally posted by gi_joe05:
Originally posted by tcmartin:
Lesson 2: window light
Looking forward to comments. |
this is a great start, I think you missed it a little bit, there is great light on one side of her face but the shadows are a touch to dark. you need to use something to reflect light back into her face. Also, did you use a tripod? there looks to be a bit of motion blur in the image. The catch lights are right though, and the poseing as far as postion to the window looks great. you are almost there, keep it up |
Thanks very much for commenting. I did use a reflector. In the last lesson I was too dark so on this one I used gold instead of white to get more light reflected - in fact you can see a small indication of that on the dark cheek. I am either afraid to use more light or I am just drawn to darker images - this I must explore so thanks. I did use a tripod and normally would sharpen a little, but the model is very concerned about wrinkles and I must take care of her or I will have to shoot myself in the rest of the lessons.
This workshop is great and I really appreciate the feedback. Thanks!
|
|
|
|
05/09/2007 11:55:46 AM · #100 |
|
Home -
Challenges -
Community -
League -
Photos -
Cameras -
Lenses -
Learn -
Help -
Terms of Use -
Privacy -
Top ^
DPChallenge, and website content and design, Copyright © 2001-2026 Challenging Technologies, LLC.
All digital photo copyrights belong to the photographers and may not be used without permission.
Current Server Time: 07/30/2026 04:56:55 PM EDT.


