| Author | Thread |
|
|
01/10/2013 11:54:57 PM · #51 |
Originally posted by myqyl:
not sure how you pulled any of the orange from the sky... I have the RAW and it seemed to be completely burned out. |
I think he added it in.
|
|
|
|
01/11/2013 08:47:38 AM · #52 |
Originally posted by myqyl:
Originally posted by mike_311:
hope you dont mind, i took a quick edit at it. there is actually quite a bit of detail in the shadows.
 |
Thanks! not sure how you pulled any of the orange from the sky... I have the RAW and it seemed to be completely burned out. I like what you've done with it, but the street detail wasn't what I was looking for. I was actually thinking of darking the shadows in the street. No offense to any New Yorkers, but this city never makes me feel very bright and sunny... For NYC I've always seen the shadows more than the detail (if that makes any sense).
Thanks for the edit! |
it was, i added it back it in. |
|
|
|
01/11/2013 11:42:31 AM · #53 |
Thank you all very much. I used the good General's suggestion about bracketing and got something much closer to what I envisoned this morning... The actual sky wasn't as nice as yesterday, but the sky in the image was a vast improvement.
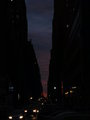
Tonight when i get to the hotel I'm going to play with that layer / mask stuff. Now I think I have a better starting point. I wish I had full tripod with me so I could have tried some of the HDR or Layers from different exposures, but the idea of setting up my minipod in the middle of 35th street sound just a little too dangerous for me to try.
Again, Thanks one and all! |
|
|
|
01/11/2013 12:23:33 PM · #54 |
If you have a RAW, you can try a false HDR. 3 conversions to TIF at different exposure levels, then do an HDR merge. I find I can get more dynamic range out of an image this way than from just using the highlight and shadow sliders.
|
|
|
|
01/11/2013 12:53:19 PM · #55 |
A quick edit on your new shot. A very dark scene, but just to see what I could pull from it.

-Noise reduction
-Some modest tonemapping using both the built-in function of PaintShop Pro and some
Topaz adjust. (I find a little of several methods to be more effective than a larger dose of one)
-Selective editing of some foreground elements to make them stand out.
-Increased contrast and saturation.
Message edited by author 2013-01-11 12:54:04.
|
|
|
|
01/11/2013 01:28:39 PM · #56 |
Originally posted by Yo_Spiff:
A quick edit on your new shot. A very dark scene, but just to see what I could pull from it.
-Noise reduction
-Some modest tonemapping using both the built-in function of PaintShop Pro and some
Topaz adjust. (I find a little of several methods to be more effective than a larger dose of one)
-Selective editing of some foreground elements to make them stand out.
-Increased contrast and saturation. |
WoW! I love that sky. I know I'm likely the only one that would want the foreground to stay mostly shadow, but I'd love to put that sky above it. I'm guessing I can do that with Layers? That's the sky I had hoped to see when I left the hotel this morning. |
|
|
|
01/11/2013 01:55:49 PM · #57 |
Originally posted by myqyl:
I'm guessing I can do that with Layers? |
Yes, layers and masking will allow you do adjust the parts of the image that need adjustment, while leaving the rest alone.
|
|
|
|
01/11/2013 02:42:06 PM · #58 |
Remember that layers and masking can refer to two quite different things:
-stacking layers containing pixels (usually at different exposures) and then masking/erasing selectively to allow only certain parts to show.
-adjustment layers with an associated mask, which allow you to make adjustments (Curves, Levels, etc.) to only certain parts of the image, but don't contain any pixels themselves.
Message edited by author 2013-01-11 14:42:48. |
|
|
|
01/11/2013 02:57:05 PM · #59 |
Originally posted by GeneralE:
Remember that layers and masking can refer to two quite different things:
-stacking layers containing pixels (usually at different exposures) and then masking/erasing selectively to allow only certain parts to show.
-adjustment layers with an associated mask, which allow you to make adjustments (Curves, Levels, etc.) to only certain parts of the image, but don't contain any pixels themselves. |
Oh my... I predict another late night of youtubing... |
|
|
|
01/11/2013 03:12:58 PM · #60 |
Originally posted by GeneralE:
Remember that layers and masking can refer to two quite different things: |
Good point, Paul. I was referring to layers of pixels. PSP calls them raster layers. Not sure what Photochop call them.
|
|
|
|
01/12/2013 02:02:47 AM · #61 |
Originally posted by myqyl:
Originally posted by Venser:
Originally posted by myqyl:
I guess this should really move to the "Help Me!" forum, but I have no clue how to do that so I'll just keep going here...
I took this today when i saw an absolutely fantastic orange sky. The image gave me a pale, dingy white sheet where that fantastic sky was...
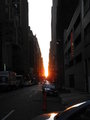
I know that I'm letting in too much light here... What I don't know is if the best solution is to close up the aperature (current f/3.5) or speed up the shutter (current 1/160)... And how much less light I need...
Opinions? |
What are you trying to achieve? Knowing your goal is extremely important in giving you feedback. |
Opps, good point... I wanted the Orange sky with a dark city street at least still slightly visible... Kind of a "It's sunrise up here, but not in this artifical valley" kinda thing. |
I would like to give it a try for the simplest explanation as possible for the questions above. More about metering. I hope anyone could correct me if any wrong and bad grammar.
Shot against the sun. How I measure and metering the scene?
In Aperture priority mode, if spot metering was to measure the scene (auto ISO off); there will be wide ranges of shutter speeds reading spreading almost similarly like below image
(visualization not actual)

The brightest part 1/2000s and the darkest part is 1/15s.
So what is the shutter speed for correct exposure?
Which auto metering work best Matrix or Center weighted?
Will the auto metering good for poor lighting scene or too high of lighting ratio?
This is where I normally go into Spot metering, Manual mode and how I do the calculation. From the above scene, I’ll choose 3 + 1 options how to capture it.
1. Correct exposure for street and building.
a) 1/125s + 1/15s = 1/140s divide by 2 = 1/70s. I'll choose 1/60s and shot on tripod.
b) 1/125s + 1/30s = 1/155s divide by 2 = approx: 1/80s. Much safer shot hand held.
The skies reading between 1/2000s to 1/500s will all burn without detail. If I want detail of sky at the same time, read option 4.
2. If I want the beautiful sunrise sky.
1/2000s + 1/500s = 1/2500s divide by 2 = 1/1250s.
Those vehicles highlight with reading around 1/750s +- 1-2 stops will all be clearly visible. The rest are silhouette and dark. I guess this is what TS want.
3. Shot with camera on tripod using bracketing shots (one of my favorite). Approximate the shots of 1/2000s, 1/250s and 1/15s and blended it later in PP. (refer to Yo spiff comments)
4. Wait for the sweetest light (minimal/basic editing). It's only happen few minutes in a day when the above atmosphere glow almost balances with the ambient light of the street/city/building. The sky reading will be around the reading of lighted streets and it buildings.
So if the capture scene without any cloud details, no way to get it back unless expect editing apply. Hope this help.
|
|
|
|
01/12/2013 09:33:09 AM · #62 |
Thank you Alex. Seeing the math is very helpful to someone like me. It's very much the world I live (and think) in...
I think perhaps I should invest in a light meter. It seems obvious to me (now that everyone has explained it to me) that my biggest hurdle is not post processing but PRE processing. I think I understand light much better now than I did at the start of this thread. I'm going to pass on the book I originally asked about and spend the cash on a light meter.
Thank you Alex and Thank you everyone!
|
|
|
|
01/12/2013 10:16:18 AM · #63 |
Good explanation on the metering. I don't do such calculations myself. I just kind of wing it based on experience.
|
|
|
|
01/12/2013 12:19:09 PM · #64 |
Originally posted by myqyl:
Thank you Alex. Seeing the math is very helpful to someone like me. It's very much the world I live (and think) in...
I think perhaps I should invest in a light meter. It seems obvious to me (now that everyone has explained it to me) that my biggest hurdle is not post processing but PRE processing. I think I understand light much better now than I did at the start of this thread. I'm going to pass on the book I originally asked about and spend the cash on a light meter.
Thank you Alex and Thank you everyone! |
I actually think experience would be a much better teacher than a light meter. I found one becomes too dependent on light meters and too hesitant to take risks. Also sometimes what seems to be the perfect exposure on paper doesn't always work out in practice.
I once had to take pictures of moving horses which were backlit by the sun and for each frame of a horse's jump the light changed so I was frantically changing my settings every second literally. That afternoon taught me so much more then any book could have so I would suggest learning a few bits online and testing those techniques and then coming back for feedback. |
|
|
|
01/12/2013 01:11:47 PM · #65 |
Your camera already has a light meter in it -- that's how those (estimated) shutter-speed values in the example were derived. If you put it in spot-metering mode and set it for aperture priority you can get the same info as from a light meter.
The exception would be if you are using an incident ight meter, which requires you to place the meter next to the subject and measure the light falling on it (not reflected from it, as your camera or a regular meter does), but this is not really practical for landscape shots like this anyway; more suitable for studio work. |
|
|
|
01/12/2013 03:00:46 PM · #66 |
Way cool!
I won't buy the book OR the meter...
I'll buy a nice lunch and a 6 pack of Guniess. |
|
|
|
01/12/2013 03:23:56 PM · #67 |
Originally posted by GeneralE:
Your camera already has a light meter in it -- that's how those (estimated) shutter-speed values in the example were derived. If you put it in spot-metering mode and set it for aperture priority you can get the same info as from a light meter.
The exception would be if you are using an incident ight meter, which requires you to place the meter next to the subject and measure the light falling on it (not reflected from it, as your camera or a regular meter does), but this is not really practical for landscape shots like this anyway; more suitable for studio work. |
Actually, incident light meters can be VERY useful for landscape photography. Since the reflected-light meter (the kind we have in the camera) reads the light reflected from some or all of the area in the frame and returns a "reading" based on the assumption that the metered tonalities average out to zone 5, it can produce very inaccurate results when, for example, you're metering a lot of sky, or snow, or dark, featureless rock, whatever's anomalous. Using the reflected meter, the only solution is to spot meter as much as your gear allows, and then mentally "place" the readings on their appropriate zones (if you're metering an area a zone darker than zone 5 would be, you have to subtract a stop in exposure).
The incident light meter, on the other hand, just tells you very simply what's in the intensity of the illumination falling on the scene, and gives you a reading that will "place" every tonality on its correct zone, in principle. Of course, this won't work if you're standing in the shade shooting a sunlit scene, so some intelligence is required, but by and large, it's the easiest way to get consistent exposures, especially outdoors in fast action.
Think about it: the light on the meadow is not going to change, there's no clouds around. You're shooting birds. if you use half-press meter-and-focus, then you'll get different readings if the bird's crossing sky, trees, grass, or water, the backgrounds, which are dominant, are of different tonalities. But if you set the camera on "manual" and dial in the exposure suggested by the incident meter, you don't have to worry anymore: focus and framing become your only concerns.
It's important to realize that the reflected meters in our cameras do this, that they are calibrated on the assumption that they are metering a zone 5, medium gray tonality. So if you set your dSLR up so the frame's filled with a white wall, the result will be underexposure, and a gray wall. Do the same thing with a BLACK wall, and you get overexposure, a gray wall. Set up so you're seeing half white and half black, and the result will be spot on, showing both white and black, because the correct exposure is the same for both as long as the lighting is constant.
I can go on at somewhat greater length if anyone wants me to, but...
Message edited by author 2013-01-12 15:24:45. |
|
|
|
01/12/2013 03:47:18 PM · #68 |
Originally posted by myqyl:
Way cool!
I won't buy the book OR the meter...
I'll buy a nice lunch and a 6 pack of Guniess. |
Always a good investment.
I play an exposure guessing game. To train your eye, before you shoot, try to guess. You find something that might be worth a frame, you figure out what you are going to have in and out of the frame. Now guess what settings the camera will give you, based on the light. It is a good way to train your eye, and by playing the guessing game, you will not just plop your camera up to your eye and use the settings that you used on your last image.
Once you have the first image, chimp, chimp chimp. I like the histogram display since I need to know how much is blocked up or blown out rather than how it looked. Based on the readings the camera guessed at, decide if you want it lighter or darker, or some of both and plan an HDR. Sure the proud masters of the form claim they do not chimp, but that is only because they have shot so many images their eye is trained already. |
|
|
|
01/12/2013 03:58:27 PM · #69 |
Originally posted by Bear_Music:
Actually, incident light meters can be VERY useful for landscape photography. |
Hmmm ... right ....
Seems like you could accomplish the same by laying out a piece of 18% gray cardboard and spot-metering off that, somewhat akin to setting a custom White Balance (can be done at the same time). |
|
|
|
01/12/2013 04:40:00 PM · #70 |
At first, when I was learning, I used a light meter. I think it might be part of the learning process. Books are good, too, in their way. Also, a mentor is good, if you are lucky to get one. Nothing beats taking a lot of pictures, IMO.
I use the camera as my light meter by setting it on spot-metering. A few seconds spent testing the light by watching the display change as I move the spot-metering around gives me a lot of information about the scene. When I find something I like, I set the exposure lock & then compose the shot. |
|
Home -
Challenges -
Community -
League -
Photos -
Cameras -
Lenses -
Learn -
Help -
Terms of Use -
Privacy -
Top ^
DPChallenge, and website content and design, Copyright © 2001-2026 Challenging Technologies, LLC.
All digital photo copyrights belong to the photographers and may not be used without permission.
Current Server Time: 07/30/2026 04:43:19 AM EDT.


