| Author | Thread |
|
|
07/03/2010 07:26:25 PM · #76 |
|
I think he is referring to the Ansel Adams zones system, which is something I have not read up on myself. |
|
|
|
07/03/2010 07:45:44 PM · #77 |
Originally posted by Yo_Spiff:
I think he is referring to the Ansel Adams zones system, which is something I have not read up on myself. |
That was my impression. But Ansel's system (I thought) dealt with black and white. Now I'm curious... |
|
|
|
07/03/2010 07:55:32 PM · #78 |
Yeah sorry, I meant to go into more detail, but my daughter came up and well...
Yes, I'm referring to Ansel Adam's Zone system. It breaks the luminosity into different sections from pure black, to pure white. If you ever noticed the grayscale bar on the bottom during voting, that is essentially what the zone system is.
There have been modifications over time, I'm referring to a 10 segment zone system here. For example, 0 is pure black, no detail or texture. Zone 4 is average dark foliage, zone 6 is caucasian skin, zone 8 is textured snow, zone 10 is pure white.
If you take an image an look at the luminosity, you'll see how the colors are represented with shades of gray. These shades correspond to the zone system.
Essentially, photos with contrast exhibit portions that span the different zones.
I'd go into more detail, but time right now is short, and I'm sure  Bear_Music could talk for hours on the topic. :) Bear_Music could talk for hours on the topic. :) |
|
|
|
07/03/2010 09:00:49 PM · #79 |
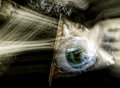
This has been a very inspiring thread for me so far, trying to make my motion-blurred forks more interesting. I had the inspiration of adding another piece of something to the shot & found the eye in my jewelry box. I placed them side by side on black matte & moved the camera between them.
Message edited by author 2010-07-04 12:46:18. |
|
|
|
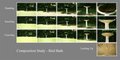
07/03/2010 11:44:36 PM · #80 |
Here is an exercise to get better acquainted with composition and to learn to see what the lens sees.
Pick and object.
Pick a focal length (best to try different ones) and set/fix the aperture.
Start at a distance that puts the object in the center with a lot of empty space. Snap.
Walk 5 paces, refocus, snap.
Keep doing it until you can no longer focus.
Do that exercise, standing, kneeling, and crawling. Then, take one last from some weird angle, close to the object.
Here is an example of something I did today. The photos aren't pretty, they aren't supposed to be. It so happened that the subject was in shade and surrounded by bright sun. Oh well. The purpose is for composition. In fact, I shot small jpg for all of these.
I used a fixed focal length lens, but if you have a zoom or additional lenses, its good to do this test using a variety of focal lengths.
Then, pick another object, do it again.
 |
|
|
|
07/03/2010 11:51:45 PM · #81 |
I supposed since I signed up to do this... I should do something... just dont know what to do... Steve is my only mentor and hes so busy (besides I bother him like crazy) and well I havent taken much interesting photos cept for the fireworks last night... but they have their own set of unfixable issues. lol
|
|
|
|
07/04/2010 12:06:07 AM · #82 |
|
Why not just find something close and reproducible. Say, the main drag in your town? We did have a main street challenge last year. |
|
|
|
07/04/2010 12:07:08 AM · #83 |
Originally posted by PGerst:
Here is an exercise to get better acquainted with composition and to learn to see what the lens sees.
|
Excellent idea! |
|
|
|
07/04/2010 12:41:49 AM · #84 |
Originally posted by PGerst:
Also equally as important is understanding how different colors correspond to the different zones. |
Another important thing to remember is that depending upon which zone you place a given colored object within, it will appear differently. It's luminosity will effect the perceived hue. So, yellow, for instance, will look more like ochre when you underexpose, while orange will appear brick red and purple violet (under the same underexposed conditions).
As a general note, I would say that Michael Freeman's Perfect Exposure is a worthwhile read for beginners on simplifying the zone approach and the basic idea that it embodies. It's also got some good general information, as well. But really, the book attempts to run through the dichotomy key that you mentally run through when you assess a scene. |
|
|
|
07/04/2010 11:09:04 PM · #85 |
Hmm....
I looked at this photo tonight and the first thing that I noticed was how they were holding the camera, specifically the location of the shutter button, one on top one on bottom.
Then, I saw Bear_Music's comment.
Now, I've always held it with the shutter button on top, but, when I placed the camera on a flash bracket, I had to shoot with the button on the bottom. It was quite difficult to get used to. Certainly there is increased stability from holding it on the top.
So, question:
Does anyone hold it on the bottom (not using a bracket) ?
|
|
|
|
07/04/2010 11:14:02 PM · #86 |
|
In a portrait mode, I usually hold it from the top, but occasionally will hold it from the bottom if the angle I am shooting at makes that more convenient. |
|
|
|
07/05/2010 02:07:07 AM · #87 |
Caree posted quite a useful thread yesterday. Some good books there. I personally think honing composition skills to be the most useful thing to learn.
Photography Books Thread
|
|
|
|
07/05/2010 03:03:57 PM · #88 |
I was going to put this on the photo page, but I figured this would serve more since it would be up front.
The other day, I posted this: as an example in composition study.
I wanted to comment on a recent post:
"...but I think the point would be better illustrated with a 'pretty photo' ..."
To clarify, this exercise should not be performed once, or twice, but many times, using many different objects. This can be expanded by holding the camera, portrait versus landscape.
The point of this exercise is to learn to "see" what the lens "sees", to explore angles and directions not normally visited. Something that is not normally "pretty", or interesting, can BECOME interesting depending on how the subject is approached.
To me, in this example, the two most interesting photos are Crawling #2 (from left) and Kneeling #5. The birdbath itself seems pretty uninteresting, but has become more interesting by approaching it differently.
The worst thing you could do in this exercise is pre-conceive what you want to show. This exercise should be unbiased. As you do this more, you'll know automatically where the interesting viewpoints are.
Message edited by author 2010-07-05 15:04:34. |
|
|
|
07/05/2010 03:07:57 PM · #89 |
After a few PMs with my mentors, I finally have somethings to post here. Both Sarah and Paul have been very patient and descriptive with their attempts to improve my original edits for at least 2 images. Sarah provided her version of editing on one of my past entries, which I am posting here. Paul will help with another soon.
Prash0001
Original: 
My edit and entry: 
 salmiakki's edit: salmiakki's edit: 
Thank you Sarah and Paul for your help till date. This is a very positive experience for me. |
|
|
|
07/05/2010 03:17:41 PM · #90 |
Originally posted by PGerst:
The birdbath itself seems pretty uninteresting, but has become more interesting by approaching it differently. |
Exactly. The straight-on perspective from a standing height is the one everybody is familiar with already. Getting away from that helps a lot. Interesting that you chose a birdbath, as one of my high scoring entries was a birdbath, and I approached it in yet another manner that you didn't illustrate.

|
|
|
|
07/05/2010 03:22:57 PM · #91 |
I dunno. I agree with you in principal, but I really think each of those 16 shots are pretty... uninteresting. I can see potential for the last two distances.
There is this to consider -- just because your lens will see things differently to you doesn't mean it can ever be interesting. But also because it does see differently to you doesn't mean it can't ever be interesting either.
Bottom line - take as many photos as possible :)
I did miss the point that it was an exercise, though. To... train your eye to be the camera.
Or did I miss it again?
Edit: Yo_Spiff, that's a very interesting shot. Obviously PGerst didn't go close enough to the bird bath in his study :)
Message edited by author 2010-07-05 15:25:54.
|
|
|
|
07/05/2010 03:23:16 PM · #92 |
Very cool. I actually have one from underneath:

Didn't know the critter was there.
Your shot is quite spectacular. Amazing what a shadow does!
Originally posted by Yo_Spiff:
Originally posted by PGerst:
The birdbath itself seems pretty uninteresting, but has become more interesting by approaching it differently. |
Exactly. The straight-on perspective from a standing height is the one everybody is familiar with already. Getting away from that helps a lot. Interesting that you chose a birdbath, as one of my high scoring entries was a birdbath, and I approached it in yet another manner that you didn't illustrate.
|
|
|
|
|
07/05/2010 03:25:12 PM · #93 |
Heh heh...sorta. You're reading way too much into it. Just try it out. :)
Originally posted by NiallOTuama:
I did miss the point that it was an exercise, though. To... train your eye to be the camera.
Or did I miss it again? |
|
|
|
|
07/05/2010 03:29:07 PM · #94 |
Originally posted by PGerst:
Heh heh...sorta. You're reading way too much into it. Just try it out. :) |
Gah! I don't get it! :)
I'll try it when I can.
|
|
|
|
07/05/2010 03:38:49 PM · #95 |
The whole objective of the exercise is to get you to approach objects from different angles and to step away from the "snapshot" pose.
For example, most adults are standing up when they take photos of their children. That is by far the worst way to photograph any child.
The best way, is to be at their level. This provides a composition that it more flattering to the child because you are now looking at their level, through their eyes.
In any gathering, I'm usually the only one sitting on the ground. :)
Originally posted by NiallOTuama:
Gah! I don't get it! :)
I'll try it when I can. |
|
|
|
|
07/05/2010 03:43:22 PM · #96 |
Here is a perfect example for what I'm talking about:
I wanted to capture the "Carving of the Turkey". But when I saw the dog eyeing the meat, I couldn't resist this shot:

Most people would have taken this from the side or from far away. But, I got right behind the dog and shot from an angle that makes it more interesting. You have to admit, this photo is quite funny. |
|
|
|
07/05/2010 03:48:12 PM · #97 |
So it is to train you.
You took one shot there. Not the array you talked about before. And the subject probably wouldn't've allowed you take as many as you did with the bath (great shot, by the way. You captured what you wanted excellently).
Edit: I'll try it. Don't worry.
Message edited by author 2010-07-05 15:51:49.
|
|
|
|
07/05/2010 03:55:50 PM · #98 |
Here is one other example. One that shows two different angles. Technically, I took these at the wrong time of day, but there was nothing I could do about it.
Check the two photos out. The left is straight on, the second is from a lower angle, looking up with the sun illuminating the back.
 
Personally, I like the one on the right better. In fact, it "means" more to the couple since they met at UCONN, and the mascot of the school is the statue of the Husky dog. In a way, the dog is looking over them. :) |
|
|
|
07/05/2010 03:58:33 PM · #99 |
Originally posted by PGerst:
Here is one other example. One that shows two different angles. Technically, I took these at the wrong time of day, but there was nothing I could do about it.
Check the two photos out. The left is straight on, the second is from a lower angle, looking up with the sun illuminating the back.
Personally, I like the one on the right better. In fact, it "means" more to the couple since they met at UCONN, and the mascot of the school is the statue of the Husky dog. In a way, the dog is looking over them. :) |
The more important piece, even more than the angle of the shot, is that they are interacting in the one on the right. That is why it is a better shot IMO. |
|
|
|
07/05/2010 04:28:42 PM · #100 |
Now I know what all I have been doing wrong, or missing:-)
Thank you Sarah and Paul for your help till date. This is a very positive experience for me. |
|
Home -
Challenges -
Community -
League -
Photos -
Cameras -
Lenses -
Learn -
Help -
Terms of Use -
Privacy -
Top ^
DPChallenge, and website content and design, Copyright © 2001-2026 Challenging Technologies, LLC.
All digital photo copyrights belong to the photographers and may not be used without permission.
Current Server Time: 07/26/2026 11:03:03 PM EDT.


