| Author | Thread |
|
|
04/09/2008 10:14:38 AM · #1 |
I'm not frustrated or pissed or anything and I'm going to continue taking pics and entering challenges, but looking at my scores is getting pretty boring. My average score literally floats just above a 5.0. It's 5.0202 right now. There is only a .4 difference in my scores in 8 challenges. So here are the reasons I think I'm at a stand still.
Only one lens- I talked to my boss and he's agreed to buy me another one (a 50mm 1.8). I had to tell him I would get better shots of the campus to put on the campus website. :) Without this job, I wouldn't have a camera or computer at all.
Minimum experience in lighting- although I can grasp the main concepts and know that the only way to learn is to experiment.
PP- apparently I over-saturate even though I avoid the saturate slider like the plague. Am I doing something wrong with curves possibly?
Can someone look at my thumbnails and give me an over-all opinion of what I'm doing wrong? Or give me a clue as to why my last entry got a 5.2 when I was so sure I'd at least get a personal best (a 5.4) LOL. |
|
|
|
04/09/2008 10:28:03 AM · #2 |
I think your latest shot suffers from over contrast, which in turn boosts the colours a lot, which is to do with curves yes. Try being less dramatic with them, subtle changes will keep a more natural looking image and keep more detail. Also you cropped in a lot which means the overall image lacks clarity. To try and get some of that back in highly cropped shots you can try applying Gaussian blur and then fading it back, followed by a sharpen at about 0.3 radius.
|
|
|
|
04/09/2008 10:31:18 AM · #3 |
I'm not really good either, but here's what I think. PP is definitely an issue. I assume you use photoshop cs2 or something since you mentioned curves. And I think you may be a little too aggressive with the S curve. try reducing the opacity after applying the curve. Or,just try levels, since levels is similar to curves but sort or easier. As for lighting and whatnot, yah you just gotta experiment around.
I aslo suggest experimenting with the Unsharp Mask filter, but don't overdo it lol. Here are some settings I suggest: at full resolution, 200%, 1 pixel, threshold 0. 50 pixels, 10 %, threshold 0. After resizing for dpc, try 0.2 pixels, 150%, threshold 0. These aren't absolute, just something you could try and play around with.
anyhoo hope this helped.
Message edited by author 2008-04-09 10:36:09. |
|
|
|
04/09/2008 10:33:08 AM · #4 |
| What are your in camera settings? You do seem to have a lot of over-saturated and over-sharpened images...so I'm wondering what you're starting with. |
|
|
|
04/09/2008 10:38:17 AM · #5 |
| Also keep in mind monitors can vary in color and contrast, Does it look over saturated on your screen or is that just from feed back from others. Try to look at your shots on other computer screens and or calibrate your screen if possible. |
|
|
|
04/09/2008 10:38:28 AM · #6 |
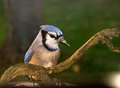
| Left some feedback on your bluejay entry. Hope it helps. |
|
|
|
04/09/2008 10:42:00 AM · #7 |
Originally posted by Konador:
To try and get some of that back in highly cropped shots you can try applying Gaussian blur and then fading it back, followed by a sharpen at about 0.3 radius. |
I'd like to try this technique, however, I understood all of it except the part about "fading it back". Could you explain this some? |
|
|
|
04/09/2008 10:42:26 AM · #8 |
| Left two cents on your family dog building pic. Don't spend them all in one place. :) |
|
|
|
04/09/2008 10:53:00 AM · #9 |
Lots to soak in here. On slightly busy at work so I'll get through it.
Originally posted by KaDi:
What are your in camera settings? You do seem to have a lot of over-saturated and over-sharpened images...so I'm wondering what you're starting with. |
I do sometimes, well more often than not, set it on vibrant colors. Hate to think something so small could be my problem all along.
Thanks  wanjun for your suggestions. I'll check it out. wanjun for your suggestions. I'll check it out.
Usually, with curves, I use the white dropper on my whitest white, the black i double click and make slightly lighter before using it. the gray, well, i'm not clear on that... occasionally I'll play with it. Then I do a very slight S-curve. Sometimes I remember to play with the opacity after that. It's definitely a good idea.
HMMM... i need a curve tutorial, don't I?
|
|
|
|
04/09/2008 10:55:03 AM · #10 |
Originally posted by Konador:
I think your latest shot suffers from over contrast, which in turn boosts the colours a lot, which is to do with curves yes. Try being less dramatic with them, subtle changes will keep a more natural looking image and keep more detail. Also you cropped in a lot which means the overall image lacks clarity. To try and get some of that back in highly cropped shots you can try applying Gaussian blur and then fading it back, followed by a sharpen at about 0.3 radius. |
Great advice. Will try... |
|
|
|
04/09/2008 10:58:09 AM · #11 |
|
|
|
04/09/2008 10:58:53 AM · #12 |
Originally posted by cynthiann:
Originally posted by KaDi:
What are your in camera settings? You do seem to have a lot of over-saturated and over-sharpened images...so I'm wondering what you're starting with. |
I do sometimes, well more often than not, set it on vibrant colors. Hate to think something so small could be my problem all along. |
It could be the problem. Certainly it would contribute. When you let the in-camera software process your photos like that you're giving up a lot of control. I shoot in fine jpeg (not RAW as I probably should) but have all the bells and whistles turned off giving me a lot of latitude in post-processing. |
|
|
|
04/09/2008 10:59:20 AM · #13 |
Originally posted by yospiff:
Originally posted by Konador:
To try and get some of that back in highly cropped shots you can try applying Gaussian blur and then fading it back, followed by a sharpen at about 0.3 radius. |
I'd like to try this technique, however, I understood all of it except the part about "fading it back". Could you explain this some? |
In Photoshop, directly after you apply an effect you can go edit>fade
|
|
|
|
04/09/2008 11:06:26 AM · #14 |
| Thanks for the explanation. Sounds like a layers related adjustment, and I use PaintShop Pro anyway. |
|
|
|
04/09/2008 11:15:28 AM · #15 |
It's the same as duplicating the layer, applying the blur to the top layer, and reducing the opacity. Its just the method which was always legal in the basic rules since you're not using multiple layers.
|
|
|
|
04/09/2008 11:21:12 AM · #16 |
Originally posted by KaDi:
Originally posted by cynthiann:
Originally posted by KaDi:
What are your in camera settings? You do seem to have a lot of over-saturated and over-sharpened images...so I'm wondering what you're starting with. |
I do sometimes, well more often than not, set it on vibrant colors. Hate to think something so small could be my problem all along. |
It could be the problem. Certainly it would contribute. When you let the in-camera software process your photos like that you're giving up a lot of control. I shoot in fine jpeg (not RAW as I probably should) but have all the bells and whistles turned off giving me a lot of latitude in post-processing. |
Important details here.
In-camera editing is generally used for people who are not interested in Post Processing. If you edit afterwards, shoot neutral or even less. I shoot with my in-camera editing at the lowest possible and in RAW. I will therefore get the greatest lattitude in editing. |
|
|
|
04/09/2008 11:38:44 AM · #17 |
Originally posted by cynthiann:
... Minimum experience in ... the only way to learn is to experiment. |
I disagree the only way to learn is by experimenting. It's one way and a good way but experimentation can be informed by the experience of others.
Pick up Scott Kelby's book The Photoshop CS_ Book For Digital Photographers. Where the _ in CS_ is your version, CS2, CS3 ... It's very readable, and he offers great guidance related to color management and how to bring out the best in a photo even when the original photo isn't perfect.
Also look at the Radient Vista website, especially the Daily Critique, Photoshop Workbench, and Video Turotials ... they're free.
Good luck. |
|
|
|
04/09/2008 12:03:43 PM · #18 |
Thanks all for the advice. I will take in all in, especially when I get off work. Looks like some great links and I've heard of Scott Kelby so I'll definitely pick up the book. I'm also taking a week long professional photoshop course in a couple of weeks.
Thanks  eschelar for all your comments as well. I shoot RAW, but I've been prolly screwing up by shooting in vibrant. I'll take a closer look tonight to make sure my camera isn't doing any other editing, but I don't think it is. eschelar for all your comments as well. I shoot RAW, but I've been prolly screwing up by shooting in vibrant. I'll take a closer look tonight to make sure my camera isn't doing any other editing, but I don't think it is.
|
|
|
|
04/09/2008 12:13:15 PM · #19 |
I think the one thing that I would take away from this is make small subtle changes. I know I am bad for taking a good image and making it terrible in Post. Subtle changes in levels or curves, a tiny bit of sharpening after resizing and that should be just about it. I use Paint Shop Pro myself and I find its hard not to get carried away.
The thing to remember is that you have a good photo, keep it that way. The original of the jay you shot was nice as is. The crop wasn't a bad idea but your background was well blurred out so you could have done a less agressive crop. I think that when I am in a rut and want to try to push my entries I tend to get heavy handed with the PP and it has the opposite effect on my score.
Something else to try, aside from the post processing stuff is shoot with a tripod. Yes it makes your shots more stable but it also forces you to slow down and think more. What do you want in the shot? What do you want to remove? What drew your eye to the scene in the first place? Where do you want to place that major element? Where should the other elements be in relation to the major element? Three of my own top 4 images I took the time to think about all of this stuff. (The swan picture? Well sometimes you just have get the subject in the view finder and get the shot. =) )
And the other piece of advice (granted I am not exactly a wellspring of photographic knowledge myself) is picking up my favorite book on photography: Understanding Exposure. It helped a lot. You get away from using auto and start composing your pictures with exposure as well as with positioning.
|
|
|
|
04/09/2008 12:31:47 PM · #20 |
I did a quick try for post processing you your jay:
All I did was really basic stuff:
- A new crop
- Levels (Just moved the black and white sliders to where the histogram starts)
- Sharpen using USM. (I probably oversharpened but I was using GIMP so I'm not familiar enough with it to tweak the sharpening well).
Again, its your picture Cynthiann and the editing I did took 5 minutes total. (including uploading it). Its all stuff that you can do quite easily.
I hope that encourages you.
Message edited by author 2008-04-09 12:32:00.
|
|
|
|
04/09/2008 01:06:45 PM · #21 |
Originally posted by Citadel:
I did a quick try for post processing you your jay:
All I did was really basic stuff:
- A new crop
- Levels (Just moved the black and white sliders to where the histogram starts)
- Sharpen using USM. (I probably oversharpened but I was using GIMP so I'm not familiar enough with it to tweak the sharpening well).
Again, its your picture Cynthiann and the editing I did took 5 minutes total. (including uploading it). Its all stuff that you can do quite easily.
I hope that encourages you. |
Excellent advice in both posts... thanks!! And yes, very encouraging!!
Reminds me of my teacher in layout class years and years ago. I used to push and push for the perfect layout and one day she beat it into my head to take 10 steps back and 1 step forward. Worked like a charm. |
|
|
|
04/09/2008 01:17:53 PM · #22 |
Two notes on Unsharp Mask:
� If your picture has that overall "dull" and hazy look, you can "clarify" it using high-radius USM, which uses a large radius/diameter setting, but a low amount; try starting with:
Amt: 15%
Dia: 50 pixels
TH: 0
� This is the only time you should use a Threshold setting of zero. This setting controls "how different" adjacent pixels must be before the mask is applied; zero means you are essentially applying it to all pixels.
Basically, the more smooth tones there are in the photo, for example skin tones or gradient sky, the higher you want to set the TH number; I usually use 7 for very smooth photos, and 5 for almost everything else. You only want the USM filter to affect edge detail, not areas of smooth tonal transitions.
You will often get better sharpening with fewer halos by applying lower USM settings twice, rather than higher settings once.
USM examples
Message edited by author 2008-04-09 13:18:15. |
|
|
|
04/10/2008 08:43:57 PM · #23 |
Originally posted by GeneralE:
Two notes on Unsharp Mask:
• If your picture has that overall "dull" and hazy look, you can "clarify" it using high-radius USM, which uses a large radius/diameter setting, but a low amount; try starting with:
Amt: 15%
Dia: 50 pixels
TH: 0
• This is the only time you should use a Threshold setting of zero. This setting controls "how different" adjacent pixels must be before the mask is applied; zero means you are essentially applying it to all pixels.
|
I don't know man... I've been using threshold 0 for 1 pixel and 500 percent settings. I mean, I don't always do it, but I don't think there should be a strict no no for that. |
|
|
|
04/11/2008 03:25:21 AM · #24 |
I never use threshold either, it kind of makes my sharpening invisible to the point there's no point me doing it in the first place :P
|
|
|
|
04/11/2008 09:55:22 AM · #25 |
I think your creativity is there with the way you take photos, so the potential for you getting a knock out image soon is right there. I've really only been truly working at photography for a year (when I got hired to teach it!), and I practice a decent amount. I think when you practice, use the challenges to think of a way to practice a new technique, or shot you haven't tried.
The main thing is light light light.
Go shoot at dusk if you can. Take someone with you to try some portraits.
Your lake landscape has nice warm colors as it was taken later in the day I imagine.
Or if shooting mid day, go indoors next to a window for portraits--I just had some real success with that.
Also, figure out something that you really like to shoot--recently for me it has been my friends' seven month old baby. I could take photos of her for hours. I shot over four hundred pictures of her on Saturday and I was thrilled with about ten of them.
my reply is a bit disjointed as I keep thinking of new things to say. just keep having fun is the most important--and you'll love that f 1.8! also look at the challenges at stuff in the 5 range. lots are pretty good. remember that stnadards are really high here. |
|
Home -
Challenges -
Community -
League -
Photos -
Cameras -
Lenses -
Learn -
Help -
Terms of Use -
Privacy -
Top ^
DPChallenge, and website content and design, Copyright © 2001-2025 Challenging Technologies, LLC.
All digital photo copyrights belong to the photographers and may not be used without permission.
Current Server Time: 08/24/2025 04:26:19 PM EDT.


