| You are not logged in. (log in or register) | |
|
|
|
Tutorials :: Duotones in Paint Shop Pro
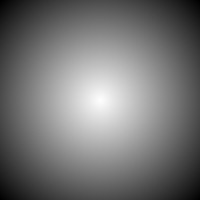
Duotones in Paint Shop Pro by glodaAdobe Photoshop offers its users a convenient way to create duo/tri/quadtoned images. If you use Photoshop, read Moodville's duotone tutorial for Photoshop. This tutorial is written for Paint Shop Pro users, but most of the steps will be similar for other graphics software as well. Notice: While Photoshop users can use Moodville's tutorial for Basic Editing challenges, the post-processing in this tutorial is not legal under the basic editing rules, but is currently legal under advanced editing. This tutorial has been written using PSPX. Users of PSP5 may run into problems once we deal with blend ranges. Also, PSP versions before 8 do not support layer groups. For the purpose of this tutorial, we'll work with a simple sunburst gradient from pure black to pure white.
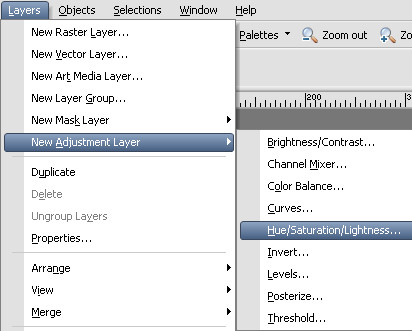
This is a simple greyscale image without any colours. Now, go to Layers -> New Adjustment Layer -> Hue/Saturation/Lightness...
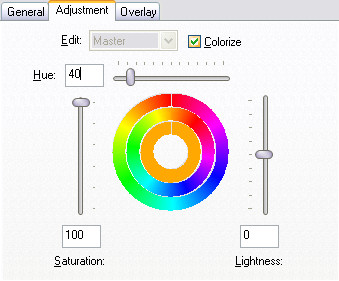
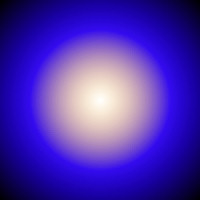
Let's add some colour to our grey image! Check the Colorize box, set the Hue to 40 (orange) and the Saturation to 100. Leave the Lightness at 0. Click OK.
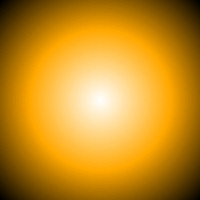
You should have something like this now:
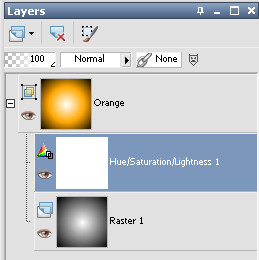
(Users of PSP versions which do not support Layer Groups will have to apply this effect directly to the layer: Go to Adjust -> Hue and Saturation -> Hue/Saturation/Lightness.) What we have had so far have been monochromes, they used one colour and varied it in all its lightness values. Sometimes the second (orange) image is also referred to as duotone, since you could say that it uses black and orange. With this same procedure you can also create sepias. Just reduce the Saturation to a more moderate value. In the layers palette, click on the raster layer. It's most probably called 'Background' or 'Raster1'. (If your layer palette is not open, go to View -> Palettes -> Layers or hit F8.) Now go to Layers -> New Layer Group... Call it 'Orange'. In the layer palette, drag and drop the HSL adjustment layer into the layer group. In PSPX, it looks like this:
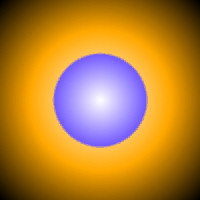
Duplicate the layer group by right-clicking on it and choosing Duplicate. (Users of PSP<8 simply duplicate the single raster layer.) We will now turn this group into the colour blue. Double click on the HSL adjustment layer in this new group and set the Hue to 220 (blue). (Users of PSP<8 repeat the former step with the new Hue, 220.) You will notice that the blue layer group does not show anything of the underlying orange layer.
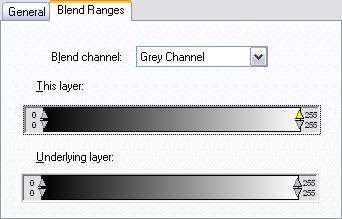
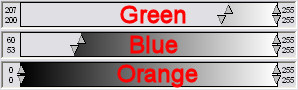
We are about to change that. What we want is the blue colour to affect only the bright part of the image (the centre, in this case) while the orange only affects the dark areas. Double click on the blue layer group (or blue layer, for PSP<8 users). Click on Blend Ranges. You should have something like this:
The black to white gradient represents the areas which this layer affects. For detailed information concerning blend ranges, check out the help file of your program. Or just follow the DPC spirit and mess around with them until you think you know what they are about :) For our purpose, drag the upper left arrow to the right.
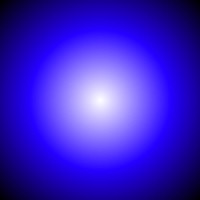
This means that the layer's opacity will increase with its lightness value. This is a way of masking and hence not legal under basic editing rules. The result looks like this:
Notice how the dark areas are orange, and the further we move into the centre, the more the blue tint increases. If you invert the blend range, the result will also be inverted:
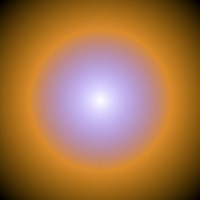
If you want to make the gradient between orange and blue less smooth, just move the arrows closer together:
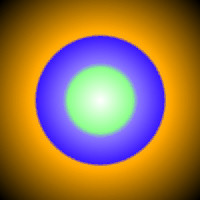
Congratulations! That's all there is to it with duotones in PSP. Experiment with various colours and blend ranges. Now, let's have a look at how to create tritones. Just duplicate the blue layer group (or blue layer for PSP<8 users). We now have a third layer group for our third colour. Repeat the steps you did for the second colour. I chose green in the HSL menu (Hue=120). Play around with the blend ranges of the second and third layer. Here's an example:
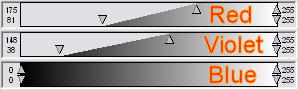
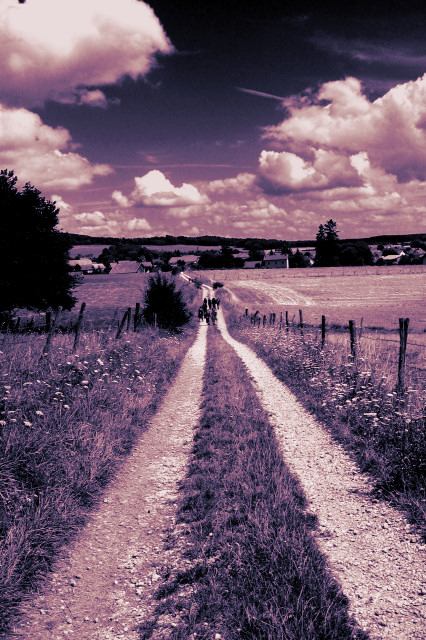
For quad/penta...tones just repeat this step. Here's an example for a photograph. I first converted the image to greyscale with the channel mixer (Note: this step is not necessary!) and then applied a blue/violet/red tritone. Here are the settings:
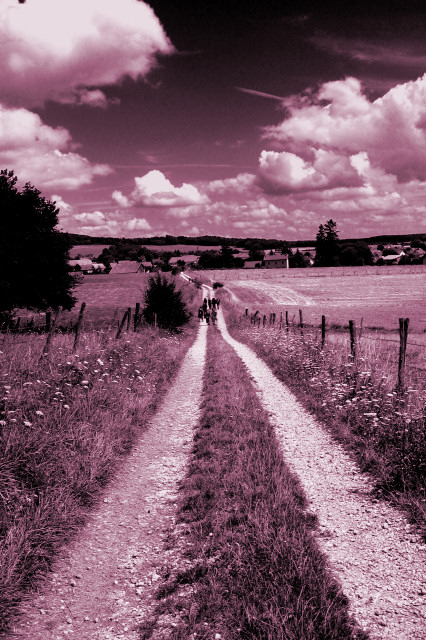
On the left is the resulting tritone, on the right, for comparison, a simple monochrome with the colour violet.
Here is the tritone image as a PSP file so that you can look at the various layers in your program. (PSP8 onwards compatible. You may have to rename the extension to .psp) You successfully completed the duotone tutorial for PSP!Some thoughts for further experimentation (not all are suitable for DPC challenges): Effects similar to this tutorial, but very difficult to control can be achieved by:
Home -
Challenges -
Community -
League -
Photos -
Cameras -
Lenses -
Learn -
Help -
Terms of Use -
Privacy -
Top ^
DPChallenge, and website content and design, Copyright © 2001-2026 Challenging Technologies, LLC. All digital photo copyrights belong to the photographers and may not be used without permission. Current Server Time: 07/14/2026 03:53:13 PM EDT. |