
| You are not logged in. (log in or register) | |
|
|
|
Tutorials :: How to Create Duo/Tri/Quadtone Images
How to Create Duo/Tri/Quadtone Images by moodvilleBelow are the instructions on how to convert an image into a duotone. To get a tritone or a quadtone it is exactly the same procedure except you add more inks. Duotones are images made up of two colors, tritones are made up of three colors, and quadtones are made up of four colors. The first thing you need to do is open up the image that you want to convert to a duotone. The Duotone option is under Image > Menu but you'll notice that the word is faded and unavailable. In order to make the duotone option available you have to convert the image to grayscale first. You can grayscale a color image or use your preferred method of creating a black and white image, but both types need to be converted to grayscale by going under the Image menu, under Mode, and choosing Grayscale. 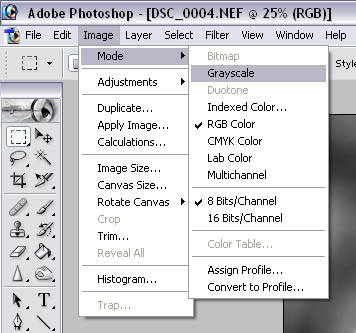
The duotone option under Image > Menu should now be available. 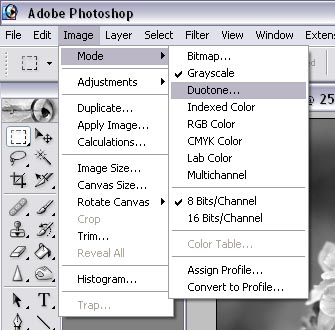
Selecting the Duotone option will open up the Duotone Options Dialog box. The first thing you do is select the Type that you want to create whether it be duotone, tritone, or quadtone. For this example we are going to create a duotone, so select Duotone from the dropdown Type box. 
With Duotone as the selected type you now have two boxes labeled Ink 1 and Ink 2, which we will choose to be the two colors we want our image to be. The first box (the one with the diagonal line) is called the Curve Box, and is used to determine how much of the color will be used for the highlights, midtones, and shadows in the image. The second box is called the Color Box and is where you choose the color of the ink. By default, Ink 1 is set to black as most duotones are made up of black and another color. To select the color you want as Ink 2 click on the Color Box, which brings up photoshop's custom color picker. Play around with the colors until you find something you like and then click OK. 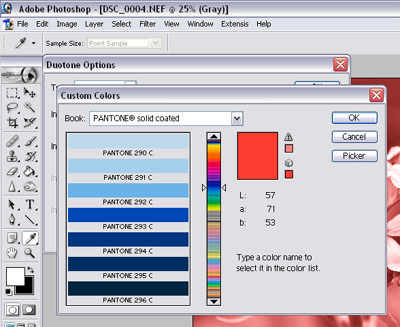
You should now notice that the name of Ink 2 is next to the color you decided on. If you picked a color from the color picker instead of the custom color picker you will have to type in the name of the color yourself. 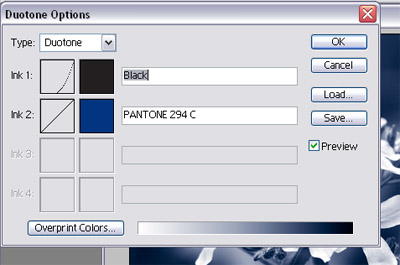
You could at this point click OK and that would be your duotone image, however, to have greater control over the highlights, midtone, and shadows we need to play with the Curve Box. Click once on the Curve Box next to Ink 2 to bring up the duotone curve dialog box. 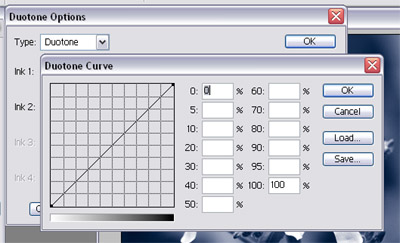
Looking at the fields on the right side of the Duotone Curve Dialog box you will see that the default curve is flat. The 100 in the 100% field indicates that 100% shadow areas will get 100% of Ink 2. If you want less Ink 2 in the shadows then reduce the number, such as 85, which means the darkest shadow areas will receive 15% less Ink 2 and will appear more black. Similarly you can change the 50% midtone (or any of the other values) until you get the colors that you want. Dont be afraid to experiment, oftentimes playing around with values can sometimes get surprising and wonderful results. If you do not want to manually type in the numbers then you can click-and-drag in the curves window. Once you have set the curves how you want them you can click OK to get back to the Duotone Options box and OK again to finish. You can now use Image > Mode > RGB Color to get back to 'normal' while retaining the duotone image. 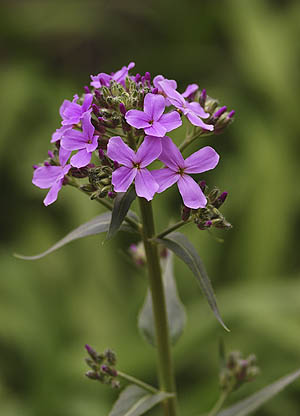 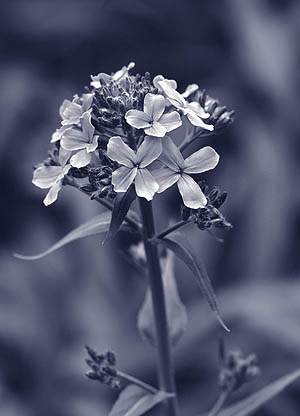
Saving your Duotone for future uses
If you create the most perfect duotone and wish to use it on future images then you can save it to a file that will
enable you to load it up every time you want to apply it. To save your duotone select the SAVE option in the Duotone
Options dialog box. This will open up a folder option where you can title it something appropriate like BlueMood or
similar. To load up the duotone on a future image follow the same instructions as loading a preset duotone as follows.
Using Photoshop's Preset Duotone, Tritone, and Quadtones.
If you do not wish to make your own duotones then you can use the preset options that come with Photoshop, or else
download some of the many duotones available on the internet. You still need to follow the first two steps above by
opening up the image you want to be a duotone, making it a grayscale by using Image > Mode > Grayscale and selecting
the duotone option under Image > Mode > Duotone. Instead of selecting the colors you want in the image you click on the
Load button. This should open up the load dialog box and should, by default, open up the duotone folder on your drive.
If the duotone folder isnt displayed then you will need to navigate your directory system until you find it. It should
be located in your Photoshop application folder under Presets > Duotones and the directory of whichever tone you are
wanting to do (duotone, tritone, or quadtone).
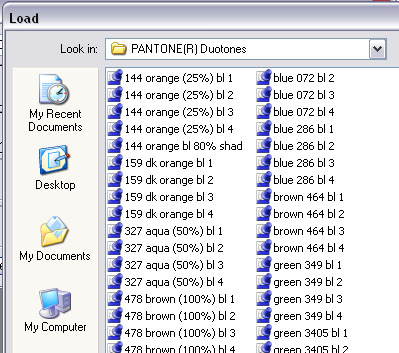
The preset colors listed are broken down into four choices. The first choice includes a curve that gives you the strongest amount progressing down to the least amount with the fourth choice. You can select the color to see if it what you are looking for, if not you can load another option until you've got the color that looks right to you. Once you are happy click OK to apply the duotone to your image.
Home -
Challenges -
Community -
League -
Photos -
Cameras -
Lenses -
Learn -
Help -
Terms of Use -
Privacy -
Top ^
DPChallenge, and website content and design, Copyright © 2001-2026 Challenging Technologies, LLC. All digital photo copyrights belong to the photographers and may not be used without permission. Current Server Time: 07/14/2026 03:53:13 PM EDT. |