| This Tutorial |
Tutorial Viewed: 44706 times
Discussion: Click Here |
Tutorials Home
|
Tutorials :: Using Photoshop to Prepare Photos for DPC Challenges
Using Photoshop to Prepare Photos for DPC Challenges by EddyG
A source of confusion for user's who are new to DPC is how to take a multi-megapixel photo from their camera and reduce it in size (both in terms of pixels and file size) to meet
the submission requirements. The rules currently mandate the following:
- File Format: JPEG (.jpg)
- File Size: No larger than 150 KB.
- Dimension: No dimension may be shorter than 160 pixels or longer than 800 pixels.
This tutorial is intended to document one "workflow" to make your photos meet the above requirements while maintaining a high-quality image. It is certainly not the only method, and you are encouraged to modify and extend this workflow as desired. This tutorial uses Photoshop as its basis, but the concepts can be easily adopted to other image editing applications.
This tutorial is quite verbose in an attempt to make it as easy to follow as possible. A summary is included at the end for easy reference once you're familiar with the process. |
Copy Your Original!
After you've downloaded your photos from your camera and decided which one you are going to use as your challenge submission, the most important thing to do is make a backup of the original, direct-from-camera file. This original file may be needed if you need to prove the validity of your entry, and not having the camera original will result in your photo being disqualified! So the first thing to do before even opening it in Photoshop is to make a copy of it.
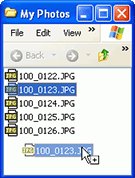
In Windows, you can make a copy of a file with a simple drag of your mouse by following these steps:
- Left-click on the file you want to copy (let's say it is named 100_0123.JPG).
- While still holding the left mouse button down, press and hold the CTRL key
- Drag the file to any "empty space" in the same window (because you have CTRL key held down, the cursor will show a small plus inside a square to let you know that you are copying the file instead of moving it)
- Let go of the left mouse button and the CTRL key, and you'll end up with a file named "Copy of 100_0123.JPG".
- Press the F2 key to enter rename mode, and set the name to something appropriate, such as "DPC-Chocolate-100_0123.JPG" ( where "Chocolate" would be the name of the challenge.) This makes it obvious what this copy is for, and since it also contains the original filename, it is easy to locate the original if you ever need it.
Note that if you don't see the ".JPG" extension on your photos (and instead see just the name), it is because you have Windows configured to hide extensions for known file types. I recommend turning this option off so it easy to see exactly what types of files you are dealing with. To do this:
- Open the Folder Options control panel (Start > Settings > Control Panel > Folder Options).
- Click the View tab.
- Uncheck Hide extensions for known file types.
- Click OK.
|
Edit Your Photo
Open the copy of your photo (the one you just created, named "DPC-Chocolate-100_0123.JPG") in Photoshop.
Depending on how you have Photoshop configured to handle color management (Edit > Color Settings...), you may get a warning about a color profile mismatch (for example, if you have your camera set to use the AdobeRGB color space and your working space in Photoshop is set to sRGB.)  If you do get a warning, it is a good reminder that you'll need to check to make sure your final photo is in the proper color space before saving it for submission to DPC. Another reminder is in Photoshop's title bar. Look immediately after the image mode and depth (the "RGB/8" in this example). If a pound symbol ( # ) appears after the color mode, it means that the document is untagged (i.e. it is not color-managed). An asterisk ( * ) after the color mode implies that the document color space is different from the working color space. The absence of either of these symbols means that the color space of the document matches the working color space. (Converting your photo to the correct color space will be covered later.) If you do get a warning, it is a good reminder that you'll need to check to make sure your final photo is in the proper color space before saving it for submission to DPC. Another reminder is in Photoshop's title bar. Look immediately after the image mode and depth (the "RGB/8" in this example). If a pound symbol ( # ) appears after the color mode, it means that the document is untagged (i.e. it is not color-managed). An asterisk ( * ) after the color mode implies that the document color space is different from the working color space. The absence of either of these symbols means that the color space of the document matches the working color space. (Converting your photo to the correct color space will be covered later.)
At this point, you can now process your photo as desired, within the limitations of the given challenge rule set. If you want to perform capture sharpening, now is the time to do it. Capture sharpening is applied very early in the editing process and is intended to restore any sharpness that was lost in the capture process. Cropping your photo to your desired aspect ratio would also be appropriate at this point, but don't resample the image to a smaller size yet. You want to make all of your edits on the "high res" version so that you have a file that matches your submission that can be used if you want to make a printable version.
Once you have your photo looking how you want, it is a good idea to save an editable, high res version in Photoshop's lossless .PSD format. Because it is lossless, you can open, edit, and save PSD files as much as necessary without negatively affecting image quality. The PSD format will also preserve any adjustment layers (which you should always use instead of the uneditable equivalents found under the Image > Adjustments menu) so that you can go back and easily adjust them if you decide you need to tweak your image a bit more later on.
- Choose Save As... from the File menu
- Select "Photoshop (*.PSD;*.PDD)" from the Format drop-down menu
- The File Name will automatically change to "DPC-Chocolate-100_0123.psd"
- Click Save
|
Resize To 800 Pixels
Now it's time to start getting your photo ready for DPC. The first thing to do (if necessary) is to flatten the image to speed up the operations that will follow. To do this, choose Layer > Flatten Image. (If the only layer in your photo is "Background", this step is unnecessary and the Flatten Image menu item will be dimmed.)
Next, you need to resize your photo. The rules specify that all entries have to be at least 160 pixels on each side, but no more than 800 pixels. You almost always want your submission to be as big as possible (to show as much detail and content to the voter), and the 800 number is key in making that happen. If your photo is noticeably smaller than this, you're likely to get comments about the small size of your image, and it will probably have a negative affect on your score. So always try to go for max!
- Choose Image > Image Size...
In order to ensure that the resize happens correctly, 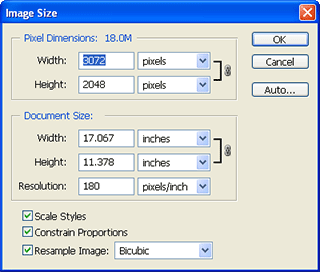 you need to make sure that the settings are correct. First, make sure the Resample Image checkbox, the Constrain Proportions checkbox and the Scale Styles checkbox are all enabled. (If this is an Advanced Editing challenge and you used any layer effects or styles, you want them to scale when you resize.) Second, in the upper block labeled "Pixel Dimensions", make sure the units drop-down menu is set to pixels. Note that when preparing challenge submissions, you can totally ignore all of the settings in the "Document Size" block (including "Resolution", which isn't relevant). you need to make sure that the settings are correct. First, make sure the Resample Image checkbox, the Constrain Proportions checkbox and the Scale Styles checkbox are all enabled. (If this is an Advanced Editing challenge and you used any layer effects or styles, you want them to scale when you resize.) Second, in the upper block labeled "Pixel Dimensions", make sure the units drop-down menu is set to pixels. Note that when preparing challenge submissions, you can totally ignore all of the settings in the "Document Size" block (including "Resolution", which isn't relevant).
Now is where you have to think just a little bit. Look at the values in the "Width" and "Height" fields. In the one with the bigger number, change it to 800. (If they happen to be identical, it doesn't matter which one you pick.) In the example shown on the right, it would be the "Width" field. When you change the larger of these numbers to 800 (remember, you always want 800 to ensure you're submitting the largest photo you can), the other dimension will automatically adjust to the correct value to preserve proportions. (In the example, Photoshop would automatically set the "Height" field to 427.)
At this point, you can click the OK button. But there is one other setting that can sometimes make a difference, and that is the resampling algorithm. The default algorithm is set to whatever the "Image Interpolation" preference is set to in Photoshop's General preferences tab."Bicubic" is the normal default, which is a good general-purpose algorithm. But sometimes, especially when the size difference is large and you are using Photoshop CS, the options "Bicubic Sharper" and "Bicubic Smoother" can provide better results. (The difference between them is that you typically use Bicubic Sharper when you are reducing the size of your image, and Bicubic Smoother when you are increasing the size of your image.) One way to compare the subtle differences between the resampling algorithms is to choose Image > Duplicate... after the "flatten" step above. You can then resize the original window with "Bicubic" and the duplicate window with "Bicubic Sharper" and compare them side-by-side.
Here's a little tip: to quickly see your resized photo at its actual size (100%) and resize the Photoshop window so it borders your photo exactly, press and hold the CTRL and ALT keys, then press 0, -, and + (one at a time, while holding CTRL and ALT) on your keypad. |
Sharpen For Web
Now that your photo is resized and you're viewing it at 100% (which is important!), you can apply some output sharpening. (Output sharpening is sharpening applied to images that have already had capture sharpening applied after they've been resized to their final output size.) This would typically mean a light application of Filter > Sharpen > Unsharp Mask... There is no specific rule about how much USM to apply (other than the fact that over-sharpening will usually result in more negative comments, so it is better to under-sharpen than over-sharpen.) A good starting point for applying USM to DPC-sized images is Amount = 85%, Radius =1, Threshold = 4. If your photo is very soft, you can try adjusting the settings to as much as 250% / 0.3 / 1. (Notice that as the "Amount" setting was increased, the "Radius" was decreased.) Just be careful not to over-sharpen. If you start seeing "halos" around the edges, you have gone too far. |
Convert To sRGB Color Space
Next, you need to make sure that your photo is in the sRGB color space.
- Choose Image > Mode > Convert to Profile...
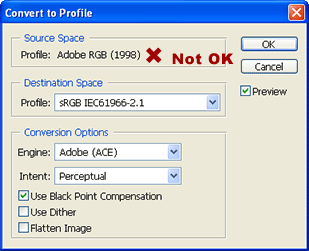 (Note that you don't want to choose "Assign to Profile..."!) (Note that you don't want to choose "Assign to Profile..."!)
Look in the block labeled "Source Space":

If the Profile shown is "sRGB IEC61966-2.1", you are fine, and don't need to do anything else in this step. Simply hit Cancel.
If your Source Space is "Adobe RGB (1998)", you need to convert your photo to sRGB. To do this, first select "sRGB IEC61966-2.1" from the "Profile" drop-down menu in the "Destination Space" block. Make sure the "Use Black Point Compensation" checkbox and "Preview" checkboxes are enabled. While looking at your photo, you can cycle through the various choices in the "Intent" drop-down menu. The changes will usually be subtle unless you have a lot of out-of-gamut colors. Typically "Relative Colorimetric" will be the best choice, but "Perceptual" is also a good possibility. Select the rendering intent which you prefer and click OK. At this point, you have successfully converted your photo to the sRGB color space and have done what you can to ensuring that your photo will look as good as it can when viewed in a web browser. If your photo is in the Adobe RGB color space and you skip this conversion, your colors will look muted and washed out when viewed on the web. |
Save For Web
You're finally ready to create the actual JPEG that you'll submit to DPC!
- Choose File > Save for Web...
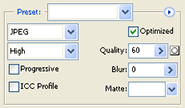 The (resizable) Save for Web interface will appear. At the top are four tabs that allow you to view: 1) your uncompressed original photo, 2) an "optimized" (compressed) preview (based on the current settings), 3) your original on the left and the compressed version on the right ("2-Up"), and 3) your original and three other previews based on user-settable compression levels ("4-Up"). This tutorial will assume the "2-Up" tab is selected. The (resizable) Save for Web interface will appear. At the top are four tabs that allow you to view: 1) your uncompressed original photo, 2) an "optimized" (compressed) preview (based on the current settings), 3) your original on the left and the compressed version on the right ("2-Up"), and 3) your original and three other previews based on user-settable compression levels ("4-Up"). This tutorial will assume the "2-Up" tab is selected.
On the right side are the settings that control how your photo will be saved. It is important that these are all set correctly. Make sure the "Optimized file format" drop-down is set to "JPEG", and that the the "Progressive" and "ICC Profile" checkboxes are disabled. Make sure "Blur" is set to 0. 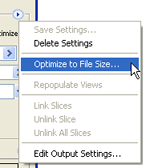 The other settings (such as Quality) don't matter; they will be set automatically next. The other settings (such as Quality) don't matter; they will be set automatically next.
Next, click on the small right arrow to the right of the "Preset" menu and choose "Optimize to File Size..." from the menu.
In the "Optimize To File Size" dialog, enter "150" in the "Desired File Size" and click OK.
Notice that the "Quality" setting has been automatically adjusted as high as possible without letting the file size go over 150 KB. The preview on the right side of the Save for Web dialog is now an accurate representation of how your photo will be saved. You can compare your uncompressed original on the left with the preview on the right, looking for compression artifacts, color shifts, etc. (The actual file size of your photo is shown in the status bar under the preview.)
Note that if the auto-computed Quality setting is much below 50, or if you are seeing large differences between the left (original) and right (compressed preview) images, the JPEG algorithm is having a tough time compressing your photo. This can be because of excessive noise, very high detail, etc. In this situation, one thing to do is to use the History palette to revert back to the "Flatten Image" step and resize your image smaller. Use a value of 750 or 700 pixels for the larger dimension instead of 800. This will make your image slightly smaller, but with a very complex image or a square crop, this can result in a higher-quality image that is worth the reduction in image dimensions.
Once you're satisfied with the preview, click the Save button, and give your DPC-prepared JPEG an appropriate name. |
Submit Your Photo!
That's it! You're done. Submit the file that you saved with the "Save for Web" tool to the challenge. |
Quick Reference
Here is a quick summary of the above steps:
- Make a copy of your "camera original"
- Open the copy of the photo in Photoshop
- Process it as desired/permitted, including any cropping
- Save your edited, full-resolution copy for possible use as a print later
- Choose Layer > Flatten Image if necessary
- Select Image > Image Size...
- Make sure "Constrain Proportions" and "Resample Image" is checked, and either "Bicubic", "Bicubic Sharper" or "Bicubic Smoother" is selected, depending on which looks "better"
- In the "Pixel Dimensions" section, enter "800" in either the "Width" or "Height" (whichever is larger). The other value will adjust automatically
- Sharpen using Filter > Sharpen > Unsharp Mark... (remember, it is easy to go overboard with sharpening)
- Choose Image > Mode > Convert to Profile...
- If the Source Space is not "sRGB", set the Destination Space to "sRGB" and click "OK"
- Choose File > Save for Web...
- Make sure "JPEG" is selected as the format, that the "Progressive" and "ICC Profile" boxes are not checked, and "Blur" is 0
- Click the little "arrow in a circle" on the right-hand side (the "Optimize Menu", next to the Preset drop-down menu) and choose Optimize to File Size...
- Enter "150" in the "Desired File Size" box
- Click "Save" and give it a name
- Upload that saved file to DPC
|
Home -
Challenges -
Community -
League -
Photos -
Cameras -
Lenses -
Learn -
Help -
Terms of Use -
Privacy -
Top ^
DPChallenge, and website content and design, Copyright © 2001-2026 Challenging Technologies, LLC.
All digital photo copyrights belong to the photographers and may not be used without permission.
Current Server Time: 04/16/2026 12:52:09 PM EDT.
|

