| Author | Thread |
|
|
03/19/2010 02:40:00 PM · #101 |
Originally posted by MaryO:
BTW (you guys will appreciate this) I went out to my favorite wetlands park today and saw: an American Wigeon (new duck for me!!!), a pair of Wood Ducks, a pair of Hooded Mergansers, numerous American Shovelers, some Greenwinged Teals, Mallards and Canada Geese (I know, they're everywhere), Northern Pintails, Gadwalls, at least 4 different hawks (individuals, not necessarily different species) and assorted songbirds. Plus interesting bits of plant life greening up, turtles and even a few bugs and an early butterfly. And I was being serenaded by about a gazillion frogs (which made me wonder where all the herons were hanging out today). I love that park :-)))
And if I had a 500mm lens I might even have some great pictures of one or more of those birds. I have some decent pix and a lot that are just good enough to ID the species. I might have some better ones if there hadn't been a fellow who kept appearing behind me just when my subject birds appeared to be getting used to me and drifting in my direction. They abruptly turned around at the sight of the newcomer every time. I hate that ::sigh:: |
Sounds like a great place! Sorry to say that want for a 500mm lens never goes away! I had a Tamron 200-500 for awhile and although it took pretty good shots in bright light I finally switched to the Nikon 80-400 just because the image quality was better. But I still want ... |
|
|
|
03/19/2010 02:43:29 PM · #102 |
 Pixelpig we want to see photos, lots and lots of photos! Pixelpig we want to see photos, lots and lots of photos!
Have fun and fill up those cards. |
|
|
|
03/19/2010 02:45:18 PM · #103 |
|
Next topic will be Focus and Exposure Settings. Hopefully tomorrow! |
|
|
|
03/19/2010 04:15:43 PM · #104 |
just want to say I want to follow this up!
Just for the record the 28-75 is my longest descent lens...
|
|
|
|
03/20/2010 09:13:08 AM · #105 |
More fun with flash:
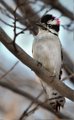
Isn't he adorable? |
|
|
|
03/20/2010 11:24:43 AM · #106 |
Focus and Exposure Settings
There are a few general statements that can be made about focus and exposure for bird / wildlife photography as I see it. Number one is focus on the eye. With all living creatures the eye is the connection point for all of us. Without that connection the viewer will lose interest. Some other constants would be to use Continuous Servo mode (in Nikon jargon) for birds in flight. The better the focus system in your camera and the better the light the better the focus will track a moving object. Use single point focus for stationary subjects. I use one point which I can move around for composition purposes and try to focus on the eye. Shoot in matrix (or evaluative) metering mode and use exposure compensation to make minor adjustments based on the subject. We’ll talk about all these in a bit more detail.
Autofocus
Autofocus in most DSLR cameras is very good. Use it whenever you can. For stationary objects you simply use a single focus point, place it on the eye of the animal and depress the shutter half-way. This will lock the focus on the eye and now you can recompose the shot and fully depress the shutter. Simple, huh? Well not always. Sometimes branches and leaves get in the way and it is not reliable. Sometimes the light is so low that the focus hunts. If these are a problem I switch to manual focus. On some lenses you can take over from auto focus by manually focusing as you keep the shutter half way pressed. Don’t try this unless your lens has a M/A setting (or similar setting that lets you manually focus while in AF mode) as you could damage the focus motor. Using this method will let you fine tune the focus if needed. But for most situations autofocus should work fine.
For moving subjects like flying birds I use Continuous Servo focus for tracking the bird. I still try and choose a focus point that falls on the eye or head of the bird and then let the camera track from there as I pan along with it. You must acquire focus first by placing a focus point on the bird and pressing the shutter halfway. It is always good to try and lock in as the bird approaches from a distance. As the bird nears begin firing off shots by fully depressing the shutter (continuous shutter or burst mode) as you pan. As the bird passes you stop firing as it is unlikely you will get a good picture as the bird moves away. It is also a good idea to try and keep the bird in the two thirds of the frame where it is coming from so as not to end up with a composition that has the bird flying out of the short end of the frame. This should leave a little sky for the bird to fly into. If for some reason you lose focus (the bird leaves the frame) let go of the shutter and press it again to try and re-acquire. Tracking and maintaining focus is difficult even when the light is good and the background clear and non-distracting for the focus system. I have had the bad habit of zooming in too tight and not giving myself room to work. I’ve found that keeping the subject in the frame and thus keeping focus is easier if I zoom out and give the bird a little space. It also makes for better compositions.
A few hints to better focus of moving subjects:
• Use the focus limiter on your lens if you have one. If the camera has less distance to search it will focus faster and give you a better chance of a fast acquisition.
• Shoot flying birds when the sky is clear and blue. The contrast will make it easier on your autofocus system. White skies or fog make it very difficult.
• Choose to shoot big birds as they are easier to focus on and for the camera to acquire.
• Try to position yourself so that the bird is flying into the sun thus being lit better. Most birds will be taking off into the wind so you can get ready by positioning yourself upwind with the sun at your back or side. Sometimes the wind and sun do not cooperate so it may be better to try again another day.
• It will likely be difficult to pick out the eye of a moving bird to focus on. Try for the head. Focusing on the body will likely result in the wings being in focus and the eyes not, so as hard as it seems go for the head.
• If you have been focusing close and now want to switch to a long flight shot it may help to manually focus out long before setting autofocus. It will help the system better acquire the subject. Again, if you have a lens with a M/A setting this is easy to do.
• Don’t use a telecoverter unless you have a very fast lens. F2.8 lenses can handle a 1.4 or a 2x TC, F4 can only handle a 1.4x TC. Don’t bother if your lens is slower than those.
Here are a few flight shot examples:
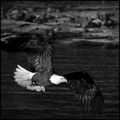
 – I was able to get this shot by anticipating which direction the eagle would take off (into the wind) and realizing the sun was setting in that direction. Still it was a pretty steep crop as it was far off. – I was able to get this shot by anticipating which direction the eagle would take off (into the wind) and realizing the sun was setting in that direction. Still it was a pretty steep crop as it was far off.
 – A more difficult eagle flight shot due to the dark background and the dark bird but I was lucky that the sun was to the side and behind him lighting up his head for me to focus on. – A more difficult eagle flight shot due to the dark background and the dark bird but I was lucky that the sun was to the side and behind him lighting up his head for me to focus on.
 – Choose big birds, blue skies, bright days and give them a little room! – Choose big birds, blue skies, bright days and give them a little room!
 – And when you are not in the right position you likely should just not take the shot. – And when you are not in the right position you likely should just not take the shot.
Exposure
Before we talk about what metering I recommend let’s go over the different metering systems in today’s DSLR cameras. Most have a choice of Center-Weighted Average Metering, Spot Metering and Matrix (Multi-Segmented) Metering.
• Center-Weighted means just that, the meter measures the entire image but give preference to the center. The amount of space at the center given preference is normally adjustable.
• Spot Metering uses only one small spot to evaluate the exposure. This spot is normally very small, maybe 3mm.
• Matrix (Multi-Segmented) Metering uses the entire area of the scene and evaluates a balance of exposure needed to give you the best shot. It is based on a history of similar shots stored in the cameras memory.
Remember that the metering system is trying to get to a middle gray tone and is based on reflected light. Because of this you will have to adjust the cameras decisions depending on the circumstance by adding or subtracting light. This is where exposure compensation comes in and learning how to change it on the fly is a necessary skill to be learned.
I use Matrix Metering almost exclusively. This multi-segmented metering system in my D300 is so good that I seldom use Spot Metering or Center-weighted Metering. I suspect that the newer evaluative multi-segmented metering systems in all DSLR cameras are as good. And once you get used to the adjustments that need to be made in specific circumstances it becomes easy to make exposure compensations to get a pretty well exposed shot. Spot metering is not dependable as you are dealing with such a small area of the image and having to make decisions based on what you perceive the tonality to be. With birds that may have light and dark colors close together it complicates matters.
When using evaluative metering here are two basic rules I use for exposure compensation:
For flight shots with a bright sky I use a + ½ to 1 stop for black or dark birds. I also use a plus exposure compensation when there is any bright background like this eagle in the snow where I used plus .7 EV:

This is the same concept that you would use for snow. Shoot snow as it meters and you get gray snow. You must add light.
For white and bright birds in a dark background, like dark water or dark foliage, I use – ½ to 1 stop of compensation. Even here where I was concerned about the bright white part of a dark bird I used -1 EV
This makes sense because the majority of the scene is dark so the metering wants to add lots of light. That added light would blow out highlights in the bird.
You will find that after getting used to your cameras metering system you will know when to make adjustments. But the metering systems have gotten pretty good and seldom should you have to make drastic adjustments, say more than 1 stop.
Think about what you are seeing through the viewfinder and remember the metering system in your camera wants to get things to middle gray. If the scene is very dark and you have a subject with fine white or light colored feathers or fur then you will want to make sure they do not blow out. It then makes sense to you that you will need to reduce the exposure a bit. Same goes for the opposite, bright sky and dark bird you would need to add a little light or the bird will end up a silhouette. Once you get used to theses two extremes then it becomes easier to make more minor adjustments based on what you see as the overall scene versus your subject.
Assignment
1) Go out and shoot a moving target. Find a park or waterfront or wherever you know that bigger birds to fly. You can always use pigeons or gulls as they can be found almost anywhere. Practice using continuous focus mode by acquiring the bird as it approaches, panning with it as you fire off shots. See what you can come up with.
2) In the same location as above try varying your exposure compensation up and down a stop or two and see what effect it has on your results. Does it make a difference in the subject’s detail?
Message edited by author 2010-03-20 13:33:35. |
|
|
|
03/20/2010 11:49:45 AM · #107 |
Originally posted by hihosilver:
Now that the equipment is squared away and we have our first assignment, would you please elaborate on the bird as a model itself?
For example, what do you look for when selecting your model (especially if within a flock) and how do you approach positioning yourself in relation to your model and the lighting. |
And what about model release forms? I can't get a bird to sign one for love nor money!
Whenever I approach they get their feathers all fluffed out of sorts and fly away. I can't even get underage birds to agree to "art" sessions.
|
|
|
|
03/20/2010 12:20:57 PM · #108 |
Originally posted by jbsmithana:
I have had the bad habit of zooming in too tight and not giving myself room to work. I’ve found that keeping the subject in the frame and thus keeping focus is easier if I zoom out and give the bird a little space. It also makes for better compositions. |
Heh. You're not the only one. And may I add that erratic flying birds (like Swallows ... I find them insanely hard to shoot) need to be zoomed out farther than predictable ones (ducks or geese coming in for a landing, say).
Hard to get decent flight shots in my yard (not enough open space) so I'm afraid I must go to a park today to carry out my assignment. If anyone asks why I neglected chores in favor of birds I will simply tell them  jbsmithana made me ;-) jbsmithana made me ;-)
Later! |
|
|
|
03/20/2010 12:35:07 PM · #109 |
[/quote] delin I'd love to hear how the spotting scope works out as I have no experience there. [/quote] delin I'd love to hear how the spotting scope works out as I have no experience there. [/quote]
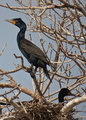
Sorry to drag this back to the equipment topic but I thought I'd do a quick show and tell on my new scope set up since you asked. Just got the adapter a couple days ago and haven't had too much time to work with it yet.
This wouldn't be the way to go moneywise if you don't have a scope already, a quality scope can put you well into the price range of a good telephoto. I got this scope a few years ago from a co-worker for a good price so I thought it'd be worthwhile to adapt my 40D to it. The scope is a Swarovski and has incredible optics.
The method of photographing through a spotting scope is called Digiscoping, if you're interested a quick Google will get you plenty of information. Most methods involve basically holding the camera up to the eyepeice and shooting. There are various adapters that can help hold the camera in place for better results. Focus and vingetting are problems. My set up is an actual optic part from Swarovski that turns the scope into a lens. This makes the scope a 800mm f/10 lens.
The reach is the obviously the biggest advantage, 800mm for about $10,000 less than the Canon version. Drawbacks are the need for a lot of light and no auto focus. The DOF at 800mm is super thin, so f/10 actually helps deepen it a little. Vibration is also very exagerated, I'm going to work on some better stabilization with a baseplate.
I'm still learning the system, it's definately not a simple point and shoot set up but I think it's going to be a good tool for certain situations, like stationary animals that can't be approached easily. Here's a pic of the setup, and a early attempt at the local Cormorant nesting site-

|
|
|
|
03/20/2010 01:24:59 PM · #110 |
Originally posted by delin:
... Sorry to drag this back to the equipment topic but I thought I'd do a quick show and tell on my new scope set up since you asked. |
Dave - thanks for the update. Look like a pretty mean setup! It should produce some great shots for you. |
|
|
|
03/20/2010 01:26:24 PM · #111 |
Originally posted by MaryO:
... If anyone asks why I neglected chores in favor of birds I will simply tell them jbsmithana made me ;-)
Later! |
That works for you but what do I tell my wife about all the yard work not getting done? |
|
|
|
03/20/2010 01:32:14 PM · #112 |
Originally posted by ikopanas:
just want to say I want to follow this up!
Just for the record the 28-75 is my longest descent lens...
|
Looks like you have your work cut out for you sneaking up on those birds. Welcome to the thread Yannis. |
|
|
|
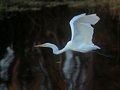
03/20/2010 01:39:18 PM · #113 |
A 180mm f2.8 AF is the only autofocus lens that I have that is fast enough focusing to shoot birds in flight. I think that this may be the only BIF image that I have shot using it. I was using it because I was driving along a back road with my knee on the wheel, and didn't want to be bothered with trying to focus manually. It's cropped to about 1/8 of the original.
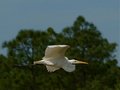
I do almost all of my bird shots with older manual lenses, so I have neither AF or AE modes available when I am shooting. I do use older I F (internal focusing) lenses though, which can be focused very easily with only my thumb on the focus ring. I find that it works about as good as AF if I can see the shot coming. Here are a couple of BIF shots done with that technique. The second was done with an old 85mm lens, which shows that you can get lucky once in a while with a short lens for birding if you learn the habits of the birds and use that to set up the shots. I knew that the egret would stay over the canal as he was flying toward me.
|
|
|
|
03/20/2010 01:40:01 PM · #114 |
Originally posted by Artifacts:
Originally posted by hihosilver:
Now that the equipment is squared away and we have our first assignment, would you please elaborate on the bird as a model itself?
For example, what do you look for when selecting your model (especially if within a flock) and how do you approach positioning yourself in relation to your model and the lighting. |
And what about model release forms? I can't get a bird to sign one for love nor money!
Whenever I approach they get their feathers all fluffed out of sorts and fly away. I can't even get underage birds to agree to "art" sessions. |
Don't you have some desert flowers to go shoot?
As for Mae's real question we'll be talking about using the light and composition starting the next lesson. |
|
|
|
03/20/2010 01:44:58 PM · #115 |
|
|
|
03/20/2010 01:48:59 PM · #116 |
Originally posted by Jessicaaa:
Also interested! :) |
Welcome to the thread Magdalena. You have not missed much as yet and can catch up quick be going back and reading the previous lessons. |
|
|
|
03/20/2010 02:22:04 PM · #117 |
In the realm of equipment that could be used for birding I recently tested some Canon lenses in combination with a 2X extender. The range tested is a little short for good birding but covered 200mm, 300mm, 400mm, and 600mm.
The results are here:
Telephoto with and without extender test results
Bottom line is that for Canon owners with good starting optics I recommend the EF Extender 2X as an inexpensive alternative to longer focal lengths needed for birding.
The extender works incredibly well. I could find almost no image quality degradation across the entire frame using it. Camera shake and subject movement, by far, will be your worst enemy.
|
|
|
|
03/20/2010 02:33:15 PM · #118 |
Originally posted by jbsmithana:
Originally posted by Artifacts:
Originally posted by hihosilver:
Now that the equipment is squared away and we have our first assignment, would you please elaborate on the bird as a model itself?
For example, what do you look for when selecting your model (especially if within a flock) and how do you approach positioning yourself in relation to your model and the lighting. |
And what about model release forms? I can't get a bird to sign one for love nor money!
Whenever I approach they get their feathers all fluffed out of sorts and fly away. I can't even get underage birds to agree to "art" sessions. |
Don't you have some desert flowers to go shoot? |
Heck, desert flowers are even harder than birds to get model releases from. I ask and ask and all they ever do is give me a blank stare. Its frustrating.
|
|
|
|
03/20/2010 03:12:21 PM · #119 |
|
|
|
03/20/2010 03:19:13 PM · #120 |
I have just about given up trying to get any photos of the swifts that live round here during the summer, they are just too fast!
I had to move quick to get this fellow as he whizzed past
Great thread, so much info. Thanks jbsmithana , appreciate your time and input.
|
|
|
|
03/20/2010 04:10:20 PM · #121 |
|
I got motivated to try things that I 've read here. Hope tomorrow to shoot some birds around..., I borrowed a Nikon 55-200 1:4-5.6 (Not the VR one, but I figure that as stated here, using a wide open aperture and some high ISO, I wont need it. Hope the nice weather will last. Great thread... Congrats jbsmithana! |
|
|
|
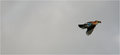
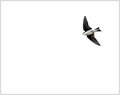
03/20/2010 04:53:45 PM · #122 |
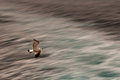
I so jinxed myself. Headed out to a park where Bald Eagles are known to appear and what is the first bird I see? A Tree Swallow!! So I had to take that as a challenge (the little things TAUNT me, I swear they do) and I am proud to say this is recognizably a Swallow in flight:
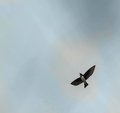
And I still want a 500mm lens ;-)
ETA another Swallow pic:
Message edited by author 2010-03-20 18:18:44. |
|
|
|
03/20/2010 10:56:47 PM · #123 |
Originally posted by davidw:
I'll be watching this thread, thank you for taking the time. I've had some luck, and this thread should help me have some more!
 |
I must have missed this 1st time around. I love these funny eagle shots. Here is one of mine, they should get together.
 |
|
|
|
03/21/2010 12:33:52 AM · #124 |

Thanks for the tip about using flash. It's something that I will be practicing for my future trips into the swamp, where the birds are under the dark tree canopy.
|
|
|
|
03/21/2010 02:08:46 AM · #125 |
Originally posted by MelonMusketeer:
Thanks for the tip about using flash. It's something that I will be practicing for my future trips into the swamp, where the birds are under the dark tree canopy. |
Thanks. I'll be posting the next lesson on light Sunday and will talk a bit more on flash, especially high speed flash. |
|
Home -
Challenges -
Community -
League -
Photos -
Cameras -
Lenses -
Learn -
Help -
Terms of Use -
Privacy -
Top ^
DPChallenge, and website content and design, Copyright © 2001-2026 Challenging Technologies, LLC.
All digital photo copyrights belong to the photographers and may not be used without permission.
Current Server Time: 07/17/2026 08:03:53 PM EDT.


