| Author | Thread |
|
|
09/15/2009 10:21:00 AM · #1 |
A little help please...
How do you remove the background from around an object in such a way that there are no "jagged edges" when it is inspected closely by zooming in?
I have been doing some product photography for a company that distributes surfboards, kiteboards, and standup paddleboards. They would like to be able to display these products in multiple places including their website. They would like to allow customers to zoom in for a closer look at the boards, but I have found that I am unable to cleanly remove the background without leaving what I can best describe as pixelated jagged edges of the object.
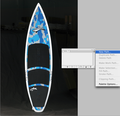
Here is an example of a kiteboard that needs to be removed from the background:

Here is an example of what my previous efforts have produced:

With my limited knowledge and skills it would take me over an hour per image to cleanly remove the board from the background. The methods that I have been using are:
1. Magic wand tool, delete, followed by history brush.
2. Lasso tool or magnetic lasso tool, invert selection, delete, followed by history brush.
3. I've tried the line tool but I can't seem figure out how to accurately control it.
4. I've tried the paint brush to paint the background out of the image.
The first two methods do remove the background but leave the edges very jagged as seen in the example. I have to spend considerable time cleaning up the result. Painstakingly painting around the object is also extremely time consuming.
How is this properly and efficiently accomplished?
Thanks.
|
|
|
|
09/15/2009 10:30:00 AM · #2 |
|
I'd say quick mask would work wonders on this since there is a distinct separation between the edge of the object and the background. |
|
|
|
09/15/2009 10:30:04 AM · #3 |
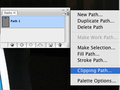
The correct way: Go to the path window and create a new path, then use the pen tool to draw a clipping path with bezier curves (draw carefully just inside the shape edges). Make sure the clipping path is turned on in the path window pop up menu (leave flatness blank), then save as a Photoshop EPS.
After you draw the path, you can also make a selection from it, invert and delete to see what it looks like or make a clean JPEG.
Message edited by author 2009-09-15 10:36:30. |
|
|
|
09/15/2009 10:34:29 AM · #4 |
English please...
...or more to the point: What the heck are you two talking about?
How to quick mask? Bezier curves????
It seems that some things I do pretty well while with others, I suppose I need to go back to Photoshop school. |
|
|
|
09/15/2009 10:42:09 AM · #5 |
|
The easiest way is magnetic lasso tool, so easy if you have white against black like you have. Don't even need to zoom in, but to limit mistakes you might want to. Now you must have a higher version of PS, but go to Select (don't have it opened infront of me but its in one of the dropdowns) 'Refine Edge'. Works fing wonders. Adjust the sliders as necessary. |
|
|
|
09/15/2009 10:49:26 AM · #6 |
Go to the path window and create a new path:
use the pen tool (looks like a fountain pen in the PS tool palette) to draw a clipping path with bezier curves (click and drag with the pen tool to create handles). You can move the handles to tweak the path by holding down the command or control key to get the direct selection tool (white arrow). It takes a little practice. Draw carefully just inside the shape edges. If you click off the path, you'll need to click the last point again with the pen tool to resume drawing. The pen cursor will change slightly when you get back to your starting point to close (finish) the path.

Make sure the clipping path is turned on in the path window pop up menu (leave flatness blank), then save as a Photoshop EPS.
This will give you perfectly clean edges as long as the resolution is high enough (zooming in on a 72dpi JPEG will show jagged edges no matter what you do).
Message edited by author 2009-09-15 10:51:27. |
|
|
|
09/15/2009 10:51:50 AM · #7 |
|
Thanks for taking the time spell this out for me. |
|
|
|
09/15/2009 10:55:04 AM · #8 |
|
Sorry if I wasn't clear to begin with. I've been using this procedure almost daily for about 20 years, so I forget how confusing it might be the first time. |
|
|
|
09/15/2009 11:03:35 AM · #9 |
Originally posted by scalvert:
Sorry if I wasn't clear to begin with. I've been using this procedure almost daily for about 20 years, so I forget how confusing it might be the first time. |
OK, so that is a new technique to me... What is the benefit of using this technique vs. simply grabbing my lasso tool or marque tool and just making a selection around a simple object like this.. Does making a path do it cleaner ??? and, mind you, I've never ever used a path for anything... But, this seems quite easy and I'm wondering if I've been making it harder for myself all along to cut out objects like this... |
|
|
|
09/15/2009 11:12:03 AM · #10 |
Originally posted by kandykarml:
What is the benefit of using this technique vs. simply grabbing my lasso tool or marque tool and just making a selection around a simple object like this. |
Paths are cleaner since they're based on antialiased (smooth) lines and curves rather than freehand "painting," and you won't have the fuzzy edges that a soft brush creates. It also tends to be much faster for simple objects once you get the hang of it. More importantly, a clipping path is required for commercial printing since the background will otherwise be opaque on a flattened image so you wouldn't be able to place the object over another color. |
|
|
|
09/15/2009 01:19:50 PM · #11 |
Shannon's way is probably far better than quick mask but here's an explanation with example of how to use it for separating a subject from the background.
//www.grafx-design.com/12photo.html |
|
|
|
09/15/2009 02:10:18 PM · #12 |
Originally posted by scalvert:
Originally posted by kandykarml:
What is the benefit of using this technique vs. simply grabbing my lasso tool or marque tool and just making a selection around a simple object like this. |
Paths are cleaner since they're based on antialiased (smooth) lines and curves rather than freehand "painting," and you won't have the fuzzy edges that a soft brush creates. It also tends to be much faster for simple objects once you get the hang of it. More importantly, a clipping path is required for commercial printing since the background will otherwise be opaque on a flattened image so you wouldn't be able to place the object over another color. |
It's worth noting that any selection can be converted to a path, and vice versa. So you can make a selection the conventional way, simplify it, convert it to a path, and then tweak the curves. Sometimes this is a useful approach.
R. |
|
|
|
09/24/2009 10:58:43 AM · #13 |
Pen tool is one of the most confusing and difficult tools to master. Once you "get it" though, you'll be hooked
Check this tutorial for a bit of practice. |
|
|
|
09/24/2009 11:13:58 AM · #14 |
|
|
|
09/24/2009 01:06:53 PM · #15 |
Originally posted by scalvert:
After you draw the path, you can also make a selection from it, invert and delete to see what it looks like or make a clean JPEG. |
CS4 has an option to "Create vector mask" (not sure about CS3, but I'm pretty sure CS2 didn't have this feature). After you create the path, right-click it, select Create vector mask. You can now edit the path and see the results in real-time. Very cool. |
|
|
|
09/24/2009 01:23:54 PM · #16 |
|
are paths available in elements? or only in cs4...? |
|
|
|
09/24/2009 01:59:18 PM · #17 |
Originally posted by vawendy:
are paths available in elements? or only in cs4...? |
I wanted to know about this too. I'm still using Elements 3, which certainly hasn't got paths, but I'm thinking of downloading a trial of Elements 8 (which has just been announced) if my poor overloaded computer can handle it. I certainly won't be spending the money on CS4 anytime soon - replacing the computer is top priority. Buying Elements 8 and Dynamic Photo HDR is more than I really want to spend right now, but I think I'll have to do it.
|
|
|
|
09/24/2009 04:37:51 PM · #18 |
In Corel Paint Shop Pro X2, I use the lasso tool, with point to point selection type, feather set to 1 to 4 (depending on the size of the photo), smoothing set to 4 or even more depending on the size of the image, and anti alias option checked.
I make a quick selection with this tool, by clicking a point to point line until I selected all the subject. Then I go back adding and removing what is not yet very accurate... Sometimes I have to go to menu Selections, Modify, Inside/Outside feather and tune the value to get more softness on the edges.
Also, there is a tool called Corel Knockout which its only purpose is to make it easier to select and cut an object, animal, person, etc from a picture. Very good btw. It install as a plugin for Photoshop or Corel Paint Shop Pro.
|
|
|
|
09/24/2009 05:03:52 PM · #19 |
Try this tutorial. It explains how to make a composite from 2 pics. First you have to extract an object from a background using the channels...and so on. It might be of use to you in this example. It is far quicker than the pen or lasso or selection tool.
Selecting objects using channels |
|
Home -
Challenges -
Community -
League -
Photos -
Cameras -
Lenses -
Learn -
Help -
Terms of Use -
Privacy -
Top ^
DPChallenge, and website content and design, Copyright © 2001-2026 Challenging Technologies, LLC.
All digital photo copyrights belong to the photographers and may not be used without permission.
Current Server Time: 06/26/2026 01:33:23 PM EDT.


