| Author | Thread |
|
|
03/05/2009 09:59:05 AM · #1 |
I was out of challenges for some time due to all the attention that my kids need (one 2 year old boy and 2 5 months old girls)...
I came back wondering if my taste for photo is better or not... And looks like my skills to judge photos is better, since on Action challenge all my votes got on respective good or bad edges, according to the challenge classification...
But looks that my photos are always stuck on 5.x area, with lots of 4's and 5's and some 6, 7, 8, 9, 10.
It looks like I keep sharpening too much my photos, as per the comments that I usually receive...
Does anybody know some good articles where I can find better techiniques to sharpen the images? (despite of the this site's tutorial that I've already read)
Thanks! |
|
|
|
03/05/2009 10:06:40 AM · #2 |
|
I've recently just learned how to do this a little better and has made a huge difference for me. You just have to experiment around with the unsharp mask filter. I learned that you can have a large radius and high amount (relatively, just eyeball it) but I have found that a 720 x "xxx" image can handle around a +30 +30 ish settings. Then you apply unsharp mask filter again but with a smaller radius, I have been doing under 1 with an amount of 20ish. Then, you go to edit and "fade unsharp mask" and set to about 50%. Try this out and see what kind of results you get... |
|
|
|
03/05/2009 10:07:13 AM · #3 |
A breakthrough (and a "duh" moment) for me was when I realized I could use unsharp mask with a radius of less than 1 pixel. The reason I didn't realize it was in PaintShop Pro, the radius slider only works in full pixel increment. I have to punch in a number if I want to use less. I now normally use a radius of .35 or .4. In advanced challenges, I will sometimes selective sharpen, either by erasing through a duplicate layer, or using the sharpening brush for small areas.
|
|
|
|
03/05/2009 10:11:46 AM · #4 |
 bear_music gave me some fantastic advice recently! bear_music gave me some fantastic advice recently!
google 'Adamus Sharpening'
the results are outstanding.
|
|
|
|
03/05/2009 10:29:40 AM · #5 |
Just taking a quick look at some of your work, it looks like you push it just a bit too hard... If you shoot RAW, amount may be between 150-250 and radius between 1-3... (at full size...) I kind of kick up my amount and radius high, and then dial them back.
Also, if in an advanced editing challenge, duplicate the layer and sharpen your details, but use a layer mask and paint back the edges, so that the softer layer below shows up, this can reduce that haloing effect, but still make lots of sharp details. |
|
|
|
03/05/2009 11:13:20 AM · #6 |
I convert the file to LAB. (converting to LAB is NON Distructive)
Go to the channels and activate only the lightness channel.
The go to filters and open the Unsharp Mask window.
Leave Threshold at 3, Radius at 1.3
Then adjust amount staring from 0 up until you start seeing the telltale halos around the edges then back it off slightly and you should be golden, BTW Ive never in 14 years had to go over 140 on the Amount.
Once thats done, reactivate all the channels and convert back to RGB.
With this method only the lightness channel is affected by the USM and often produces a nicer effect.
You can also skip the LAB part and adjust in RGB as you normally would with the above USM settings. |
|
|
|
03/05/2009 11:31:01 AM · #7 |
Full size image, smart sharpen 0.3px, remove lens blur, strength dependent on subject usually around 250-300%
Shrink to tiny dpc submission size, hit with smart sharpen again 0.3px, remove lens blur, strength 30-60% dependant on subject.
The second application is critical to having sharp images at submission size. |
|
|
|
03/05/2009 11:36:37 AM · #8 |
Originally posted by dainmcgowan:
bear_music gave me some fantastic advice recently!
google 'Adamus Sharpening'
the results are outstanding. |
I haven't tried it yet (at work) but this looks fascinating if it works... |
|
|
|
03/05/2009 11:54:08 AM · #9 |
Originally posted by tryals15:
Originally posted by dainmcgowan:
bear_music gave me some fantastic advice recently!
google 'Adamus Sharpening'
the results are outstanding. |
I haven't tried it yet (at work) but this looks fascinating if it works... |
I tried it for my latest entry, after seeing the results that mpeters demonstrated in a recent challenge. I've started using it as my default sharpening method. It takes a little tweaking depending on the amount of detail in the image, but it gives wonderful sharpness without any harshness.
Message edited by author 2009-03-05 11:54:50. |
|
|
|
03/05/2009 12:22:57 PM · #10 |
Adamus sharpening:
From the full size image resize to somewhere between 1000-1500 pixels. Will need to experiment depending on the image.
Usually I duplicate the image, but for Basic Editing you would just have to experiment to get it right.
Then fun Filter->Sharpen two to three times. Your image will look oversharpened. Do not be afraid, it should look overdone.
Resize to DPC submission size and you are done.
If it is advanced editing, I will duplicate the image a couple times and run sharpen 3 times on the top image, twice on second duplicate and once on the third duplicate then see which looks the best once resized. Or add masks and mix and match.
This works better for Landscapse and small details, downside is you get really large files sizes. Also you may lose a little bit of contrast and saturation so may need to put that back in.
Luko USM technique
its three passes of USM, at web size.
first at 150, .3, 0. Edit->Fade, set to darken.
second at 150, .3, 0 Edit->Fade 50% set to lighten.
third 18, 40, 0. normal settings.
This will add contrast and works better for portraits but I used it for many landscapes also, downside is that it can add noise. Also if you have parts of your image that are very bright and close to blowing highlights it will push it past the limit and blow them out. This technique is only legal for advanced editing, so what I do is resize image to web size, duplicate the image and then run the sharpening technique, I made it an action, so I just hit one button and its done. Then I make a mask and erase problem areas, which can include a noisy sky which doesn't need sharpening, sometimes it adds to much texture to skin so I mask that out and masking where it blows out highlights.
If you want to add local contrast into you image use a large radius (25-60) and a small amount (15-40) this will give you image some punch. To make sure not to oversharpen, you need to make sure that you do not see any halos around the fine details in your image. Pay attention to the percentage at which you are Saving for the Web. If you have to move the percentage way down to 65% you may have over done it. When looking at the final product, are the lines smooth or jagged? If you have lines on a diagonal or a curve make sure they look smooth and don't have mini steps to make the turn. Oversharpening can give you artifacts in the sky or areas without details so look for these.
The simplest sharpening I use just USM at ~150-200 and .3 radius with a 0 threshold. May be a place to start. Hope this helps
Joe |
|
|
|
03/05/2009 12:25:41 PM · #11 |
Thanks everybody!
I'm using Paint Shop Pro to do that, but the USM filter looks to be equal to the Photoshop one...
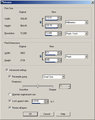
Take a look on what I usually do for basic editing rules, I think I may be making mistakes on my editing steps, other than just USM.
Please help as you can on correcting me on any of the steps.
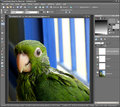
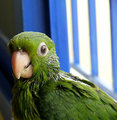
I don't think this photo would be good for DPC anyway, I just posted it so you can help me to review my editing steps.
1-The first step is to crop, I usually crop using rule of thirds and removing distracting points. This one below is the original just exported to web, still without the crop.

2-Then I play with levels, curves and HSL. Usually I use Auto Levels, don't touch too much on Curves, and increase a little the Saturation and play with the Hue as needed.
3-Then I Neat Image it on full size to remove noise and sharpen a little. On Neat Image I auto profile the image and then apply Filter and Sharpen.
4-Then I resize to 640.
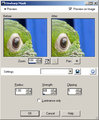
5-Then I apply USM.
6-Export to web.
|
|
|
|
03/05/2009 12:34:25 PM · #12 |
|
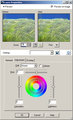
just a quick comment on your workflow. when you sharpen at the reduced size (640 pixels), you'll need to decrease the radius of the USM. For that size image, a radius of 0.3 to 0.4 pixels works best, with a strength of 80-130 to taste. A radius of 1.0 is too large, and will usually result in an oversharpened look. |
|
|
|
03/05/2009 12:40:54 PM · #13 |
Originally posted by brownsm:
just a quick comment on your workflow. when you sharpen at the reduced size (640 pixels), you'll need to decrease the radius of the USM. For that size image, a radius of 0.3 to 0.4 pixels works best, with a strength of 80-130 to taste. A radius of 1.0 is too large, and will usually result in an oversharpened look. |
Thanks, this is very useful since I've never used values smaller than 1.00 pixel. |
|
|
|
03/05/2009 12:42:58 PM · #14 |
|
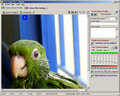
I left the same comment on on your USM mask image as brownsm. Also I don't think the image needs NI and I would not use the sharpening built into NI. Using NI will get rid of some finer details, and once you sharpen those missing details can be exagerrated and can make for an unflattering result. Mostly I think you radius is too large though for your USM. :) |
|
|
|
03/05/2009 12:44:40 PM · #15 |
May be use one of these?
 |
|
|
|
03/05/2009 12:52:59 PM · #16 |
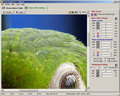
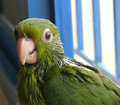 Here is you exported image, only sharpened. once at 150, .3 radius and 0 clipping. And again with 8 or 9, radius 25 and 0 clipping. Here is you exported image, only sharpened. once at 150, .3 radius and 0 clipping. And again with 8 or 9, radius 25 and 0 clipping.
EDIT: I would also look at the way you resize and maybe someone who else who has Paintshop Pro can chime in, but I would experiment with the different options besides "smart size". I use Bicubic to go from full size to web size. I feel it does the least amount of sharpening on the way, so I can control the sharpening how I see fit.
Message edited by author 2009-03-05 13:39:01. |
|
|
|
03/05/2009 01:05:42 PM · #17 |
Originally posted by brownsm:
just a quick comment on your workflow. when you sharpen at the reduced size (640 pixels), you'll need to decrease the radius of the USM. For that size image, a radius of 0.3 to 0.4 pixels works best, with a strength of 80-130 to taste. A radius of 1.0 is too large, and will usually result in an oversharpened look. |
For DPC-sized images, I usually use a radius between 0.6-0.8, but sometimes as high as 1.3 ... I do this with the "amount" set to between 60-90%, and a threshold of 5 or so. I also often find that applying a "light" setting two or three times will give a cleaner result without halos than a single "heavier" application.
If your image seems a bit "flat" and you are trying to get more "pop" in it, try enhancing the contrast with high-radius USM ... in Photoshop I'll use a setting of around 15%, radius of 50-60 pixels, and a threshold of 0 (zero). Be careful, as it can blow out highlights or block up shadows (try a lower % setting), but it can work wonders on lackluster midtones. |
|
|
|
03/05/2009 01:34:52 PM · #18 |
Originally posted by GeneralE:
...For DPC-sized images, I usually use a radius between 0.6-0.8, but sometimes as high as 1.3 ... I do this with the "amount" set to between 60-90%, and a threshold of 5 or so. I also often find that applying a "light" setting two or three times will give a cleaner result without halos than a single "heavier" application.
If your image seems a bit "flat" and you are trying to get more "pop" in it, try enhancing the contrast with high-radius USM ... in Photoshop I'll use a setting of around 15%, radius of 50-60 pixels, and a threshold of 0 (zero). Be careful, as it can blow out highlights or block up shadows (try a lower % setting), but it can work wonders on lackluster midtones. |
Wow, that is heavy. |
|
|
|
03/05/2009 02:18:42 PM · #19 |
Originally posted by brownsm:
just a quick comment on your workflow. when you sharpen at the reduced size (640 pixels), you'll need to decrease the radius of the USM. For that size image, a radius of 0.3 to 0.4 pixels works best, with a strength of 80-130 to taste. A radius of 1.0 is too large, and will usually result in an oversharpened look. |

I have been using a radius of .35 or .4 and a clipping of 3. I start with an amount of 150 and go up or down as needed.
On the high radius USM for contrast, I have a script in PSP that uses a radius of 100 and an amount of 12 as a starting point. That seems to be about the medium value I use. Sometimes a little more, sometimes less.
Message edited by author 2009-03-05 14:20:31. |
|
|
|
03/05/2009 02:22:44 PM · #20 |
Originally posted by jdannels:
someone who else who has Paintshop Pro can chime in, but I would experiment with the different options besides "smart size". I use Bicubic to go from full size to web size. I feel it does the least amount of sharpening on the way, so I can control the sharpening how I see fit. |
I normally use bicubic. |
|
|
|
03/05/2009 02:29:16 PM · #21 |
man! google works fast! i googled 'adamus sharpening' and this thread was already listed as the 4th choice!
|
|
|
|
03/05/2009 03:24:16 PM · #22 |
Just an observation here... how's your monitor? I was getting "oversharpened" comments too, and just couldn't see any problem until I checked one of the shots on my daughter's new monitor. ACK! Apparently my old CRT had gotten soft and what looked good on it looked horrid elsewhere.
p.s. I've learned a lot from this thread! |
|
|
|
03/05/2009 03:24:35 PM · #23 |
Originally posted by smardaz:
man! google works fast! i googled 'adamus sharpening' and this thread was already listed as the 4th choice! |
off topic, but they will dominate the world. |
|
|
|
03/05/2009 03:26:52 PM · #24 |
Originally posted by BeeCee:
Just an observation here... how's your monitor? I was getting "oversharpened" comments too, and just couldn't see any problem until I checked one of the shots on my daughter's new monitor. ACK! Apparently my old CRT had gotten soft and what looked good on it looked horrid elsewhere. |
Also make sure you are checking the image at 100% magnification -- "fit to screen" will often end up an odd size which will cause/hide artifacts because of limitations in monitor resolution.
Originally posted by marcusvdt:
Originally posted by smardaz:
man! google works fast! i googled 'adamus sharpening' and this thread was already listed as the 4th choice! |
off topic, but they will dominate the world. |
What do you mean "will" ...?
Message edited by author 2009-03-05 15:28:27. |
|
|
|
03/05/2009 03:29:47 PM · #25 |
Any other comments on the other steps, other than the sharpening?
Regarding the sharpening, I will try all your tips later, mainly with some of my recent challenge submissions. Despite of the technique, I need to train my eyes since I was not noticing what exactly was making my photos look oversharpened.
Yo_Spiff would you mind sending me the script that you mentioned? I'd like to know more about using USM to enhance the contrast.
Thank you so much!
Message edited by author 2009-03-05 15:31:52. |
|
Home -
Challenges -
Community -
League -
Photos -
Cameras -
Lenses -
Learn -
Help -
Terms of Use -
Privacy -
Top ^
DPChallenge, and website content and design, Copyright © 2001-2026 Challenging Technologies, LLC.
All digital photo copyrights belong to the photographers and may not be used without permission.
Current Server Time: 07/15/2026 10:59:05 AM EDT.


