| Author | Thread |
|
|
01/22/2009 12:35:51 AM · #51 |
Originally posted by Shutter-For-Hire:
can I put Camera Raw into Monitor RGB so I can see things properly while editing in Camera raw? |
No, it's a PS preview. Note also that if you convert the Color Profile to sRGB (in the edit menu), PS will reset the preview back to your default, so make sure it's really on MonitorRGB before you do any critical editing for the web. |
|
|
|
01/22/2009 12:41:32 AM · #52 |
ok...i THINK I have it figured out... still have to play with it a bit... here's my result test pic...
.
Message edited by author 2009-01-22 00:54:45. |
|
|
|
01/22/2009 12:41:49 AM · #53 |
Originally posted by Shutter-For-Hire:
my camera was set to Adobe RGB.... should my camera be set to sRGB? does that matter? |
If you are shooting in RAW then it won't make one bit of difference. The Color profile is applied in the RAW conversion. You can choose to open the image in Adobe 1998 or sRGB. Mind you it is usually better to open it in Adobe 1998 make your edits and then convert to sRGB. You have a larger color pallet (Gamut) to work with in Adobe 1998.
As for the darkening of the image that should not happen if you have a properly profiled monitor. Profiling your monitor is the single best thing you can do to prevent headaches. A properly profiled monitor will display colors as accurately as possible on your monitor. Once you know the colors you see are what they are supposed to look like then editing is much simpler.
An oversimplification of color management can be thought of as this. Imagine you are on a construction site. The architect speaks German, the Foreman speaks Spanish, and the work crew speaks Japanese. They all have an idea as to what needs to be done but they all interpret what needs to be done differently. You can get the job done with no translator but it will take a long time and cause a lot of headaches. If you get a translator in at the beginning then the whole job is much easier. Color management is the translator you need for your particular job. Color profiles will describe the colors your camera took and translate that to a proper set of instructions for your monitor to display, and in turn when you go to print, a color profile for your printer will translate the colors you see on your monitor to something your printer can handle.
Message edited by author 2009-01-22 00:44:18. |
|
|
|
01/22/2009 12:49:50 AM · #54 |
ok... i do understnad it now... but something is still screwey...
Here is what I am dealing with...
I see the pic show up in Bridge, it looks good, then when I click on it, it goes to teh usual RWA poop... that's just PS stripping off the cameras settings from the preview...
then I right click on the pic, and click on open in camera raw, and do my editing... BUT in camera raw, it always looks a bit messed and there is a weird colour/contrast screwey business going on... but i go ahead and do my best to edit it anyways, then I click "open" and then PS asks me what profile I want to use, so I click on "Monitor RGB" then it opens, then I Convert to sRGB ###### (whatever that code thingie is) then AGAIN go to monitor RGB proof... then the pic gets darker and that screwey contrast/colour business that was showing up in Camera raw seems to kinda go away, but the pic sometimes looks like crap now because it is darker due to the monitor proofing...
what's wrong here... |
|
|
|
01/22/2009 01:02:57 AM · #55 |
Originally posted by Shutter-For-Hire:
ok... i do understnad it now... but something is still screwey...
Here is what I am dealing with...
I see the pic show up in Bridge, it looks good, then when I click on it, it goes to teh usual RWA poop... that's just PS stripping off the cameras settings from the preview...
then I right click on the pic, and click on open in camera raw, and do my editing... BUT in camera raw, it always looks a bit messed and there is a weird colour/contrast screwey business going on... but i go ahead and do my best to edit it anyways, then I click "open" and then PS asks me what profile I want to use, so I click on "Monitor RGB" then it opens, then I Convert to sRGB ###### (whatever that code thingie is) then AGAIN go to monitor RGB proof... then the pic gets darker and that screwey contrast/colour business that was showing up in Camera raw seems to kinda go away, but the pic sometimes looks like crap now because it is darker due to the monitor proofing...
what's wrong here... |
The first thing that is wrong is that you are opening the image and assigning a very small gamut color space (Monitor RGB) to the image. You are severely limiting the color options available to the image. While in Camera RAW look just below the image, there should be a single line of text in blue. This indicates what parameters are going to applied to your image once opened into Photoshop. A good set of setting would be something like this: Adobe 1998, 16 bit, 4288 x 2848, 300dpi. To change that all you have to do is click on the text it is like a hyperlink.
Message edited by author 2009-01-22 01:04:13. |
|
|
|
01/22/2009 01:09:14 AM · #56 |
|
it says the same except 8bit and 240 dpi... can I chage those, or are those set by the camera |
|
|
|
01/22/2009 01:17:34 AM · #57 |
Originally posted by Shutter-For-Hire:
it says the same except 8bit and 240 dpi... can I chage those, or are those set by the camera |
Absolutely you can change those. They are not set by the camera if you are shooting RAW in fact the bit depth in RAW is either 12 bit or 14 bit and there is no output resolution. Just click on the text and a dialogue box should pop up with drop down menus just make the change to 16 bit (which gives you a greater flexibility in the shades of color you have to work with), and then change the output resolution to what ever you want. This has no effect on the real resolution of the image, it only effects how densely the pixels are arranged for final output (240 and 300 are typical).
You do need to remember to convert from 16 bit to 8 bit prior to Save for Web and Devices. I will typically convert to sRGB in 16 bit and then go and convert from 16 bit to 8 bit and then do Save for Web and Devices.
It sounds like your default color space needs to be adjusted as well. You can do this in Photoshop under the "Edit" menu and selecting "Color Settings". A dialogue box should pop up and I would select on drop down for "Settings" "North American Prepress 2" this will make your default RGB color space for Photoshop Adobe 1998. That dialogue that keeps popping up between Camera RAW and Photoshop should go away.
Message edited by author 2009-01-22 01:21:24. |
|
|
|
01/22/2009 07:49:12 AM · #58 |
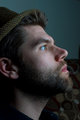
here is what I see in camera raw...
.

.
.
.
.
.
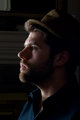
then I open the pic into PS, follow the steps, then it darkens and looks like this:
.
. |
|
|
|
01/22/2009 07:50:58 AM · #59 |
|
Notice those weird constasty edges where the light hit my face? why di they show up in Camera raw, (there is no wditing between versions) but go away when I sRGB/Monitor RGB the pic??? |
|
|
|
01/22/2009 08:05:12 AM · #60 |
|
Just a reminder... there is NO editing between versions... just Convert to sRGB and then Monitor RGB proofing, then save for web... |
|
|
|
01/22/2009 08:50:36 AM · #61 |
Originally posted by Shutter-For-Hire:
...I click "open" and then PS asks me what profile I want to use, so I click on "Monitor RGB" then it opens, then I Convert to sRGB ###### (whatever that code thingie is) then AGAIN go to monitor RGB proof... |
NO. If you're opening a file and PS asks you what profile to use, you should either choose the profile you shot in (AdobeRGB or SRGB) or, if you're only editing for web, you can convert to sRGB. DO NOT assign or convert to MonitorRGB as your image profile! That's only for previewing what your image would look like on a "typical" PC monitor (it's sort of a "lowest common denominator" color space).
Message edited by author 2009-01-22 09:00:27. |
|
|
|
01/22/2009 09:18:37 AM · #62 |
Originally posted by Ivo:
Same problem. As said many times make sure that you've set up Monitor RGB when starting the process. If that is done, I will complete my edit as best as possible, save for web, export to workshop and readjust my original several times to compensate for the quality lost between saving for web and further viewing on DPC. This will mean you may need to have 4 or 5 tweaked attempts before you get the output you want. There may be a simpler way but I haven't fount it. |
It really is much easier than this, but will require you to learn a bit about colour profiles and how to use them.
Work in the colour space the images are captured in (not Monitor RGB) view them with the correct profile (probably your calibrated monitor profile(*)) When you want to output, convert to sRGB, with appropriate parameters, then SaveForWeb. There should be little or no colourshift at all (**) between the saved result and how it looked in photoshop when you were editing . If there is, you aren't doing things correctly - again, I'd recommend learning some more about colour spaces and colour profiles.
Once it is set up correctly, it is pretty trivial to get no colour shifts when editing and showing on the web and takes about 1 second.
(*) if you aren't calibrating your monitor with a hardware calibration tool, just do everything in sRGB. Set your camera to sRGB, edit in sRGB, save in sRGB. It isn't worth the trouble, given that you don't really know what you are looking at anyway.
(**) very small shifts are possible, towards the edges of the colourspaces, but for the majority of images, you shouldn't be able to notice anything. |
|
|
|
01/22/2009 09:32:10 AM · #63 |
Originally posted by Gordon:
Work in the colour space the images are captured in (not Monitor RGB) view them with the correct profile (probably your calibrated monitor profile(*)) When you want to output, convert to sRGB, with appropriate parameters, then SaveForWeb. There should be little or no colourshift at all. |
The Proof Setup preview is important, too. Even if you shoot and edit entirely in sRGB, if your Proof Setup is set for an incorrect space (like CMYK), you'll be editing through the "rose colored glasses" of another gamut, and the colors WILL shift when viewed online. |
|
|
|
01/22/2009 09:56:28 AM · #64 |
Originally posted by scalvert:
Originally posted by Gordon:
Work in the colour space the images are captured in (not Monitor RGB) view them with the correct profile (probably your calibrated monitor profile(*)) When you want to output, convert to sRGB, with appropriate parameters, then SaveForWeb. There should be little or no colourshift at all. |
The Proof Setup preview is important, too. Even if you shoot and edit entirely in sRGB, if your Proof Setup is set for an incorrect space (like CMYK), you'll be editing through the "rose colored glasses" of another gamut, and the colors WILL shift when viewed online. |
Yup. I agree entirely that I didn't explain everything. There are several other things people can and do screw up along the way too, other than proof setups.
Originally posted by Gordon:
It really is much easier than this, but will require you to learn a bit about colour profiles and how to use them. |
My post was more a suggestion to spend the time to learn about it, rather than trying to spell out all the details. It's more complicated than a few lines in a forum post will clear up, but there are plenty of well written articles and books out there.
|
|
|
|
01/22/2009 10:44:45 AM · #65 |
i just read this entire thread and i feel like if we had a webcam at  Shutter-For-Hire's house we would see Rod Serling standing behind him.... Shutter-For-Hire's house we would see Rod Serling standing behind him.... |
|
|
|
01/22/2009 01:12:55 PM · #66 |
and this why i got frustrated, and suggested some sort of guidance be highlighted ( a link, a tutorial, something ) and permenantly displayed where the 'site news' is.
i would say this same question - worded differently - comes up about once a week.
it isn't that complicated, and if you want to shoot digital at any level above family gathering snapshots you HAVE to understand how it works.
Originally posted by Gordon:
My post was more a suggestion to spend the time to learn about it, rather than trying to spell out all the details. It's more complicated than a few lines in a forum post will clear up, but there are plenty of well written articles and books out there. |
|
|
|
|
01/22/2009 01:19:37 PM · #67 |
Originally posted by soup:
and this why i got frustrated, and suggested some sort of guidance be highlighted ( a link, a tutorial, something ) and permenantly displayed where the 'site news' is.
i would say this same question - worded differently - comes up about once a week.
it isn't that complicated, and if you want to shoot digital at any level above family gathering snapshots you HAVE to understand how it works.
Originally posted by Gordon:
My post was more a suggestion to spend the time to learn about it, rather than trying to spell out all the details. It's more complicated than a few lines in a forum post will clear up, but there are plenty of well written articles and books out there. |
|
I don't know, in my experience working with them, color spaces are easy to explain, very difficult to understand at first. I find the knowledge of how they really work comes in small bursts.
Shutter-for-Hire, I can't see any weird contrasty edges, but I do see a darkening (looks better IMO but that's not the point). Is the second shot a screengrab or the final pic? |
|
|
|
01/22/2009 02:06:47 PM · #68 |
just got home from work...
ok... the first shot was a screenshot from Camera Raw directly uploaded..
after taking the screen shot, I clicked "open" then it opened in photoshop. I did NO editing at all...
All I did was Convert to sRGB and then Monitor RGB proofing, then save for web...
I agree the second shot is exactly the way i want it to be... so i think i understand what everyone is telling my...
my problem is that no matter what I do in camera raw I can NOT get the pic you see in the screeen shot to look like the second pic... the problem lies in the fact that they are the same pic with no editing differences between them.... something screwey is up with camera raw...
I really want to learn, you will just have to bare with me... |
|
|
|
01/22/2009 02:09:43 PM · #69 |
as a side note, the weird contrasty edges are around the bright spots on my cheek and forehead and can be seen (by me) in the first pic (which is a screen shot) but disappear in the second one after I convert to sRGB, turn on monitor proofing and save for web...
|
|
|
|
01/22/2009 02:16:35 PM · #70 |
|
For any hope of a color match, you would have to convert to sRGB and Preview for MonitorRGB BEFORE taking a screen shot. Otherwise you're discarding the profile and/or capturing a "flawed" view before you ever get to the conversion step. |
|
|
|
01/22/2009 02:22:42 PM · #71 |
ok..ok... now... i see how when I open the pic into PS I have to convert to sRGB and turn on monitor RGB proofing so that any editing I do IN PHOTOSHOP will not be affected when I save for web... i am clear with that
but how about in camera raw? i can't do any conversions before camera raw?
what is someones typical editing process? lay out some steps for me:
1. i will set my camera to sRGB or Adobe RGB ?
2. take pic
3. open pic in bridge
4. .... fill me in...
Message edited by author 2009-01-22 14:23:27. |
|
|
|
01/22/2009 02:28:03 PM · #72 |
Originally posted by soup:
Originally posted by Gordon:
My post was more a suggestion to spend the time to learn about it, rather than trying to spell out all the details. It's more complicated than a few lines in a forum post will clear up, but there are plenty of well written articles and books out there. |
and this why i got frustrated, and suggested some sort of guidance be highlighted ( a link, a tutorial, something ) and permenantly displayed where the 'site news' is.
i would say this same question - worded differently - comes up about once a week.
it isn't that complicated, and if you want to shoot digital at any level above family gathering snapshots you HAVE to understand how it works. |
You could write a tutorial and get a free month's extension on your membership. :-)
I've found that frequently the very best way to learn something is to try to explain it to someone else. |
|
|
|
01/22/2009 02:31:11 PM · #73 |
Originally posted by Shutter-For-Hire:
just got home from work...
ok... the first shot was a screenshot from Camera Raw directly uploaded..
after taking the screen shot, I clicked "open" then it opened in photoshop. I did NO editing at all...
All I did was Convert to sRGB and then Monitor RGB proofing, then save for web...
|
Okay, so let's clarify...
You're using PS. What version?
Is your monitor calibrated? Hardware calibration? Recently?
You opened the image. When you look at the unedited image in PS, does it look like what you saw in Camera Raw, or did it change? It doesn't matter what your camera is set to if you're shooting raw. You set the color space during the raw conversion. In Camera Raw, there's a place to select the color space. I think it's at the bottom of the screen.
You converted to sRGB. Did the image change when you converted to sRGB? It shouldn't.
You did proofing using Monitor RGB. Not sure this is necessary, as it just shows the differences between your monitor calibration and sRGB, but was there a big difference when you turned proofing on? |
|
|
|
01/22/2009 02:38:09 PM · #74 |
Originally posted by Ann:
Okay, so let's clarify...
You're using PS. What version?
Is your monitor calibrated? Hardware calibration? Recently?
You opened the image. When you look at the unedited image in PS, does it look like what you saw in Camera Raw, or did it change? It doesn't matter what your camera is set to if you're shooting raw. You set the color space during the raw conversion. In Camera Raw, there's a place to select the color space. I think it's at the bottom of the screen.
You converted to sRGB. Did the image change when you converted to sRGB? It shouldn't.
You did proofing using Monitor RGB. Not sure this is necessary, as it just shows the differences between your monitor calibration and sRGB, but was there a big difference when you turned proofing on? |
I have CS3 Extended version
Monitor is not calibrated
there is a dialog box that opens and I selected "use the embeded profile" and it looks just as messed as it does in camera raw
in camera raw, i changed it to sRGB and no difference
when I turn on proofing there is a HUGE ASS difference!!! much darker and more contrasty... BUT the crappy mess that WAS visible in Camera raw gets fixed... so it looks much better, but MUCH different |
|
|
|
01/22/2009 02:44:41 PM · #75 |
|
None of this stuff is going to work until your monitor is calibrated. What you're seeing when you turn on proofing is the difference between your monitor and sRGB. |
|


