| Author | Thread |
|
|
10/12/2007 09:57:08 AM · #1 |
Does anyone have any good suggestions for dodging and buring photos? I see some really good work out there...at least it looks like dodging and burning.......I can't seem to get the same effect. Any techniques, tutorials etc?
Brimac |
|
|
|
10/12/2007 10:05:04 AM · #2 |
use a large brush, take the hardness down to 0% to make it much more subtle.
when i burn shadows I do it at 4% exposure on a 250pix brush.
for dodge its highlights at 5%, same brush settings.
Also, a little thing I picked up: set the burn to midtones, and bump it up to around 25-30%, it helps a lot with the blending on certain things. |
|
|
|
10/12/2007 10:09:34 AM · #3 |
so is the idea to burn the shadow areas and dodge the highlights to "bring them out"?
Thanks for the advice..... |
|
|
|
10/12/2007 10:14:22 AM · #4 |
exactly.
Burn darkens, dodge lightens. It's a method of localising contrast I suppose, instead of just using the blanket commands for contrast you can select which bits to darken, which bits to lighten and which bits remain untouched.
example: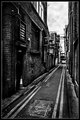
example 2: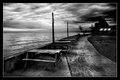
I brought out the blacks a lot more with burning on a big soft brush at 5%. dodging, same specs just with dodge.
And a little thing I learned recently: O selects the dodge/burn commands. If you do alt+O you can go through the commands without having to right click on the icon. |
|
|
|
10/12/2007 10:22:39 AM · #5 |
 Pedro's Dodging and Burning tutorial kicks ass. Pedro's Dodging and Burning tutorial kicks ass. |
|
|
|
10/12/2007 10:42:50 AM · #6 |
While I use dodge and burn techniques in many of my photos, I very seldom use the dodge and burn tools in photoshop. I usually make an adjustment layer, either curve or levels, and then use the layer mask to apply the adjustment. This gives me a lot for control and is more similar to the burn and dodge that I would do in the darkroom.
|
|
|
|
10/12/2007 10:58:08 AM · #7 |
| do you do this by using the brush and repeatedly painting over certain areas? |
|
|
|
10/12/2007 12:05:02 PM · #8 |
Say there is an area that I want to darken... I'll create an curves adjustment layer, select an appropriate area to create the curve, and then pull down. I use a mask set to hide all and then use a white brush to paint in the area that should be burned. I like this because the adjustment layer really controls the depth of the burn and the mask controls where it is applied. If I get the curve right I usually don't have to worry much about feathering edges, but it some cases I'll use the brush at a lower opacity. The mask is easy because I can switch black to white and add or remove the burn.
|
|
|
|
10/12/2007 12:26:17 PM · #9 |
I never dodge or burn because it's irreversible and hard to control.
Adjustment layers with masks are great tools, but another method is to use a layer set to the soft light blending mode. Paint black to darken or white to lighten whatever's underneath. Change opacity to make it look right. Use multiple layers if the effect isn't strong enough or to control precisely what's happening in various places.
Idnic wrote a good tutorial on it.
Here's an example of what's possible.
Original, final
With this method, everything is completely reversible at any time.
|
|
Home -
Challenges -
Community -
League -
Photos -
Cameras -
Lenses -
Learn -
Help -
Terms of Use -
Privacy -
Top ^
DPChallenge, and website content and design, Copyright © 2001-2026 Challenging Technologies, LLC.
All digital photo copyrights belong to the photographers and may not be used without permission.
Current Server Time: 05/08/2026 12:45:06 AM EDT.


