| Author | Thread |
|
|
01/26/2005 06:02:08 AM · #1 |
Thanks for all the votes and comments on my Breaking New Ground entry.
Here's a short explanation of the technique for those unfamiliar with it.
Rayography is not Photography.
The first image captured on photosensitive media was not a photograph, nor was it captured with any sort of camera. The progenitor of photography was a photogram. Fox Talbot experimented with a chemical fixing technique by placing objects of various kinds on photosensitive paper, exposing to light and developing / fixing a permanent image.
Some years later, after the development of the optical camera and the evolution of the +ve image as the –ve of a –ve, an artist named Man Ray went back to first principles in order to express his artistic vision. His artistic photograms are now known as Ragograms.
These images do not capture reflected light as conventional photographs do. The impression on any part of the image is made purely by exposure to either direct light or light permeating through a material. Rayograms are a fixed –ve image on paper. The degree of exposure is dependant upon the “transparency” of the object and “light intensity vs. photosensitivity” of the media. The image is therefore a reversal and captures the “structure and form” of an object rather than it’s image.
To date, photograms have (to my knowledge) been produced by the conventional technique, by exposure to cathodic radiation and by x-rays. I have not seen any examples of photograms produced with a digital camera.
This challenge inspired me to attempt to reproduce a digital photogram. The technical imperative is that the only light impinging on the CCD should be that light permeating the elements of the subject. Any light reflected from the surface of the elements and registered by the CCD would render the image as simply a conventional backlit exposure.
I constructed a “dark box” within which the elements were arranged on a glass screen. A diffuser was placed between the screen and the light source and the camera was positioned above the screen with the lens inserted into a light tight gaiter seal.
The “dark box” was lined with light absorbent material to attenuate tramp light reflection and a mask was placed beneath the diffuser to eliminate tramp light ingress.
The camera CCD was now as close an approximation as I could make it to the surface of the photosensitive media used in a conventional photogram. Some degree of experimentation was necessary between light intensity and EV in order to capture the desired effect but I am happy that the process is practical and possible.
Man Ray worked with simple B/W media. We are fortunate that we now have access to image manipulation technology which enables further development of the artistic potential of this technique.
My submission to the challenge war in raw B/W –ve form in order to be honest to the technique and to comply with basic editing rules. However, with the addition of a little colour, the images can be made more visually appealing.
   
I'd love to know if anyone has attempted this before. In any event, this was my most enjoyable challengs and best result to date. |
|
|
|
01/26/2005 06:21:36 AM · #2 |
I wanted to do a similar thing using a scanner, I had it worked out, but SC said it wasn't legal since a scanner is not a "camera". It seemd to me that the scanner appraoch was more faithful to the idea of Man Ray's work, since it used no lens, but since the rules say "pictures must be taken with a digital "camera", it was ruled that this required a lens.
Congrats on figuring out an elegant way to do this. Very nice image, and one I scored highly.
Robt.
Message edited by author 2005-01-26 06:23:05.
|
|
|
|
01/26/2005 08:05:51 AM · #3 |
I've seen where people make very large photograms by placing objects on lawns and waiting until the grass under them is nice and brown.
|
|
|
|
01/26/2005 12:17:04 PM · #4 |
Originally posted by Spazmo99:
I've seen where people make very large photograms by placing objects on lawns and waiting until the grass under them is nice and brown. |
I think that my neighbour's cat is tryng for the same effect on my lawn !! |
|
|
|
01/26/2005 12:36:33 PM · #5 |
These are a real treat - please post more if you have them or create some new ones. They are stunning.
|
|
|
|
01/26/2005 03:12:55 PM · #6 |
Originally posted by Kylie:
These are a real treat - please post more if you have them or create some new ones. They are stunning. |
Thanks again for your very kind comments kyle......as requested, I created one...just for you !
 |
|
|
|
01/26/2005 04:43:46 PM · #7 |
|
|
|
01/26/2005 06:02:17 PM · #8 |
Originally posted by Fibonacci:
Originally posted by Kylie:
These are a real treat - please post more if you have them or create some new ones. They are stunning. |
Thanks again for your very kind comments kyle......as requested, I created one...just for you !
|
THANK YOU, THANK YOU, THANK YOU!!!!! I love it!!! Beats a ribbon any day!!!
|
|
|
|
01/26/2005 06:07:54 PM · #9 |
I’ve created some photograms before with B&W photo paper, but nothing nearly as exciting as this. I never realized how a subject with some translucency to it could make such an incredible difference.
The color shots are absolutely amazing as well.
Thanks a lot for posting such an elaborate and detailed explanation of what you did.
|
|
|
|
01/27/2005 02:53:50 PM · #10 |
This is a very nice instructive post. Back in the film days many of us took advantage of placing objects right on top of printing paper and leaving it in the sun for several hours. A little fixing then preserved the work. This of course led to placing glass and any transparant material.
Your technique here is well appreciated because digital can only emulate it. Yet you have managed to put together a sytem in which to accomplish this. Thanks for sharing, you are a man on the ball. |
|
|
|
01/27/2005 07:25:10 PM · #11 |
Thanks Max and Daniel for your comments.
I saw this challenge as more of a community brainstorming opportunity than a competitive contest, and I'm picking up tips on style and technique from a lot of entries all the way through the rankings.
I don't know if anyone will be motivated to explore the possibilities of digital photograms. I hope that someone does.
The youngest and tallest branches should be nourished by the oldest and deepest roots. That's how the tree "grows".
Bob |
|
|
|
01/27/2005 07:31:34 PM · #12 |
If you have a commercial print shop in your area, you might ask them for a sample of some "Blueline" material, used for proofing negatives for offset printing. It turns blue (some brands turn black) when exposed to ultraviolet light (e.g. a "blacklight" or sunlight), while the image is stablized by exposure to strong "white" light with the UV filtered out; the paper is usually a pale yellow with a slight sheen to it.
Message edited by author 2005-01-27 19:32:07. |
|
|
|
01/27/2005 07:43:09 PM · #13 |
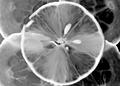
if you define rayography as taking a picture of only *transmitted* light, then my entry to the BNG challenge

may also perhaps qualify as such. This photo only contains the light trasmitted through the canvas and partially blocked by the flower. Am I right? |
|
|
|
01/27/2005 07:45:13 PM · #14 |
could you post pictures or outtakes of how you did it. I read it all and I'm still confused a little. I would love to see a picture of your dark box
|
|
|
|
01/28/2005 06:07:11 AM · #15 |
Originally posted by gi_joe05:
could you post pictures or outtakes of how you did it. I read it all and I'm still confused a little. I would love to see a picture of your dark box |
Here's a schematic.

Hope this shows the arrangement better.
The "key" issue is tha "ALL" the light registering on the CCD in the camera "MUST" come from behind the subject.....any light reflected within the box onto the subject and picked up by the camera will show up as unwanted surface detail.
Bob |
|
|
|
01/28/2005 06:26:04 AM · #16 |
Originally posted by maxj:
I’ve created some photograms before with B&W photo paper, but nothing nearly as exciting as this. I never realized how a subject with some translucency to it could make such an incredible difference. |
Translucency of the objects used has always been the key to many of the most eye-catching photograms that I have seen.
I created some photograms as part of a photography course I did a few years back, here are a couple of them, scanned in using a somewhat decrepit flatbed scanner.
Kavey's Photograms
|
|
|
|
01/28/2005 06:27:29 AM · #17 |
Fibonacci
Kudos for finding a way of bringing this technique into the digital arena - certainly something groundbreaking in my eyes!
|
|
|
|
01/28/2005 07:32:03 AM · #18 |
Originally posted by Kavey:
Fibonacci
Kudos for finding a way of bringing this technique into the digital arena - certainly something groundbreaking in my eyes! |
Thanks Kavita. I think that my execution of the technique is still rather crude but serves to prove the principle. Best I could do within the challenge timeframe !
The S7000 is very difficult to focus in low light but the lens design is perfect for the type of seal that I used.
The box was not tall enough (350mm) to give sufficient DOF for anything more than 25mm high.... more work needed here!
The diffuser is optional. Sometimes a pure white ambient light reflector outside field of focus worked better.
The cut out size in the mask obviously varies to suit the size of the subject field.
Thanks again.
Message edited by author 2005-01-28 08:10:36. |
|
Home -
Challenges -
Community -
League -
Photos -
Cameras -
Lenses -
Learn -
Help -
Terms of Use -
Privacy -
Top ^
DPChallenge, and website content and design, Copyright © 2001-2026 Challenging Technologies, LLC.
All digital photo copyrights belong to the photographers and may not be used without permission.
Current Server Time: 04/29/2026 01:47:20 AM EDT.


