| Author | Thread |
|
|
01/26/2012 01:21:40 PM · #1 |
hi,
I'm interested in experimenting with HDR. From the articles and stuff I read online it seems that importing the raw RAW images into PS (or other software for merging the shots) is the standard way to go. It seems strange that I wouldn't first correct the white balance in Lightroom before heading off to PS. Is it easier to do white balance after the merge?
thanks
deeb |
|
|
|
01/26/2012 04:13:02 PM · #2 |
|
I use Photomatix HDR with Lightroom but it can be used with PS too. I correct blown highlights and dark shadows in Lightroom before exporting to Photomatix. |
|
|
|
01/26/2012 04:33:22 PM · #3 |
HDR Efex Pro is a plugin for Aperture, Lightroom and PS. 15 day free trial. U-Point technology.
Okay and probably best to correct color cast after the merge.
Message edited by author 2012-01-26 16:35:18. |
|
|
|
01/26/2012 04:46:17 PM · #4 |
Oloneo photoengine is yet another option, which also allows for develooemnt of RAW files and tweaking of Jpegs.
It's a fascinating program and extremely fast compared to other HDR.
//www.oloneo.com/en/page/download.html
Some more options here: //www.dpchallenge.com/forum.php?action=read&FORUM_THREAD_ID=1113495&highlight=hdr
Tweaking general hue can be done in software, in most HDR apps, as a parameter of the conversion process. If in doubt, you could take a series of frames where WB is quite off, one where WB is spot on and pleasant. Port in HDR with and without tweaking WB first and try and come up with a similar final result. Then you can choose which process works better for you.
If you put by mistake a completely wrong WB (e.g. fluorescent WB vs. sunny day) , tweaking before hand might be an idea :D
|
|
|
|
01/26/2012 04:48:28 PM · #5 |
Whether you are first processing in Lr or opening directly in Ps, you are using the ACR engine to convert from RAW. By default you should get the same WB settings during conversion, unless your default is "Auto." You want to be sure you are getting the same conversion settings.
|
|
|
|
01/26/2012 04:56:49 PM · #6 |
You can do corrections in LR, then use the "Edit In" option in Lightroom, select "Merge to HDR Pro in Photoshop", and it should take care of the rest. I'm not sure if the changes get applied in LR or PS, but they are taken care of either way.
If you use one of the third party HDR packages instead (I have both HDR Efex and Photomatix) the files are converted to TIF first and so it might be even more important to do any white balancing first. |
|
|
|
01/26/2012 09:41:35 PM · #7 |
thanks for all the tips and ideas.
Interestingly, I tried opening 3 shots directly in PS and upon saving it's a PSD file. I tried opening them in LR and then Edit in > merge in HDR Pro in PS and then upon saving it's a TIF file, and re-opens in LR again. |
|
|
|
01/26/2012 10:03:36 PM · #8 |
Originally posted by deeby:
thanks for all the tips and ideas.
Interestingly, I tried opening 3 shots directly in PS and upon saving it's a PSD file. I tried opening them in LR and then Edit in > merge in HDR Pro in PS and then upon saving it's a TIF file, and re-opens in LR again. |
That's how lightroom normally exchange files with PS and most other applications and plugins, I think.
I don't remember whether hdr merge in PS will produce a layered file or not, but TIF allows for layers too, so you might be able to tweak the file further by reopening the TIF in PS rather than LR, if needed.
I run into the same problem with photomatix, in that opening from LR will return me to LR after processing. Which is a pain because I like to stay in photomatix so to save the file in hdr format and try alternative processing. So I tend not to use photomatix as a plugin. |
|
|
|
01/27/2012 04:11:07 AM · #9 |
I have dabbled a bit with some of the products mentioned here but I like having complete control so I use Photoshop and blend the different exposures manually using gradients and luminosity masks. If there is something you want to change then it just requires a bit of brushing on the masks.
Here is some reading if you want to check it out further:
//www.hougaardmalan.com/blog/manual-hdr-blending/
//goodlight.us/writing/paintinghdr/paintinghdr-1.html
|
|
|
|
01/27/2012 10:51:18 AM · #10 |
|
As I was experimenting last night, I realized that the hdr-merge process is a lot like blending layers. I'll experiment with what you describe as well. The playground is full of toys.... |
|
|
|
01/27/2012 02:44:56 PM · #11 |
That luminosity mask method looks amazing! I'm have some stuff to try when I get home. Thanks for sharing. |
|
|
|
01/27/2012 04:01:44 PM · #12 |
I took the images from the second article (luminosity layers) and did the following:
1. adjusted 0 exp (fig2) in Lightroom 4 beta using Highlights, Shadows, Whites and Blacks sliders (they seem to be working better than curves!)
2. adjusted fig2 to remove blown highlights and did single image toning in Photomatix
3. adjusted fig1, fig2 and fig3 by removing blown highlights and dark shadows and did 3 image merging in Photomatix
These are the results in random order:
 . .  . .  . . 
(I have included the result of blending from the article)
Which one would you choose and why?
(I know small JPGs don't give justice to the original RAW files but I thought the differences were sufficient to see the impact of each method) |
|
|
|
01/27/2012 04:39:05 PM · #13 |
|
the far left (hdr1) for sure. The way the light smacks the rock is almost startling, the shadows are pretty hard (as they would be at that time of day), and the light in the sky seems well coordinated too. It looks great |
|
|
|
01/27/2012 04:42:25 PM · #14 |
Originally posted by deeby:
the far left (hdr1) for sure. The way the light smacks the rock is almost startling, the shadows are pretty hard (as they would be at that time of day), and the light in the sky seems well coordinated too. It looks great |
Agreed. 2 & 4 are totally blocked up in the reds, no texture. In 3 the sky's gone way too dull. Even in HDR1, the sky needs work to be more luminous. The best of the skies is in HDR4; it needs a little darkening and a little more structure, but it's the most natural of the skies. I'd mask together 1 & 4 at this point.
R.
|
|
|
|
01/27/2012 05:13:44 PM · #15 |
1 and 3 feel over done in the sky and the shaded part of the rocks. For some reason 1 and 3 darken the top of the arch, which doesn't make sense. The sky looks unnatural in all of them except 4. I think I like 4 the best but the red in the lit part of the rocks needs some major work. It would nice to be somewhere in between 1 and 4 in regards to the texture on the shaded rocks.
I'm curious, which one is which?
I've tried the demos for many of the HDR packages and I was never happy with my results. There is a good chance I just suck at these tools, but they didn't seem to have a lot of flexibility if you want the end result to look realistic. In the end I couldn't justify buying any of them. Maybe I was just trying to make the tool do too much. Many people seem to use them as a starting point and finish their work in Ps. Unfortunately with most of the demos you can't export a full res image so I couldn't try that workflow. |
|
|
|
01/27/2012 05:57:12 PM · #16 |
|
I also use Photomatix HDR plugin for Aperture 3, I find the HDR results are much better than anything I am able to generate with PS. I would suggest trying Photomatix (there is trial installs from their site). You can get standalone, or as plugin for PC & OSX. |
|
|
|
01/27/2012 05:59:00 PM · #17 |
MargaretN, I like HDR2 (the second from the left) of the ones you put up, that is a really cool shot with the colors.
|
|
|
|
01/27/2012 06:04:31 PM · #18 |
I forgot which is which one!! Anyway, I liked Bear's take on this. But then I tend to get carried away with light & color, like in this one:
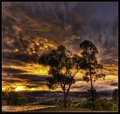
Ouch! :)
|
|
|
|
01/27/2012 06:18:13 PM · #19 |
I agree with VAWendy's comment on this image, over the top works in this case :) When it gets to be to much with HDR for me is when you start to see the harsh haloing around the subjects in the foreground, there is slight haloing around the trees here but not so much that it takes too much away from the impressive color contrast of the image.
Originally posted by MargaretN:
I forgot which is which one!! Anyway, I liked Bear's take on this. But then I tend to get carried away with light & color, like in this one:
Ouch! :) |
|
|
|
|
01/27/2012 06:49:43 PM · #20 |
Originally posted by bhuge:
For some reason 1 and 3 darken the top of the arch, which doesn't make sense. |
the sun is lower than the arch...? I dunno, it really works for me
|
|
|
|
01/27/2012 07:30:29 PM · #21 |
Originally posted by ShutterRev:
MargaretN, I like HDR2 (the second from the left) of the ones you put up, that is a really cool shot with the colors. |
I have worked it out through elimination - the one you liked is not HDR at all, it was just playing with Highlights and Shadows in Lightroom 4 Beta (much better than LR3!). HDR1 is Photomatix with 3 exposures, HDR3 Photomatix single exposure, and HDR4 is the result of luminosity blending from the article. I personally like the range of colors and the luminosity as handled by Photomatix but I don't like Photomatix skies. I would probably go back to the originals and get the best looking sky without any HDR processing and then merge in PS with the Photomatix output.
PS It was a good exercise for me as it reminded me about the importance of taking 3 exposures (I tend to do a lot of single image toning) and using PS for the skies. I read about all this in the past but I got somewhat lazy :/
|
|
Home -
Challenges -
Community -
League -
Photos -
Cameras -
Lenses -
Learn -
Help -
Terms of Use -
Privacy -
Top ^
DPChallenge, and website content and design, Copyright © 2001-2026 Challenging Technologies, LLC.
All digital photo copyrights belong to the photographers and may not be used without permission.
Current Server Time: 06/24/2026 10:53:57 AM EDT.


