| Author | Thread |
|
|
03/04/2011 11:00:52 AM · #1 |
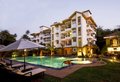
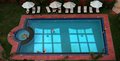
Just put my new Canon 10-22mm f/3.5-4.5 USM to some use for the first time. I have never shot wider than my kit 18-55mm and it took some time to get used to it. Here are some shots for your feedback and critique
  
Message edited by author 2011-03-04 23:24:15. |
|
|
|
03/04/2011 11:10:29 AM · #2 |
Generally, the trick to success with a WA lens is rather than using the FOV to fit more into the frame, is to fill the foreground and let the rest of the frame provide context.
In your shots, the foreground is mostly empty.
Message edited by author 2011-03-04 11:22:06. |
|
|
|
03/04/2011 11:23:03 AM · #3 |
Watch out for that keystoning!
|
|
|
|
03/04/2011 12:22:54 PM · #4 |
Originally posted by Spork99:
Generally, the trick to success with a WA lens is rather than using the FOV to fit more into the frame, is to fill the foreground and let the rest of the frame provide context.
In your shots, the foreground is mostly empty. |
You are very right but i guess thats the first impulse of a new user to fit more into the viewfinder. Thanks for the tip |
|
|
|
03/04/2011 12:25:49 PM · #5 |
Originally posted by coryboehne:
Watch out for that keystoning!
|
Yes - that was a major trouble and i did my bit in PS. Is there any way to get around it when shooting tall structure?
Is it a framing problem? |
|
|
|
03/04/2011 01:55:51 PM · #6 |
Originally posted by manish:
Originally posted by Spork99:
Generally, the trick to success with a WA lens is rather than using the FOV to fit more into the frame, is to fill the foreground and let the rest of the frame provide context.
In your shots, the foreground is mostly empty. |
You are very right but i guess thats the first impulse of a new user to fit more into the viewfinder. Thanks for the tip |
I know I did it when I first started with WA. Eventually, you get to the point where one of the critical factors for a WA lens purchse is how close it can focus and how much closer you can get to the subject by stopping down. |
|
|
|
03/04/2011 02:19:20 PM · #7 |
|
um, how about a little help to us beginners, what is keystoning and can you provide an example of filling the foreground? |
|
|
|
03/04/2011 02:24:47 PM · #8 |
Originally posted by manish:
I did find an interesting article here
here
which explains the concept of filling the foreground |
I did find an interesting article here
here
which explains the concept of filling the foreground
Message edited by author 2011-03-04 14:29:07. |
|
|
|
03/04/2011 03:06:59 PM · #9 |
Originally posted by mike_311:
um, how about a little help to us beginners, what is keystoning and can you provide an example of filling the foreground? |
I had to look it up too.
//www.photoshopessentials.com/photo-editing/keystoning/ |
|
|
|
03/04/2011 03:08:19 PM · #10 |
Originally posted by mike_311:
um, how about a little help to us beginners, what is keystoning and can you provide an example of filling the foreground? |
Keystoning info here > Keystone effect
Michelle beat me to it :-)
Message edited by author 2011-03-04 15:09:17. |
|
|
|
03/04/2011 03:10:11 PM · #11 |
Originally posted by Sevlow:
Michelle beat me to it :-) |
Victory is mine! |
|
|
|
03/04/2011 04:20:42 PM · #12 |
I love to use my 14-24 to get really close to stuff, it gives a wonderful effect!
 |
|
|
|
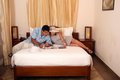
03/04/2011 11:29:30 PM · #13 |
Is something like this

looking any better ? |
|
|
|
03/05/2011 01:08:09 AM · #14 |
Originally posted by manish:
Is something like this
looking any better ? |
It's okay, but your white balance needs work. That sickly yellow light isn't helping anything, especially with the daylight out the window.
I don't really get what the story is. You've got a table set with dishes, and people outside in the pool. My eye went straight to the pool.
|
|
|
|
03/06/2011 04:55:12 AM · #15 |
Originally posted by alohadave:
Originally posted by manish:
Is something like this
looking any better ? |
It's okay, but your white balance needs work. That sickly yellow light isn't helping anything, especially with the daylight out the window.
I don't really get what the story is. You've got a table set with dishes, and people outside in the pool. My eye went straight to the pool. |
This is a test shot. I was shooting some pictures of the restaurant.
Message edited by author 2011-03-06 04:55:50. |
|
|
|
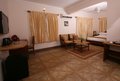
03/06/2011 08:51:20 AM · #16 |
Here's the keystoning fixed with Photoshop's perspective, skew, and scale controls. It's worth noting that when you straighten this stuff out, the building will look squat, so you need to use "scale" to stretch it vertically and get the proportions back.

Note also that the processing you've already done has brought tremendous artifacting to the sky areas.
Of the shots you've shown us, this is by far the most successful. The interior shots, frankly, are basically worthless. The whole key to shooting interiors is arranging and composing the image: we'd spend as much as 2-3 hrs per shot getting things right. One thing you need to watch out for is this tendency to be shooting down on stuff; try to get the camera lower for most of your shots. Here's a very bad scan from a faded print of one I did 30 years or so ago:

R.
|
|
|
|
03/06/2011 09:20:44 AM · #17 |
Originally posted by Bear_Music:
One thing you need to watch out for is this tendency to be shooting down on stuff ... |
Agreed. Same goes for shooting up. With the real wide angles you get into trouble immediately if you deviate from the horizontal plane at all. Keep it level.
Of course this can be frustrating, as horizons typically shouldn't appear in the middle of your shot, but this is why foreground elements are so important and, as Bear said, getting lower helps a lot. And there's cropping to better compositions, of course. Perspective can be fixed later, as Bear has done, but it's much more rewarding to never have to do that when it could have been avoided while shooting. |
|
|
|
03/06/2011 10:27:23 AM · #18 |
Originally posted by bohemka:
Originally posted by Bear_Music:
One thing you need to watch out for is this tendency to be shooting down on stuff ... |
Agreed. Same goes for shooting up. With the real wide angles you get into trouble immediately if you deviate from the horizontal plane at all. Keep it level.
Of course this can be frustrating, as horizons typically shouldn't appear in the middle of your shot, but this is why foreground elements are so important and, as Bear said, getting lower helps a lot. And there's cropping to better compositions, of course. Perspective can be fixed later, as Bear has done, but it's much more rewarding to never have to do that when it could have been avoided while shooting. |
Doing architectural photography without a tilt/shift lens is, at best, an exercise in compromise. Especially with a crop-sensor camera. One way to deal with the keystoning, on exterior photographs, is to step back far enough to shoot with the camera in portrait orientation, with the intention of cropping to horizontal. This allows you to square up the verticals with massive amounts of excess foreground that you will later cut away in post. It works reasonably well with a FF camera like the 5D, but it's problematical with APS-C sensors, which don't have anywhere near the latitude for cropping without loss of detail.
For the record, the way to have squared verticals is to have the back of the camera aligned on the vertical plane. If your tripod doesn't have levels, a small carpenter's level can be held against the camera back while you set up the tripod.
But what I was referring to above, re: getting a lower camera angle, wasn't specifically pointed at controlling perspective. No, the basic idea is that you have less of a problem with "empty foregrounds" if you get lower, and you get a more human perspective as well. If you look in magazines like Architectural Digest, which is famous for the excellence of its interior photography, you'll see instantly what I mean.
R. |
|
|
|
03/06/2011 11:39:47 AM · #19 |
Originally posted by Bear_Music:
For the record, the way to have squared verticals is to have the back of the camera aligned on the vertical plane. If your tripod doesn't have levels, a small carpenter's level can be held against the camera back while you set up the tripod.
But what I was referring to above, re: getting a lower camera angle, wasn't specifically pointed at controlling perspective. No, the basic idea is that you have less of a problem with "empty foregrounds" if you get lower, and you get a more human perspective as well. If you look in magazines like Architectural Digest, which is famous for the excellence of its interior photography, you'll see instantly what I mean.
R. |
Thanks Robert for a detailed comment and specifically pointing out the issues. In most of these pictures I tried not to go right up to 10mm wide and mostly stayed on 12-14 focal lengths but still the problems of perspective and barrel distortion kept cropping up. Sticking to the vertical plane was difficult inspite of the level on my tripod - I guess a three way head would have been a much better choice rather than my ball head.
I do a few such shoots (mostly as a hobby or for friends) in small resorts/apartments and would like to make use of a better techniques as i cant go in for a tilt shift lens and nor can i upgrade to a full frame camera body as of now. As I can understand from the posts in this thread , its good to
1. Shoot from a lower angle
2. maintain verticals
3. get some stronger foreground elements. any more additions??
I would also like to know the best way to light small rooms as in this shoot the brief was to highlight the spaciousness of the room and thus i have taken more of , 'get everything in' kind of shots. I took 2 flash units (400watts) with soft box and brollies but the mix of white lights and the tungsten lights in the room made it look so bad.
These were shot in the available light
 
but then the details are missing from corners.
When using the flash units the pictures are very flat and boring
Whats the best way to overcome such issues?
Message edited by author 2011-03-06 11:40:51. |
|
|
|
03/06/2011 12:02:04 PM · #20 |
|
I know a lot of real estate folks have been doing HDR, so that would certainly give your room photos that were lacking detail some pop. |
|
|
|
03/06/2011 01:25:09 PM · #21 |
1. We used to avoid strobe lighting wherever possible. Certainly, if you want to strobe architecture you have to have professional lights, on light stands, with umbrellas and diffusers and barndoors, the whole 9 yards. On-camera flash units are useless. We's work with 500W floods for fill, that's about all the lighting we did whenever possible. We'd choose the time of day so that the views through the windows wouldn't get blown out. We'd never, EVER shoot with the drapes closed; there's no surer way to kill the mood of a room.
2. As Bohemka mentioned, HDR will be your friend. Not exaggerated, over-the-top HDR but the subtle, fill-in-the-gaps kind. Do 3-5 exposures of each shot as a matter of course, then pick what you need in post.
3. Those first 2 images are much better compositions than the earlier interior set.
4. You NEED to pay a lot of attention to things like the irregularities in the folds of the coverlets at the end of the beds etc.
5. In general, in interior photography, you can get away with a certain amount of distortion from pointing the camera DOWN: in other words, converging verticals almost always look like hell, but DIVERGING verticals (wider at the top) often look OK. The key is to have them be symmetrical: true vertical should be at the center of the image and the divergence to each side should be symmetrical.
6. If you can't square up your horizontals, then make sure they taper off at a reasonably pronounced angle; nothing looks worse than an almost-square horizontal surface, it looks like an accident and shouts "sloppy work".
R. |
|
|
|
03/06/2011 01:25:52 PM · #22 |
Originally posted by manish:
Originally posted by coryboehne:
Watch out for that keystoning!
|
Yes - that was a major trouble and i did my bit in PS. Is there any way to get around it when shooting tall structure?
Is it a framing problem? |
I use either Robert's post editing method, or if I don't need the whole frame, I burn the lower half of a portrait orientation to get a landscape shot without keystoning, since the rectelinear correction is so good on the 10-22. |
|
|
|
03/06/2011 01:32:40 PM · #23 |
Originally posted by BrennanOB:
Originally posted by manish:
Originally posted by coryboehne:
Watch out for that keystoning!
|
Yes - that was a major trouble and i did my bit in PS. Is there any way to get around it when shooting tall structure?
Is it a framing problem? |
I use either Robert's post editing method, or if I don't need the whole frame, I burn the lower half of a portrait orientation to get a landscape shot without keystoning, since the rectelinear correction is so good on the 10-22. |
Note, from earlier post :-)
Originally posted by bear_music:
One way to deal with the keystoning, on exterior photographs, is to step back far enough to shoot with the camera in portrait orientation, with the intention of cropping to horizontal. This allows you to square up the verticals with massive amounts of excess foreground that you will later cut away in post. |
Message edited by author 2011-03-06 13:33:04. |
|
|
|
03/06/2011 02:09:57 PM · #24 |
Originally posted by bohemka:
I know a lot of real estate folks have been doing HDR, so that would certainly give your room photos that were lacking detail some pop. |
well i did try the HDR thing but maybe the scene was not apt for it or i processed it wrongly, I think the results are very average
 
|
|
|
|
03/06/2011 03:22:58 PM · #25 |
With HDR, if you create the correct set of exposures to begin with, there's no reason for the finished product to look forced or artificial in any way. So ANY image that covers a dynamic range greater than the camera can handle in on exposure, is good for HDR. However, in cases where most of the image is within single-exposure range, except for views out a very bright window, you can usually make a better image by layering a correct window exposure on top of an otherwise-correctly-rendered "everything else" exposure, and erasing all but the window. Or behind, and erasing a hole in the top layer.
The problem is, you run the risk of destroying subtle local variations as the software tries to average everything between the window and the room.
R. |
|
Home -
Challenges -
Community -
League -
Photos -
Cameras -
Lenses -
Learn -
Help -
Terms of Use -
Privacy -
Top ^
DPChallenge, and website content and design, Copyright © 2001-2026 Challenging Technologies, LLC.
All digital photo copyrights belong to the photographers and may not be used without permission.
Current Server Time: 07/30/2026 05:06:16 AM EDT.


