| Author | Thread |
|
|
02/21/2013 07:11:35 PM · #26 |
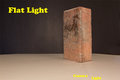 Flat light Flat light
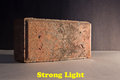
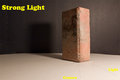 Strong light Strong light
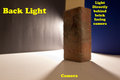 Back light Back light
Not sure I took the next two quite right....
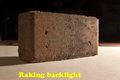
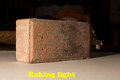
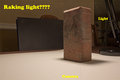 Raking light Raking light
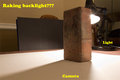 Raking backlight Raking backlight
Im finally off from work tomorrow so I will take your field pictures tomorrow and post those as well!
Message edited by author 2013-02-21 19:38:38. |
|
|
|
02/21/2013 09:14:48 PM · #27 |
The "Strong Light" would be stronger if it were at right angles to the axis of the camera.
Here's a diagram for "Raking Light":

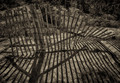
Note, however, that the quality of "raking light" is relative to the surface, not the camera position; it's a light that sweeps along parallel to an object's surface and highlights all the texture, details, and even imperfections of that surface of the object. Here's an example of Raking Light on an old building in Maine; see how every detail is fully articulated? In any case, Raking Light of an object seen not in elevation (like my building below) but on the oblique (like the brick in the illustration) will give you one fully lit side and one textured side. Raking Backlight will give you one textured side and one side in complete shadow.

For what it's worth, here's an example of full backlight:
In general you're on the right track, but there's so much fill light in these shots that we can't really see that well the effect of the main light positions. It'll work best if there's only one light in the room.
Message edited by author 2013-02-21 21:17:35. |
|
|
|
02/21/2013 09:17:25 PM · #28 |
Raking light should be perpendicular to the short face, because it should be nearly parallel to the long face.
Here's an application in real life- //stanschaap.com/dune-top-in-raking-light/
This is end of day light, so it is originating very close to the horizon. It is depicting and illustrating the texture of the landscape by casting shadows, which is what you want to do with the brick. That long face that is looking towards you is what you should align (or at least nearly so... make it not quite parallel but ever so slightly facing towards the face itself) with, but looking away from you. The light should be to your right.
Raking backlight is the same thing reversed, so it would be to your camera left, ever so slightly angling into the face and aiming ultimately rather camera right.
ETA: And Bear and I have crossposted saying the same thing...
Message edited by author 2013-02-21 21:19:05. |
|
|
|
02/21/2013 10:48:07 PM · #29 |
Bear I understand and will try again in a lower light session. The diagram is extremely helpful and clearly explains what I missed in this lesson. try 2 tomorrow, hopefully its better. Are you saying the strong light should have had the light facing the solid part of the brick head on, which in your illustration would have been in the bottom right corner?
Derek, I understand now I think, hopefully I get it on the second try! |
|
|
|
02/21/2013 11:08:42 PM · #30 |
Originally posted by CaptUnderpants:
Are you saying the strong light should have had the light facing the solid part of the brick head on, which in your illustration would have been in the bottom right corner? |
No, that's what YOUR shot did; move the light just a tad more towards you and it would have been RAKING the long side of your brick. Typical "strong" light would be at around 45 degrees to the surface being shot, whilst your setup has it essentially perpendicular. On my diagram, "strong" light would be parallel to the top and bottom edges of the frame, from the right side.
Message edited by author 2013-02-21 23:09:41. |
|
|
|
02/21/2013 11:12:51 PM · #31 |

I see a big difference, hopefully this is correct! |
|
|
|
02/21/2013 11:17:20 PM · #32 |
| Yeah, there ya go! Now do the Strong Light over with it throwing a shadow on the tabletop at 45 degrees (light at 45 degrees to the long face). See how the shadow will help make the whole form more solid-looking. |
|
|
|
02/21/2013 11:33:38 PM · #33 |

better? |
|
|
|
02/22/2013 12:23:36 AM · #34 |
Like this:
 |
|
|
|
02/22/2013 03:41:08 AM · #35 |
| This may become the most viewed thread for 90% of DPC'ers... thanks to everyone participating! |
|
|
|
02/22/2013 05:28:10 AM · #36 |
|
|
|
02/22/2013 07:02:21 AM · #37 |
Originally posted by mrchhas:
This may become the most viewed thread for 90% of DPC'ers... thanks to everyone participating! |
mad props to the captain for starting this, and for r/derek/anyone who's so willing to help. this is awesome. |
|
|
|
02/22/2013 07:11:21 AM · #38 |
Great learning thread. Thanks capt undies for starting the thread, thanks bear for the explanations/lessons, thanks spirit for elaborating.
I gotta keep my eye on this. |
|
|
|
02/22/2013 11:46:17 AM · #39 |
| definitely your 2nd picture, I see what you mean, I was confused bc Bear said to bring that light closer to me, I would be behind the camera so I moved it closer to the camera instead of off at the proper angle, I will re take the strong light photo again tonight, I find the lower the light in the house the easier it is for the camera to catch the light I'm using which was mentioned by Bear formerly in this thread. I had too much outside lighting. I greatly appreciate everyone's help with this. Don't get me wrong I feel a bit "SLOW" but its clearly helping me learn properly. I apologize if I'm frustrating anyone, I just wanna learn so I can improve. |
|
|
|
02/22/2013 12:04:45 PM · #40 |
| From an angular perspective, which is what we're talking about here, you stand at 6 o'clock on a clockface, and the subject's in the center. Bringing the light "closer" to you means moving it from, say, 3 o'clock to 5 o'clock. On-camera flash or a light shining from behind you is a light "at the same place" as you are. A light at 12 o'clock is as far from you as it's possible to get, in an angular sense. This was kinda fuzzy terminology, I admit :-) |
|
|
|
02/22/2013 04:28:55 PM · #41 |
Strong light |
|
|
|
02/22/2013 04:38:14 PM · #42 |
That's more like it! Notice how you're picking up the detail of the bevel on the end now? That's one of the more subtle aspects of lighting, especially natural lighting; if the light were moved a little clockwise, that bevel would be lit nearly as much as its matching face and that detail would be minimized. Move the light counter-clockwise, to make it more of a raking light, and you'd also lose that detail.
In natural lighting situations, landscapes and architecture, it's easy to accept the light the way you happen to find it because it looks pretty good, not realizing that if you waited a few minutes, or for that matter came back in a few hours (or earlier in the day the next day), the light could be MUCH more descriptive.
Message edited by author 2013-02-22 16:38:56. |
|
|
|
02/22/2013 05:07:13 PM · #43 |
| I see it, such subtle changes makes a lot different looks. Great lesson. Ill do the field shooting tomorrow morning I forgot today was Friday and my son had school, I was gonna use him as the subject so as i rotated around I can see the difference on him as well as the field. Ill post those results here as well. |
|
|
|
02/22/2013 10:14:30 PM · #44 |
Originally posted by CaptUnderpants:
I see it, such subtle changes makes a lot different looks. Great lesson. Ill do the field shooting tomorrow morning I forgot today was Friday and my son had school, I was gonna use him as the subject so as i rotated around I can see the difference on him as well as the field. Ill post those results here as well. |
Well, before I had checked back into the thread, I had already shot some things to illustrate the same effect on the human face. I'd still encourage you to do the same, but here are some for everybody else to see, as well.
All shots were using an SB900 with a Lumiquest Softbox LTp. You'll notice there is no 90 degree decline right, which is because I didn't feel like moving my couch. You'll also see some variation in the light, because I didn't have much room to shot and currently am using an improvised boom, so the on axis shots are all shot with the light source further away. And because the distance was changing some, I was using ttl for speed. Anyway, it still shows the premise. I'll arrange them in this post according to where the light source was. My nomenclature lists the angle relative to the angle of view for the camera, so 90 left is perpendicular to the camera view, meaning it is like a side strip light or similar.
I've provided a key to show what the lights look like for the subject. I did not show overhead or the side lights as they aren't actually visible to the subject unless they turn their head and look.

___________________________ 


Message edited by author 2013-02-24 16:35:14. |
|
|
|
02/23/2013 12:57:48 AM · #45 |
| Damn Derek, that looked like it took you some time, I know you have a lot going on right now and I really appreciate that you did all that for me. I see the subtle change in every photo. This is what I plan on doing with my 5 year old tomorrow out in a field with natural light if he has the patience for it. |
|
|
|
02/23/2013 11:08:36 AM · #46 |
this mornings test didn't last long as the patience of my five year old wore thin rather quickly.


After he decided to sprint to the playground behind him I should have taken the raking light pictures of the field but it was still early in the morning and I wasn't thinking clearly.
Ill try and go outside of my house and get a shot of the raking light/backlight on my house if I can. Strong light too. |
|
|
|
02/24/2013 10:54:53 PM · #47 |
| I cant figure out how to take a photo of my house with raking light or back light because the sun is always over head here in Florida. Im thinking im going to have to wake up early to catch sunrise to get raking light and also be available at sunset for raking back light in order to get these shots. I also have to figure out which side of the house id be photographing to get these correctly. Am I on the right track? |
|
|
|
02/24/2013 11:05:33 PM · #48 |
The photographer's ephemeris is a great program to find out, for any location, what the direction of the sun and also it's elevation will be at any point in time. I'll see if I can find the link for you. It does the same for the moon too.
ETA: Here is the link: The photographer's ephemeris. I don't know where you are in Florida but I just looked at the details in the vicinity of Miami and found the following. The highest elevation the sun reached today was 54.9 degrees above the horizon, at 12:40pm, and at 8:30am, about 2 hours after sunrise, the sun's elevation was still only 20.9 degrees above the horizon.
Message edited by author 2013-02-24 23:28:40. |
|
|
|
02/25/2013 12:27:59 AM · #49 |
| You got the kid in backlight and flat light just dandy, yup. As for photographing architecture, it's actually often the case that very high light is useful for vertically raking a particular surface, which will highlight stucco texture, window detail, stuff like that. As long as there's not an overhanging roof that shades the whole wall anyway. Penny put you on the right track with the ephemeris. Study it and you'll see just how powerful a tool it can be. |
|
|
|
02/25/2013 12:32:20 AM · #50 |
Originally posted by PennyClick:
The photographer's ephemeris is a great program to find out, for any location, what the direction of the sun and also it's elevation will be at any point in time. I'll see if I can find the link for you. It does the same for the moon too.
ETA: Here is the link: The photographer's ephemeris. I don't know where you are in Florida but I just looked at the details in the vicinity of Miami and found the following. The highest elevation the sun reached today was 54.9 degrees above the horizon, at 12:40pm, and at 8:30am, about 2 hours after sunrise, the sun's elevation was still only 20.9 degrees above the horizon. |
Nice. Thanks for posting.
They have iPhone app and Android app links too. |
|
Home -
Challenges -
Community -
League -
Photos -
Cameras -
Lenses -
Learn -
Help -
Terms of Use -
Privacy -
Top ^
DPChallenge, and website content and design, Copyright © 2001-2026 Challenging Technologies, LLC.
All digital photo copyrights belong to the photographers and may not be used without permission.
Current Server Time: 05/12/2026 10:14:41 PM EDT.


