| Author | Thread |
|
|
03/14/2011 06:47:28 PM · #1 |
| What are your favorite items for supporting subjects when creating a "table top" composition? How do you keep the supports from showing in the image? Is traditional chem lab ring stand etc. the way to go? |
|
|
|
03/14/2011 07:20:14 PM · #2 |
Originally posted by jnenvir:
What are your favorite items for supporting subjects when creating a "table top" composition? How do you keep the supports from showing in the image? Is traditional chem lab ring stand etc. the way to go? |
LOL - anything that works, depending on the need.
Skewers, pins, modeling clay, Styrofoam, strategically placed leaves, a nicely draped cloth.
Or in other words, anything that works.
Sounds as if you have a project in mind?
:)) |
|
|
|
03/14/2011 10:49:34 PM · #3 |
| My problem is what to drape the cloth on, hold the skewer up, etc. Hadn't thought of styrofoam. Been trying to support glass with glasses and just get reflections from the supports. Maybe need larger glass base. Just trying to learn still life creation. |
|
|
|
03/14/2011 11:11:37 PM · #4 |
Cardboard boxes come in handy to stick skewers in, glue to, etc, etc.
Another handy helper for me is Calumet's PortaCube. They come in different sizes (and the illustration they give is not a good one). But essentially, it's a translucent box that provides diffused light and can act as a defined space for set-ups. I use two sizes, depending on the project. I've draped them in various fabrics, etc. They fold flat when not in use.
Of course, if you're handy, the sky's the limit on building scenery...
:)) |
|
|
|
03/14/2011 11:31:38 PM · #5 |
For a black background I've been using a piece of inexpensive, fairly coarse weave (similar to hopsack) cloth, which I drape over a microphone stand with boom attachment positioned horizontally, to make a temporary curtain rod; the cloth then drapes over a small table. The cloth is about 44" wide, plenty for still-lifes and macros. 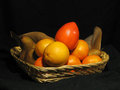  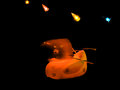
 ... and the revised animated version: ... and the revised animated version: 
Message edited by author 2011-03-14 23:31:52. |
|
|
|
03/15/2011 03:44:49 AM · #6 |
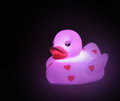
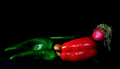
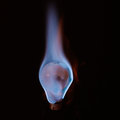
Velvet for the material, pins for support, styrofoam below if needed. Foamcore is another option. As Alice said, really anything I have around that might work at all. The key is just putting it out of view or cloning it out (depends on editing rules for challenges, obviously). A lot can be done through your lighting and placement to show/not show things.
You wouldn't know it, but there are 50 or so pins in this thing
 |
|
|
|
03/15/2011 08:39:35 PM · #7 |
 jnenvir Have we answered some of your questions. jnenvir Have we answered some of your questions.
Tell me, what are you working on. Or are you just chasing ideas.
Table-top photography takes so many forms.
(Unless, of course, it's secret or for a current Challenge) |
|
|
|
03/15/2011 11:05:07 PM · #8 |
Thanks so much for the information. Don't have a well defined project in mind. Just have not been successful with trying to position bottles and fruit, especially sliced fruit. With the bottles I tried placing on a sheet of glass and lighting from below. That did not work well at all. Now have a vacant room and a table, and am going to try to learn to create. Tacked a white cloth to the wall and just got wrinkles. Obviously I'm at an early stage of what I hope is a steep learning curve.
Message edited by author 2011-03-15 23:10:22. |
|
|
|
03/16/2011 04:14:30 AM · #9 |
Try and get your bg sheet as wrinkle-free as you can and light it using non-directional light. A big source works better, or if it's not big, make it at least on axis with your shot. You want to flatten the background by preventing shadows and on-axis does that. Next, make sure your intensity is high enough. It needs to be pretty bright to fully blow out, and of course this can be helped in post. At a certain point it gets hard because your bg becomes a competing light source and lights your subject in ways you don't want.
Also any bg that has a soft face will look better. I imagine fine polar fleece could work pretty well, for instance. |
|
|
|
03/16/2011 12:36:34 PM · #10 |
For a white BG, I am a big fan of placing the item on a lucite sheet ( available in widths up to 48" at your local hardware shop, and can be cut to size with wood working tools, and most importantly does not shatter when you drop something on it or over load it), and lighting the background separately. the key factor is keeping the distance big enough that you can blur out the Bg a bit and that lighting the subject doesn't change the BG

For positioning things, I like to use 36" brazing rod (sort of a thick rigid wire) stuck through foamcore board, using either tape, caulk or museum wax to adhere the item onto the wire. Brazing rods are also the dividers in the dice shot above if you don't know what they look like, I keep two thicknesses on hand, that one is the thinner. The nice thing about them is that they are very rigid.
Message edited by author 2011-03-17 22:27:42. |
|
|
|
03/16/2011 12:40:16 PM · #11 |
Originally posted by jnenvir:
Thanks so much for the information. Don't have a well defined project in mind. Just have not been successful with trying to position bottles and fruit, especially sliced fruit. With the bottles I tried placing on a sheet of glass and lighting from below. That did not work well at all. Now have a vacant room and a table, and am going to try to learn to create. Tacked a white cloth to the wall and just got wrinkles. Obviously I'm at an early stage of what I hope is a steep learning curve. |
As  Spiritualspatula says, white cloth can be a bother. To get a pretty good background (white or any other color), try light-weight poster board. If it's lightweight enough it bends nicely, making seamless curves that sometimes come in handy. Craft and art supply stores are full of that type of material. They also have a startling supply of substances that stick things together. Spiritualspatula says, white cloth can be a bother. To get a pretty good background (white or any other color), try light-weight poster board. If it's lightweight enough it bends nicely, making seamless curves that sometimes come in handy. Craft and art supply stores are full of that type of material. They also have a startling supply of substances that stick things together.
 BrennanOB's post came through while I was typing. Brazing rod. Something like a long metal skewer? BrennanOB's post came through while I was typing. Brazing rod. Something like a long metal skewer?
Message edited by author 2011-03-16 12:45:22. |
|
|
|
03/16/2011 12:45:51 PM · #12 |
Originally posted by GeneralE:
For a black background I've been using a piece of inexpensive, fairly coarse weave (similar to hopsack) cloth, which I drape over a microphone stand with boom attachment positioned horizontally, to make a temporary curtain rod; the cloth then drapes over a small table. |
Boom mic stand = genius! Thanks!
This thread is great for rookies like me. Lots of good info - very helpful! |
|
|
|
03/16/2011 12:47:19 PM · #13 |
| If you want a white background, another way to reduce the shadows from any wrinkles would be to backlight it -- put bright lights behind it and let it act as its own diffuser. |
|
|
|
03/16/2011 01:31:55 PM · #14 |
If you are the least bit handy, and either too cheap or dont have enough storage space for professional light cubes and bounce reflectors, you might want to check out Tinker tubes a series of simple plans using PVC pipe that can create a fair number of studio tools, for me the great joy of this system is that I can break them down and store these tools when they are not in use, and in a pinch I can canibalise them to fix the sprinklers. I made up a big light cube and a couple of light stands a few years ago and see no reason to buy better ones.
Message edited by author 2011-03-16 13:32:29. |
|
|
|
03/17/2011 07:48:32 PM · #15 |
| Wow -- thanks for all the great ideas. Never occurred to me to backlight the backdrop. Brazing rod may be around here -- my husband is a retired welder. Though mostly I find rolls of mig wire, short lengths might work. I'm checking out tinker tubes tonight. |
|
Home -
Challenges -
Community -
League -
Photos -
Cameras -
Lenses -
Learn -
Help -
Terms of Use -
Privacy -
Top ^
DPChallenge, and website content and design, Copyright © 2001-2026 Challenging Technologies, LLC.
All digital photo copyrights belong to the photographers and may not be used without permission.
Current Server Time: 01/14/2026 10:59:11 PM EST.


