| Author | Thread |
|
|
03/08/2011 09:11:12 AM · #1 |
I always shoot in 14-bit, compressed lossless RAW. It may seem like overkill but I've always thought it was good for making adjustments in processing to get the best final image, but yesterday I found just how valuable it actually is.
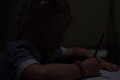
I was shooting the family cat, and if you know cats, you'll know they aren't the most cooperative subjects in the world. It looked at me for one brief second and I got the shot, unfortuantely my flash hadn't had time to recycle from the previous shot and I got this:
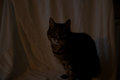
After that it jumped down and walked away, typical cat!
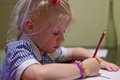
My amazement however came when I put the shot in Aperture, and just as I was about to discard it I decided to see what detail I could bring out. An Aperture only edit and crop (no Photoshop trickery) gave me this:
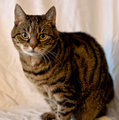
I would never have believed I could have pulled so much detail from such an underexposed shot! It wasn't the best shot of the lot, but it was the only one with the cat looking directly at the camera, so worth saving!
Lesson learned, those huge space taking files are worth having after all. Just thought I'd share! |
|
|
|
03/08/2011 09:16:59 AM · #2 |
| Nice example! Yes, RAW files are large, and folks used to complain about the "extra step" in the workflow, but with applications like Lightroom and Aperture, workflow is easier than ever. Back in 2004 I decided to shoot RAW for a weekend and see how it worked out... I never went back to JPEG. |
|
|
|
03/08/2011 09:20:40 AM · #3 |
I always shoot in the raw.
Message edited by author 2011-03-08 09:20:47. |
|
|
|
03/08/2011 09:27:29 AM · #4 |
What would happen if you exported the original RAW to a jpeg and then tried the same editing steps?
|
|
|
|
03/08/2011 09:28:27 AM · #5 |
Originally posted by Strikeslip:
I always shoot in the raw. |
isnt there some joe rogan clip where hes supposed to be a famous photographer and at some point asks his model if she is ok with nude photography and when she says yes he starts shooting with all his clothes off? |
|
|
|
03/08/2011 09:45:01 AM · #6 |
Originally posted by NiallOTuama:
What would happen if you exported the original RAW to a jpeg and then tried the same editing steps? |
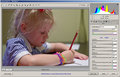
Tried what you suggested, exported the original RAW file, imported it, lifted the adjustments from the edit and stamped them onto the imported file, got the following results:
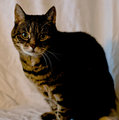
I also tried to adjust the jpg version to see if I could bring out some more detail with different settings but this was as good as it gets.
Message edited by author 2011-03-08 09:45:16. |
|
|
|
03/08/2011 09:46:37 AM · #7 |
Thanks for trying my little experiment :)
Very interesting indeed! I'm glad you kept the crop the same.
|
|
|
|
03/08/2011 11:40:22 AM · #8 |
| Can I ask what your editing steps were to get it to the right exposure? |
|
|
|
03/08/2011 11:45:06 AM · #9 |
i always shoot in raw, and this is the reason.
i can always make my own jpgs. |
|
|
|
03/08/2011 12:29:39 PM · #10 |
Originally posted by adamelliott111:
Can I ask what your editing steps were to get it to the right exposure? |
With a RAW file, it's just a matter of moving the "Exposure" slider to the right. This should be true for both Aperture and Lightroom. There may be additional steps taken, such as raising shadow brightness, which are different in Aperture vs. Lightroom. In Lr, this would mean moving the "Fill Light" slider to the right and/or reducing the black point, and/or messing with the luminosity curve. A final step would be to adjust NR, which would be a completely different process depending on which tool you are using (Lr, Aperture, or a plug-in for same). |
|
|
|
03/08/2011 12:43:26 PM · #11 |
Originally posted by kirbic:
Originally posted by adamelliott111:
Can I ask what your editing steps were to get it to the right exposure? |
With a RAW file, it's just a matter of moving the "Exposure" slider to the right. This should be true for both Aperture and Lightroom. There may be additional steps taken, such as raising shadow brightness, which are different in Aperture vs. Lightroom. In Lr, this would mean moving the "Fill Light" slider to the right and/or reducing the black point, and/or messing with the luminosity curve. A final step would be to adjust NR, which would be a completely different process depending on which tool you are using (Lr, Aperture, or a plug-in for same). |
In Aperture, sliding the Exposure slider to the right moves the entire histogram to the right. Sliding the Brightness slider to the right brings up the shadows without blowing out highlights. The Recovery slider recaptures highlights without detail. The Black Point slider recovers shadows without detail. I rarely use Shadows and Highlights sliders because they flatten the color and light in the image. Most raw images benefit from a simple s-curve adjustment.
A gentle hand is best on all these adjustments.
In general, RAW images respond really well to corrections in Color Temperature, when the camera's AWB (auto white balance) misses the mark.
Message edited by author 2011-03-08 12:44:25. |
|
|
|
03/08/2011 01:34:56 PM · #12 |
Originally posted by hahn23:
A gentle hand is best on all these adjustments. |
Indeed.
Originally posted by hahn23:
In general, RAW images respond really well to corrections in Color Temperature, when the camera's AWB (auto white balance) misses the mark. |
Good point, and something that is not often brought up... it is *so* easy to correct WB in RAW conversion, as compared to trying to post-adjust a JPEG, and the results are much better. |
|
|
|
03/08/2011 01:49:27 PM · #13 |
I'll accept that there are many advantages of RAW over JPEG, including White Balance correction, increased (potential) tonal range, and higher color resolution (bits/pixel), but don't overlook the power of simple editing tools to recover usable images from ugly-looking JPEGs.
While I was reviewing pictures for the Best of 2010 challenge, I came across these two "out-takes" which were taken on my last two trips on the train. The combination of contantly changing light and scene make adjusting settings almost impossible, so I get a lot of "bad" exposures.
I make almost all of my color/tone edits using Curves adjustment layers, in some cases with graduated masks made using the Blend/Gradient tool, or sometimes custom-painted on an alpha channel.
Original: 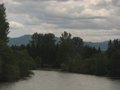 Edited: Edited: 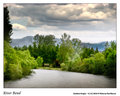 Example Curves setting: Example Curves setting: 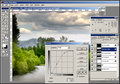
Original: 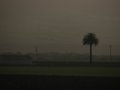 Edited: Edited: 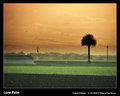 |
|
|
|
03/08/2011 01:54:08 PM · #14 |
I'm thinking your monitor needs adjusted ;) Both of those are eye-killing saturated.. (of course, I suspect you did that intentionally)... |
|
|
|
03/08/2011 02:24:36 PM · #15 |
Originally posted by coryboehne:
I'm thinking your monitor needs adjusted ;) Both of those are eye-killing saturated.. (of course, I suspect you did that intentionally)... |
Perhaps ... my (usual) monitor runs a little dark, though my prints tend to come out a little darker still, so I don't want ot adjust it much more. I am using a Sony CRT monitor -- if you are on an LCD monitor that would probably account for the difference. |
|
|
|
03/08/2011 02:28:15 PM · #16 |
Originally posted by GeneralE:
Originally posted by coryboehne:
I'm thinking your monitor needs adjusted ;) Both of those are eye-killing saturated.. (of course, I suspect you did that intentionally)... |
Perhaps ... my (usual) monitor runs a little dark, though my prints tend to come out a little darker still, so I don't want ot adjust it much more. I am using a Sony CRT monitor -- if you are on an LCD monitor that would probably account for the difference. |
Yep, on a LCD monitor...
*chuckles* man you are such a throw-back.... 1.3MP camera AND a CRT monitor!! Awesomeness. |
|
|
|
03/08/2011 02:34:18 PM · #17 |
Ah, the Olympus is a full 1.9MP ... and I usually shoot with the 6MP Canon. I've just always lived on a limited budget, and I use stuff until it doesn't work any more. Can I help it if the (near top of the line P&S) camera I bought almost eleven years ago is still (mostly) working?
Besides, with Photoshop 5 (not CS5) running on a blazing Pentium III, I don't need no stinking RAW files ... ;-) |
|
|
|
03/08/2011 02:52:33 PM · #18 |
Originally posted by GeneralE:
Besides, with Photoshop 5 (not CS5) running on a blazing Pentium III, I don't need no stinking RAW files ... ;-) |
not sure you could even if you wanted to... :) |
|
|
|
03/08/2011 03:55:31 PM · #19 |
Shooting 14-bit RAW's also helps to increase the dynamic range which is what gives the files the latitude for recovery.
I did a similar test a couple of months back by deliberately underexposing a shot at base ISO to get a feel for the useable limits.
Before:
Settings:
After:
Infact the second realisation was that ACR was a limitation in that it could only push +4 EV in post. The answer to that problem was to switch to a Mac and use RPP, (Raw Photo Processor), instead of ACR for RAW conversion which caters for +10EV corrections in post.
bazz.
|
|
|
|
03/08/2011 04:08:58 PM · #20 |
|
|
|
03/08/2011 04:36:44 PM · #21 |
Originally posted by GeneralE:
Ah, the Olympus is a full 1.9MP ... and I usually shoot with the 6MP Canon. I've just always lived on a limited budget, and I use stuff until it doesn't work any more. Can I help it if the (near top of the line P&S) camera I bought almost eleven years ago is still (mostly) working?
Besides, with Photoshop 5 (not CS5) running on a blazing Pentium III, I don't need no stinking RAW files ... ;-) |
Honestly, I really like it that you are using the older equipment and often getting pretty darn good results, sometimes better than people with MUCH more expensive equipment are producing. |
|
|
|
03/08/2011 04:44:58 PM · #22 |
This one?
Originally posted by smardaz:
Originally posted by Strikeslip:
I always shoot in the raw. |
isnt there some joe rogan clip where hes supposed to be a famous photographer and at some point asks his model if she is ok with nude photography and when she says yes he starts shooting with all his clothes off? |
|
|
|
|
03/08/2011 04:50:07 PM · #23 |
Originally posted by Hye5:
This one?
Originally posted by smardaz:
Originally posted by Strikeslip:
I always shoot in the raw. |
isnt there some joe rogan clip where hes supposed to be a famous photographer and at some point asks his model if she is ok with nude photography and when she says yes he starts shooting with all his clothes off? |
|
that kills me...."who do you love? no, me MEEEEEE!"
LOL |
|
|
|
03/08/2011 05:20:17 PM · #24 |
This is a good thread. Caused me to go back and work on an image which I had discarded as a lost cause. (Of course, I had retained the original RAW image... just in case.) RAW processing software has made huge advances/improvements in the past year. It's always better to get the capture right in the first place, but sometimes rescue missions are needed.
The original: 
The flash did not recycle fast enough to fire. I still had my shooting mode on "Manual" from a previous project. The ISO was set to 800. (Bad photographer in a hurry.)
Rescued: 
Using every exposure, shadows, highlights, curves, etc. slider available in Aperture 3.1.1., the histogram was normalized. The tones were okay, but the electronic noise needed to be handled in Dfine2. And, due to the heavy processing, the colors were "off".
Refined: 
Squared away lines and perspective with PTLens. Cropped. Then, in SEP2, preset 032 Film Noir 3 and Coffee Tone 1 gave me the look which I wanted for this guy.
|
|
|
|
03/08/2011 06:22:29 PM · #25 |
Love the final result Richard!
I agree, this is a fabulous thread to show what can be done to rescue those "OOOOPS!" shots we all have. Assuming, that is, that we shot RAW! |
|
Home -
Challenges -
Community -
League -
Photos -
Cameras -
Lenses -
Learn -
Help -
Terms of Use -
Privacy -
Top ^
DPChallenge, and website content and design, Copyright © 2001-2026 Challenging Technologies, LLC.
All digital photo copyrights belong to the photographers and may not be used without permission.
Current Server Time: 01/15/2026 02:14:51 AM EST.


