| Author | Thread |
|
|
06/07/2010 03:16:21 PM · #151 |
I was tempted to use Photomatrix, but being a noob at HDR, I really wanted to try it hands on. Trust me, you won't understand the details of why/how it works UNTIL you have tried it at least once manually (and when I say manually, I also include the initial sub pixel 'alignment' part by hand). It was very time consuming, I did at least 8 passes, with 8 different results, but I finally understand the concept now of why the dynamic range gets enhanced/compressed to a single image (of course this doesn't mean I took a good picture in the first place, since that to me is real photography, everything else is a tool to beautify it:-)
Originally posted by DrAchoo:
Originally posted by cpanaioti:
Originally posted by Alex_Europa:
Originally posted by Yo_Spiff:
One thing of interest I noticed in the stuckincustoms tutorial was he layered the original images under the merged and tonemapped image in order to bring some other details back in. A good thing to remember. |
I did something similar to that this time around (which was a first for me). I created 2 separate HDRs from the same 3 exposures: one pushed harder and one more natural. I then blended the 2 HDRs with a mask so that the crazy sky and haloing from the one that was pushed didn't show through.
- Alex |
That's a good tip. I was wondering on a few how they got the clouds to come out so well since every time I try one with clouds, the clouds just look weird. |
Drop the programs and do it manually. Regularly looks better in my book and I don't really remember the last time I used Photomatix. |
|
|
|
|
06/07/2010 03:24:11 PM · #152 |
| Yes, understanding how it works in the first place will help you understand what to tweak if you do decide to use a program like photomatix. However, if you're not a techno/minute detail junkie then you want the quicker way of doing things. You still need to understand what's happening to get the best from a set of exposures. |
|
|
|
06/07/2010 03:40:30 PM · #153 |
Originally posted by cpanaioti:
Yes, understanding how it works in the first place will help you understand what to tweak if you do decide to use a program like photomatix. However, if you're not a techno/minute detail junkie then you want the quicker way of doing things. You still need to understand what's happening to get the best from a set of exposures. |
I'm still trying to really figure out what the best set of exposures looks like..
Right now I'm basically figuring on three for darkest details, midtones, and highlights - and optionally an additional 2 or 4, bracketing the first three..
It seems that overall, with RAW I'm getting as good of results out of the three as I am out of the 5 or 7.. Although, honestly, there is a slight price in terms of noise.. I've found that the more exposures I use the less noise is apparent.. |
|
|
|
06/08/2010 10:40:02 AM · #154 |
| I was wondering the same thing and I have seen hdr's made from a single raw file where they changed the exposure right in the raw converter, is there a drawback to doing it that way? |
|
|
|
06/08/2010 10:45:49 AM · #155 |
Originally posted by curtpetguy:
I was wondering the same thing and I have seen hdr's made from a single raw file where they changed the exposure right in the raw converter, is there a drawback to doing it that way? |
The only drawback is you don't actually get as much dynamic range as if you used multiple RAW exposures. However, if that single RAW contains all the dynamic range needed to capture the desired level of highlight and shadow detail, it works just as well, IMO. My entry in the last HDR challenge was made from 3 JPG exposures, as my SLR was out of commission. |
|
|
|
06/08/2010 11:04:00 AM · #156 |
Originally posted by curtpetguy:
I was wondering the same thing and I have seen hdr's made from a single raw file where they changed the exposure right in the raw converter, is there a drawback to doing it that way? |
In a word, noise... The shadows become noisy as hell when they're brought up from a single RAW...
Also dynamic range is reduced, but, it does work wonders on shots that couldn't be taken as multiple exposures.. |
|
|
|
06/08/2010 11:14:35 AM · #157 |
| I haven't yet noticed a noise problem when doing it that way, but I'll keep an eye out for it. Of course there's a joke to be made there: "What shadows in HDR?" But as you also rightly point out, it's the best way to expand the range in an HDR shot while not losing the picture to moving leaves or a random bird or even people being present. |
|
|
|
06/08/2010 11:17:30 AM · #158 |
Originally posted by coryboehne:
The shadows become noisy as hell when they're brought up from a single RAW... |
Oh, yes, I forgot about that drawback. |
|
|
|
06/08/2010 11:25:22 AM · #159 |
Originally posted by Yo_Spiff:
Originally posted by coryboehne:
The shadows become noisy as hell when they're brought up from a single RAW... |
Oh, yes, I forgot about that drawback. |
Here, have a look at this... This is a 1x RAW HDR.
Mind you, that was after a TON of noise reduction...
Message edited by author 2010-06-08 11:25:40. |
|
|
|
06/08/2010 11:30:20 AM · #160 |
Originally posted by coryboehne:
Originally posted by Yo_Spiff:
Originally posted by coryboehne:
The shadows become noisy as hell when they're brought up from a single RAW... |
Oh, yes, I forgot about that drawback. |
Here, have a look at this... This is a 1x RAW HDR.
Mind you, that was after a TON of noise reduction... |
But there is also the benefit of using a single raw file. You can get shots of moving subjects. |
|
|
|
06/08/2010 11:31:57 AM · #161 |
Originally posted by coryboehne:
Originally posted by cpanaioti:
Yes, understanding how it works in the first place will help you understand what to tweak if you do decide to use a program like photomatix. However, if you're not a techno/minute detail junkie then you want the quicker way of doing things. You still need to understand what's happening to get the best from a set of exposures. |
I'm still trying to really figure out what the best set of exposures looks like..
Right now I'm basically figuring on three for darkest details, midtones, and highlights - and optionally an additional 2 or 4, bracketing the first three..
It seems that overall, with RAW I'm getting as good of results out of the three as I am out of the 5 or 7.. Although, honestly, there is a slight price in terms of noise.. I've found that the more exposures I use the less noise is apparent.. |
Very loosely, the best set of exposures seems to be, at a minimum, a set with no more than one stop difference between adjacent exposures. If your best exposure for the dark areas is plus 1, and your best exposure for the bright areas is minus 1, then 3 exposures is sufficient. If they are plus 2 and minus 2 respectively, you want 5 exposures. If they are plus and minus 1/2, you can get away with using a single RAW exposure with little or no loss of quality.
That's my rule of thumb.
If you try to gap the 5-EV range with 3 exposures, you are going to see noise.
You gain nothing by adding exposures outside the extremes; your darkest exposure should be correct for the bright areas, and your lightest exposure correct for the dark areas; if you add outliers beyond those points, the image will go muddy. Many of the HDR "pros" recommend using a 1/2 stop scale, or even a 1/3 stop scale (+1, +1/2, 0, - 1/2, -1 in the case of the +1, -1 range) but I've noticed no discernible difference on average scenes, using Photomatix. I can see where that approach might be more desirable if you are doing a manual merge, however.
The difference is in what the tone mapping brings to the party. When you do the manual merge, you are not usually doing any tone mapping, hence you are not working with fine-detail local area contrast changes. Manually merged HDR is mostly very pure, it doesn't "look" like HDR, in the sense that it doesn't incorporate any of that extreme tone mapping people so like to use.
Even so, I suspect that if that very "natural" look is what you're after, most of the time you can accomplish it with Photomatix by using the "exposure fusion" feature, which combines exposures without using tone mapping, and then possibly layering the individual exposures with that for local area enhancement...
R.
|
|
|
|
06/08/2010 11:38:15 AM · #162 |
Originally posted by Bear_Music:
Originally posted by coryboehne:
Originally posted by cpanaioti:
Yes, understanding how it works in the first place will help you understand what to tweak if you do decide to use a program like photomatix. However, if you're not a techno/minute detail junkie then you want the quicker way of doing things. You still need to understand what's happening to get the best from a set of exposures. |
I'm still trying to really figure out what the best set of exposures looks like..
Right now I'm basically figuring on three for darkest details, midtones, and highlights - and optionally an additional 2 or 4, bracketing the first three..
It seems that overall, with RAW I'm getting as good of results out of the three as I am out of the 5 or 7.. Although, honestly, there is a slight price in terms of noise.. I've found that the more exposures I use the less noise is apparent.. |
Very loosely, the best set of exposures seems to be, at a minimum, a set with no more than one stop difference between adjacent exposures. If your best exposure for the dark areas is plus 1, and your best exposure for the bright areas is minus 1, then 3 exposures is sufficient. If they are plus 2 and minus 2 respectively, you want 5 exposures. If they are plus and minus 1/2, you can get away with using a single RAW exposure with little or no loss of quality.
That's my rule of thumb.
If you try to gap the 5-EV range with 3 exposures, you are going to see noise.
You gain nothing by adding exposures outside the extremes; your darkest exposure should be correct for the bright areas, and your lightest exposure correct for the dark areas; if you add outliers beyond those points, the image will go muddy. Many of the HDR "pros" recommend using a 1/2 stop scale, or even a 1/3 stop scale (+1, +1/2, 0, - 1/2, -1 in the case of the +1, -1 range) but I've noticed no discernible difference on average scenes, using Photomatix. I can see where that approach might be more desirable if you are doing a manual merge, however.
The difference is in what the tone mapping brings to the party. When you do the manual merge, you are not usually doing any tone mapping, hence you are not working with fine-detail local area contrast changes. Manually merged HDR is mostly very pure, it doesn't "look" like HDR, in the sense that it doesn't incorporate any of that extreme tone mapping people so like to use.
Even so, I suspect that if that very "natural" look is what you're after, most of the time you can accomplish it with Photomatix by using the "exposure fusion" feature, which combines exposures without using tone mapping, and then possibly layering the individual exposures with that for local area enhancement...
R. |
Well said... Thanks Bear!~ |
|
|
|
06/08/2010 01:16:21 PM · #163 |
I theoretically disagree and I'll lay out my argument and then someone can educate me. If your 3 exposure bracket captures the width of the scene's histogram so the underexposed has no true whites and the over exposed has no true blacks, what are you gaining by having two more exposures in between? The data is the data and is recorded somewhere on the three exposures. Going to five is only going to introduce motion artifact as most images have some sort of potential for movement in them (most interesting ones anyway).
The only possible benefit I can see is on the lower end of the histogram. The sensor has fewer "steps" to record darks and if you push them upward on the histogram you will get more detail and less noise. This is not nearly as true on the highlight portion.
So when I capture a scene, I bracket +2/-2 stops and often when I'm working on an image I will wind up blending only two of them (but other times I'll use all three). I will blend in the areas of highlight and shadow that I want to add detail but will leave the midrange areas alone. Photomatix and such only add a grainy, textured feel which some people dig, but I've never enjoyed. It looks artificial to me and gimmicky. |
|
|
|
06/08/2010 01:59:17 PM · #164 |
Just because you have the limits covered doesn't mean you have ALL of the midtones exactly where they need to be. The greater the spread between the extremes, the more likely it is that neither extreme will have the midtones exposed correctly.
If I understand you correctly, you're saying that you ALWAYS shoot +2, 0, -2 on any given shot that you're planning to HDR? If so, you're not optimizing very well. If you're saying that you shoot 5 exposures in 1-stop increments and then choose which ones to optimize with, you're getting closer. But even so, if you use the +2, the 0, and the -2 you can't have full articulation of the midtones, Seriously. Those extremes are too far apart.
If you always get that "grainy, textured appearance" with Photomatix, perhaps this is why; it's inevitable if you don't have enough interim steps.
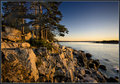
Where's the "grainy, textured appearance" on that one? And note that I did manually blend in the sky from a single exposure, because yes, you definitely have issues with featureless skies in Photomatix.
R.
|
|
|
|
06/08/2010 02:02:18 PM · #165 |
I'll post a full size of my challenge entry after voting is over... There is basically no graininess.. However it was taken as 12 exposures, with the sweet 9 chosen and used.. This is how I've been approaching the problem for some time now, take 9-12 exposures and choose later... Quite frankly I would love a program for my camera that would just slam out everything from -4 to +4 in 1 step increments...
However, until they do make a sweet toy to do that for me, I would like to decrease the number of exposures I'm finding that I need to take.. Hence the optimization question :)
Message edited by author 2010-06-08 14:03:08. |
|
|
|
06/08/2010 02:10:10 PM · #166 |
Originally posted by coryboehne:
I'll post a full size of my challenge entry after voting is over... There is basically no graininess.. However it was taken as 12 exposures, with the sweet 9 chosen and used.. This is how I've been approaching the problem for some time now, take 9-12 exposures and choose later... Quite frankly I would love a program for my camera that would just slam out everything from -4 to +4 in 1 step increments...
However, until they do make a sweet toy to do that for me, I would like to decrease the number of exposures I'm finding that I need to take.. Hence the optimization question :) |
The number of exposures is going to depend on the scene. If the shadows are very deep and dark you'll need more at the over exposure end to bring them out. The same goes if you have overly bright areas, you'll need more at the under exposure end to tone them down. |
|
|
|
06/08/2010 02:39:08 PM · #167 |
Just FYI for those interested. It sounds relatively easy to take multiple exposures, and somehow 'blend' them in a weighted fashion manually or using a software. However, there is a fair amount of science and mathematics involved behind the concept. If you are interested, here is a recent landmark paper on topic.
This is the same author who was a pioneer in instrumenting the Matrix movie 'bullet' scenes on the building's roof using image based illumination and rendering techniques.
Enjoy!
|
|
|
|
06/08/2010 02:49:43 PM · #168 |
Originally posted by Bear_Music:
Just because you have the limits covered doesn't mean you have ALL of the midtones exactly where they need to be. The greater the spread between the extremes, the more likely it is that neither extreme will have the midtones exposed correctly.
If I understand you correctly, you're saying that you ALWAYS shoot +2, 0, -2 on any given shot that you're planning to HDR? If so, you're not optimizing very well. If you're saying that you shoot 5 exposures in 1-stop increments and then choose which ones to optimize with, you're getting closer. But even so, if you use the +2, the 0, and the -2 you can't have full articulation of the midtones, Seriously. Those extremes are too far apart.
If you always get that "grainy, textured appearance" with Photomatix, perhaps this is why; it's inevitable if you don't have enough interim steps.
Where's the "grainy, textured appearance" on that one? And note that I did manually blend in the sky from a single exposure, because yes, you definitely have issues with featureless skies in Photomatix.
R. |
I see it in the darks of the trees, although it's an entirely acceptable level and that is a really nice shot. Still, shots utilizing Photomatix and Topaz do not typically look like that. I could pull out two or three dozen shots blindly from the current challenge and most would have textured noise. I could pull out the same number from your own portfolio, but you tend to go for that look (Best Seinfeld voice: "Not that there's anything wrong with it!").
You will have to explain to me how increasing a stop or decreasing a stop will change the relationship of the midtone values? I don't think it will, it will only add or subtract a constant amount across the board. Look at it this way, what is the difference in the midtones between a "correctly exposed" shot and one overexposed by one stop and then reduced in RAW by one stop (I'm talking about midtones only)? I submit there is very little difference. That is what you are essentially doing by trying to sandwich in extra shots all while introducing motion artifact and hogging up your HD space (Now each "picture" is 100MB? Ouch!)
I don't always use -2/0/+2. At times I will do -3/-1/+1 as it does better with the sky. I'll adjust on the fly while I'm shooting instead of doing five exposures on everything and then sorting it out at home. |
|
|
|
06/08/2010 03:27:01 PM · #169 |
Originally posted by DrAchoo:
... it will only add or subtract a constant amount across the board. |
This might be the source of the "error" since I am pretty sure that sensor sensitivity -- as with film -- is not exactly linear. Doubling the exposure of a dark pixel has a different effect than doubling the exposure to a light pixel, and the various midtone values will likewise respond with varying degrees of change to a fixed alteration in exposure. |
|
|
|
06/08/2010 03:35:59 PM · #170 |
Simplified explanation: The software has to "choose" which values to use. If it doesn't have the exact value it needs, it has to interpolate. Up to a point, the more variations you give it with the range of extremes, the smoother is the interpolation. The difference is negligible within 1-stop brackets, IMO, but can be seen within 2-stop brackets. It depends, however, on the spread of those "midtones" within the scene. It's not as simple as you're making it out to be. You're making it sound like the range is equivalent to a gamma adjustment (curve stays the same but moves left or right on the scale, when actually it moves more like an exposure adjustment, increasing steepness as it approaches the ends when you under/overexpose.
The difference can often be very slight, but it is nevertheless there. We know about it from Zone System too, where there are substantial differences between exposing/processing the negative versus making adjustments in the print. Up to a point, we can capture the same *range* in a B/W print, for example, by altering paper contrast, but we can't fully express the midtones without the perfect negative.
It's not a question of whether you can pull the detail out, it's a question of what sort of local contrast resides in the midtones.
I just saw GeneralE's comment I was typing this, and he's on the same track. It's not a linear response. And for that reason, you can get a more fully realized image out of a FLAT scene by using HDR techniques to EXPAND the tonal range than you can by simply adjusting contrast in the post-production.
R.
|
|
|
|
06/08/2010 03:49:12 PM · #171 |
As an additional resource to those mentioned earlier, here's another tutorial.. //beforethecoffee.wordpress.com/photomatix-tutorial/
Simple and clean.. I think this is a good read. |
|
|
|
06/08/2010 04:00:16 PM · #172 |
Originally posted by Bear_Music:
Simplified explanation: ... it's not a linear response. |
Say "Reciprocity Law Failure" three times real fast ... ;-)
Message edited by author 2010-06-08 16:00:32. |
|
|
|
06/08/2010 04:26:04 PM · #173 |
| Well, I submit that if the "difference is negligible within 1-stop brackets" then you are gaining very little in return for increase motion artifact and HD space. I will not claim to be an authority though and your mileage may vary. I don't feel like I miss too much with the 2-stop, 3-exposure bracketing I do. |
|
|
|
06/08/2010 07:17:31 PM · #174 |
Originally posted by DrAchoo:
Well, I submit that if the "difference is negligible within 1-stop brackets" then you are gaining very little in return for increase motion artifact and HD space. I will not claim to be an authority though and your mileage may vary. I don't feel like I miss too much with the 2-stop, 3-exposure bracketing I do. |
If you really NEED your -2 and your +2, then you're missing something, Doc. If your -2 is darker than it has to be, and your +2 is brighter than it has to be, for the lights and darks respectively, then your 0 will probably be fine but neither your over nor your under is optimized. If your over and your under are optimized, and there is more than that 3-stop range, you will get better results, even if only marginally so, with at least one more middle exposure.
R.
ETA: Look, the way you're describing it, it sounds like you just grab a 0, a +2, and a -2 on every shot and figure it all covered. But if spot metering and careful calculation would have shown you that a +1 was all you needed for the shadows and a -1 was all you needed for the highlights, then that +2 0 -2 pattern is giving you LESS quality than +1 0 -1 would have. You have to work harder to make the highlights bright and the shadows crisp. But your midtones will be fine, yes. And there are times when I find that the desirable range of exposures is + and - 2/3, even the 1-stop differential can be too much...
Frequently enough I'll do a 4-exposure sequence, with a - 1 1/3, a - 2/3, a 0, and a +2/3, to illustrate a common variation. There';s nothing magic about full stops. The goal is to fit the accurately exposed tones to the image. The above example would be for a scene with a lot of dominant bright areas, like a snowy scene. It will produce more subtle variations in the lighter midtones than the standard +1 0 -1, and the +2 0 -2 is no help because the changes are on the extremes, not in the middle where I need them.
Message edited by author 2010-06-08 19:24:47.
|
|
|
|
06/08/2010 08:21:47 PM · #175 |
| Maybe this is where doing it manually comes in handy. I'll possibly post an example when I get home of what I do. I watch, of course, for blinkies when I'm shooting and will adjust if I don't have them under control with a -2. |
|


