| Author | Thread |
|
|
01/30/2010 07:41:15 PM · #1 |
I find myself doing the same processing to the majority of my photos. There's so many options in Photoshop of which I know nothing, I wanted to start this thread to figure out what people "typically" do to their photos.
I primarily used high radius unsharp mask 25,50,0, but now I've been doing librodo's sharpening. I use curves and play with hue/saturation. I don't do much with layers, because I don't know what to do with layers.
What do you usually do with your photos? |
|
|
|
01/30/2010 07:43:58 PM · #2 |
Usually, up the brightness and contrast...if needed
then USM
curves, levels
saturation
colour balance
thats usually the basics of most of my photos
Message edited by author 2010-01-30 19:44:18. |
|
|
|
01/30/2010 07:51:47 PM · #3 |
"Most" of mine use pretty similar processing, with Curves (usually RGB and on the Blue channel), high-radius USM and then "regular" USM (66-88%, 0.6-1-3 diameter, 5 levels Threshold). If it's for an Advanced editing challenge and the photo needs it, I'll use additional Curves through a mask, often a gradient blend one which can simulate the effect of a graduated neutral-density filter.
I'll often use a new layer if I need to do some cloning or other local touch-up (e.g. dodge/burn) so that it's non-destructive to the original image, either by copying the entire Background layer, or by selecting the part which needs correction and pasting it into the same selection on a new layer so that it's in perfect alignment with the underlying image. |
|
|
|
01/30/2010 07:53:16 PM · #4 |
Originally posted by GeneralE:
"Most" of mine use pretty similar processing, with Curves (usually RGB and on the Blue channel), high-radius USM and then "regular" USM (66-88%, 0.6-1-3 diameter, 5 levels Threshold). If it's for an Advanced editing challenge and the photo needs it, I'll use additional Curves through a mask, often a gradient blend one which can simulate the effect of a graduated neutral-density filter.
I'll often use a new layer if I need to do some cloning or other local touch-up (e.g. dodge/burn) so that it's non-destructive to the original image, either by copying the entire Background layer, or by selecting the part which needs correction and pasting it into the same selection on a new layer so that it's in perfect alignment with the underlying image. |
Ok, I don't know about the gradient blend. Can you give just a quick low down of what settings you use?
|
|
|
|
01/30/2010 08:22:39 PM · #5 |
Originally posted by vawendy:
Ok, I don't know about the gradient blend. Can you give just a quick low down of what settings you use? |
If you send me this (or another more suitable) image (or put it in your Workshop folder temporarily) I'll send you an example of how I'd apply it.

The basic idea is to create a Curves adjustment layer, then use the Channels palette to fill it with a gradient blend. You can use the Curves adjustment directly on the mask channel to adjust what areas are affected and how much. Then go back to the adjustment layer and apply the correction(s) through the mask.
You can also then duplicate the adjustment layer and invert the mask channel to apply adjustments to the other part of the picture. |
|
|
|
01/30/2010 09:13:07 PM · #6 |
Originally posted by GeneralE:
Originally posted by vawendy:
Ok, I don't know about the gradient blend. Can you give just a quick low down of what settings you use? |
If you send me this (or another more suitable) image (or put it in your Workshop folder temporarily) I'll send you an example of how I'd apply it.
The basic idea is to create a Curves adjustment layer, then use the Channels palette to fill it with a gradient blend. You can use the Curves adjustment directly on the mask channel to adjust what areas are affected and how much. Then go back to the adjustment layer and apply the correction(s) through the mask.
You can also then duplicate the adjustment layer and invert the mask channel to apply adjustments to the other part of the picture. |
thanks! I moved it into the workshop.
This will be well worth playing with! |
|
|
|
01/30/2010 09:23:02 PM · #7 |
i depend most heavily on paintshop pro's "clarify"
almost all of my shots use it -- some more than others. i *think* it is similar to PS shadows/highlights function, but a bit different |
|
|
|
01/30/2010 09:35:17 PM · #8 |
Originally posted by karmat:
i depend most heavily on paintshop pro's "clarify"
almost all of my shots use it -- some more than others. i *think* it is similar to PS shadows/highlights function, but a bit different |
I've heard of clarify, but I don't know what it does. Shadows/highlights seem to be for evening out the range of a photo -- seems to flatten it a bit, but in interesting ways. What does clarify do? |
|
|
|
01/30/2010 09:37:50 PM · #9 |
Originally posted by vawendy:
I've heard of clarify, but I don't know what it does. |
I believe "clarify" has an effect similar to high-radius USM -- I think it's only a PSP command, not Photoshop.
I've copied your image -- you can move it back now. :-) |
|
|
|
01/30/2010 09:38:49 PM · #10 |
clarify in PSP is different than clarify in PS (based on conversations i've had with others).
it doesn't necessarily even the tones out, but it does seem to make the darks a bit darker and the brights a bit brighter. it also sucks any color out. i think i've got some examples. let me dig through my port and see fi i can find them.
found them
original 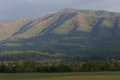
clarify +5 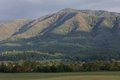
clarify +5 more 
(at this point, I would add some [a lot] of saturation back into the shot, probably)
clarify +25 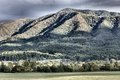
USM -- radius 100, strength 500, clipping 0 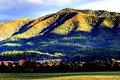
IF I added quite a bit of saturation back into the +25 one, it would be closest to the USM method.
Message edited by author 2010-01-30 21:42:29. |
|
|
|
01/30/2010 09:47:17 PM · #11 |
Originally posted by vawendy:
I find myself doing the same processing to the majority of my photos. There's so many options in Photoshop of which I know nothing, I wanted to start this thread to figure out what people "typically" do to their photos.
I primarily used high radius unsharp mask 25,50,0, but now I've been doing librodo's sharpening. I use curves and play with hue/saturation. I don't do much with layers, because I don't know what to do with layers.
What do you usually do with your photos? |
What is the "Librodo" sharpening? |
|
|
|
01/30/2010 09:47:26 PM · #12 |
Originally posted by karmat:
USM -- radius 100, strength 500, clipping 0 |
High-radius USM typically uses a low "amount" value along with the high radius -- in "normal use" it doesn't produce the extreme changes shown in your example here. I'll try to find some good examples later ...
Message edited by author 2010-01-30 21:48:38. |
|
|
|
01/30/2010 10:09:18 PM · #13 |
I tend to underexpose my shots a lot, and this technique works pretty well for those. However, I applied it to my Best of 2009 entry to boost the colors and bring out some shadow detail, and it worked well. Layers are numbered from the bottom, with the bottom one being "Layer 0."
Duplicate original 4 times (Layers 0 1 2 3 4).
Layer 1 - apply USM at 100%/2-5px/small threshold (like 4)
Layer 2 - apply Gaussian Blur, 2px
Layer 3 - apply Gaussian Blur, 10px
Layer 4 - apply Gaussian Blur, 50px
Set Layers 1 2 3 4 blending mode to Soft Light, and add a Levels Adjustment Layer to each one (check the box that says "Group with previous layer" as well).
Your picture should've gotten fairly dark and contrasty. Click one of the blurry layers, then add an Invert Adjustment Layer and a Hue/Saturation Adjustment Layer to it; adding these after clicking the actual layer should automatically check the "group with previous layer" checkbox and add them between the layer and the Levels Adjustment Layer. Make sure Invert is visible, and then go into Hue/Saturation and change the Hue slider to +/-180.
Now it's a bit of a guessing game, and a bit of a logic game. You have to play with the Levels Adjustment Layers, especially to lighten up mids in your non-inverted layers. You really have to watch the output leves on the sharpened layer - make sure the black level is not at 0, else you'll probably be losing a lot of shadow detail. If you have a full version of Photoshop (not Elements), Curves Adjustment Layers may work better. Remember you also have the opacity sliders, so if you have your Levels set to something you think is perfect (a bit higher and it'd be too high, a bit lower and it'd be too low) but the effect is a bit too strong, lower the opacity. You can also use Layer Masks if you don't like the effect in an area, or the sponge tool if it tends to saturate an area too much.
So basically, you're duplicating the original layer a bunch of times, setting all of them to soft light, having different degrees of sharpness/softness in each one, inverting a few, and adjusting levels on each. My Best of 2009 entry and my 2009-09 entry are both done that way. |
|
|
|
01/30/2010 10:26:45 PM · #14 |
Originally posted by karmat:
i depend most heavily on paintshop pro's "clarify"
almost all of my shots use it -- some more than others. i *think* it is similar to PS shadows/highlights function, but a bit different |
Clarify is in Lightroom and seems similar to what others are saying about it in PSP. I use it but try not to over do it, which is sometimes very easy to do.
I can't say I have a typical PS edit but I do more often than not start with contrast either with curves or levels. For B&W I convert then use the colour sliders to enhance contrast and bring out tonal values in the shadows. |
|
|
|
01/30/2010 10:57:51 PM · #15 |
having only paint net I use levels mostly that or curves resize and thats all i know to do
|
|
|
|
01/30/2010 11:05:52 PM · #16 |
RE: High-radius USM (image is unadjusted other than USM; normally I'd apply Curves first and "regular" USM afterwards):
Resized original: 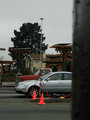 USM at 16%/64 dia/TH = 0: USM at 16%/64 dia/TH = 0: 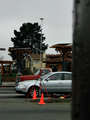 USM at 16%/64 dia/TH = 0 (applied twice): USM at 16%/64 dia/TH = 0 (applied twice): 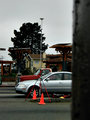
 vawendy: I did a pretty quick adjustment; could probably adjust masks and curves more precisely. Only showing screenshots of the RGB Curves -- I also made slight adjustments to the Blue/Yellow Curves through the same masks. When you have the adjustment layer selected you can edit its mask in the Channels palette. vawendy: I did a pretty quick adjustment; could probably adjust masks and curves more precisely. Only showing screenshots of the RGB Curves -- I also made slight adjustments to the Blue/Yellow Curves through the same masks. When you have the adjustment layer selected you can edit its mask in the Channels palette.
Original: Adjusted: 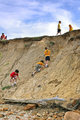
FG Curve:  FG Mask: FG Mask: 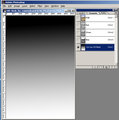 Sky Curve: Sky Curve:  Sky Mask: Sky Mask: 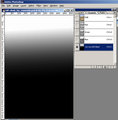
Message edited by author 2010-01-30 23:08:44. |
|
|
|
01/30/2010 11:33:04 PM · #17 |
| My first step is to always to a levels adjustment. This allows me to get my density correct. From here it all depends on what the image calls for and what I feel is needed to get the shot I saw in my head. It's worth noting that with levels it also allows me to do some color correction right away as well. You will notice that by either adding or subtracting a color will effect the density of the shot as well. This is how I was taught to proccess in a wet darkroom and it carries over to the digital world as well. |
|
|
|
01/31/2010 12:34:48 AM · #18 |
Originally posted by cryan:
My first step is to always to a levels adjustment. This allows me to get my density correct. |
Curves perform the same basic function as Levels, but with far greater control/precision. Try them out ... DPC Curves Tutorial ... Curves examples |
|
|
|
01/31/2010 03:24:59 AM · #19 |
RE: What's your typical photoshop edit?
 + +  = =  |
|
|
|
01/31/2010 05:44:22 AM · #20 |
I always shoot in raw so open in adobe raw convertor
up exposure by ~0.4
up blacks to about 8-10
up clarity to ~20
up vibrancy to ~10
open in cs4
curves & levels layer
a little dodge and burn layer if required
flatten, resize and noise ninja to sharpen, ~40% @ 0.8
That covers probably 95% of my edits
If there are some deep shadows I might open as object from raw, duplicate layer and then change the exposure and use masks to bring out the shadows etc
Message edited by author 2010-01-31 05:44:47. |
|
|
|
01/31/2010 06:45:22 AM · #21 |
lol, Interesting! I'll have to try this method sometime.
|
|
Home -
Challenges -
Community -
League -
Photos -
Cameras -
Lenses -
Learn -
Help -
Terms of Use -
Privacy -
Top ^
DPChallenge, and website content and design, Copyright © 2001-2025 Challenging Technologies, LLC.
All digital photo copyrights belong to the photographers and may not be used without permission.
Current Server Time: 12/24/2025 12:02:25 PM EST.


