| Author | Thread |
|
|
03/19/2009 02:19:14 PM · #1 |
Hi All!
Recently, I have really enjoyed going out and taking night photos. This week has been exceptionally clear (for Belgium), and I have been trying to take advantage of it.
Last night I went out and was trying to get a starblur photo, but failed at it. Initially I did a 15 minute exposure that was located in the middle of a field (at the darkest area I could find in Belgium), but it was way overblown. I had my camera set on the lowest (or is it the highest?) Fstop, 3.5, and an ISO of 400. I tried a 3minute exposure, but again it was too overblown. 70 seconds ended up working quite well, but at 70 seconds with those settings you get a starblur, but it is more of a distraction than anything.
How would I go about getting a decent starblur in an area where the light polution is relatively high? I plan on experimenting in my backyard tonight (because I was freeezing in that feild last night), but I hope that some of you can help my learning curve a bit!!! Thanks ahead of time! |
|
|
|
03/19/2009 02:25:16 PM · #2 |
Low aperture number means wider opening (more light/exposure). I'd start by reducing the ISO value, since that should reduce noise (ISO 100 will give you one-fourth the light for the same exposure time), and then closing up the aperture (higher numbers) gradually until you get the result you want.
Check out this tutorial. |
|
|
|
03/19/2009 02:26:18 PM · #3 |
You've already discovered that one critical factor is the light pollution in the area, which will determine what is the maximum exposure you can use. Here are a few additional tips you can use:
- Stop down a bit, from f/3.5 to perhaps f/5.6 or even f/8. that will allow longer exposures, and the stars will still show up quite well.
- Set your ISO to 100. No need for high ISO for star trail images. That change alone will allow you 4x longer exposures
- Shoot multiple exposures and combine them in post (note, not legal for DPC, even in advanced) :-P In order to effectively combine several exposures, you must start each exposure *immediately* after the last. There are various methods available for combining them; it's a separate topic entirely. |
|
|
|
03/19/2009 02:29:12 PM · #4 |
a larger f number is a smaller aperture and therefore lets less light in.
If the correct exposure is
f/3.5 ISO 400 60s
you can immediately drop your ISO to start with
f/3.5 ISO 100 240s will be the same exposure
for every time you halve the ISO you need to double your shutter speed
every time you decrease your aperture by 1 stop you again need to double your shutter speed but remember your camera will go in 1/3 stop, so
f/5 ISO 100 480s
f/7.1 ISO 100 960s
Message edited by author 2009-03-19 14:30:29. |
|
|
|
03/19/2009 02:30:12 PM · #5 |
The smaller the f/number the wider the aperture is. The wider the apterture is the less time is needed for a "correct" exposure. Since you want to expose for a longer period of time, reduce the aperture by a few stops (each stop cuts the amount of lighting through to the sensor in half), maybe something in the f/8-9 range. I took this in a relatively bright suburb of New York, take a look at the camera data...this might be a good starting point:
Wow. beaten to it... Well my $.02 anyway. |
|
|
|
03/19/2009 02:32:12 PM · #6 |
| Lowering the ISO will also help reduce noise... |
|
|
|
03/19/2009 02:57:26 PM · #7 |
| Great!!! I am glad that I was thinking along the right lines. I REALLLY appreciate all your help! Now I get to go play! |
|
|
|
03/19/2009 04:58:05 PM · #8 |
Originally posted by kirbic:
- Shoot multiple exposures and combine them in post (note, not legal for DPC, even in advanced) :-P In order to effectively combine several exposures, you must start each exposure *immediately* after the last. There are various methods available for combining them; it's a separate topic entirely. |
I thought it is allowed to take multiple exposures, even if we change the exposure settings manually and hence take some seconds of interval between each shot... Or did I get it wrong? Could you please explain a little bit?
I just don't want to be DQ'ed because of wrong interpretation of the rules...
Thanks! |
|
|
|
03/19/2009 05:12:53 PM · #9 |
Originally posted by marcusvdt:
Originally posted by kirbic:
- Shoot multiple exposures and combine them in post (note, not legal for DPC, even in advanced) :-P In order to effectively combine several exposures, you must start each exposure *immediately* after the last. There are various methods available for combining them; it's a separate topic entirely. |
I thought it is allowed to take multiple exposures, even if we change the exposure settings manually and hence take some seconds of interval between each shot... Or did I get it wrong? Could you please explain a little bit?
I just don't want to be DQ'ed because of wrong interpretation of the rules...
Thanks! |
We had a lengthy discussion about this when I was on SC, and the consensus was that the moving stars meant that each frame wasn't really the "same scene" anymore, same as if a subject were moving in a street scene. While I disagree with this interpretation, those are the rules.
|
|
|
|
03/19/2009 05:28:05 PM · #10 |
Originally posted by kirbic:
Originally posted by marcusvdt:
Originally posted by kirbic:
- Shoot multiple exposures and combine them in post (note, not legal for DPC, even in advanced) :-P In order to effectively combine several exposures, you must start each exposure *immediately* after the last. There are various methods available for combining them; it's a separate topic entirely. |
I thought it is allowed to take multiple exposures, even if we change the exposure settings manually and hence take some seconds of interval between each shot... Or did I get it wrong? Could you please explain a little bit?
I just don't want to be DQ'ed because of wrong interpretation of the rules...
Thanks! |
We had a lengthy discussion about this when I was on SC, and the consensus was that the moving stars meant that each frame wasn't really the "same scene" anymore, same as if a subject were moving in a street scene. While I disagree with this interpretation, those are the rules. |
Part of the problem with using mulptiple images with star trails is that you are not "stacking" the star trails, but laying them end to end, in effect creating a feature (long trails) not present in any of the individual frames, which is not allowed. |
|
|
|
03/19/2009 06:22:31 PM · #11 |
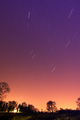
Well, after playing around tonight with a 22minute exposure, at 100ISO, and f10, this is what I got.
I took one more photo at a different location but I took it as a landscape and the star blur was there but the curvature didnt show up as well.
BTW: I know you can turn (not sure exactly what it is) on-camera noise reduction on and off. By default it is on, which means that for this 22minute exposure it took 22minutes to process. Is there an advantage to having this function on or off?
 |
|
|
|
03/19/2009 06:27:26 PM · #12 |
| You get noise reduction without the guessing that external applications do. The second 22 minute exposure takes a picture of all the noise, then subtracts it from the first exposure. |
|
|
|
03/19/2009 06:51:07 PM · #13 |
Shot this one night F3.5 ISO 100 20 min. one thing is to make sure you use your mirror lockup and a cable release. Find the north star.
 |
|
|
|
03/19/2009 07:09:26 PM · #14 |
Originally posted by brumer0:
...I know you can turn on-camera noise reduction on and off. By default it is on, which means that for this 22minute exposure it took 22minutes to process. Is there an advantage to having this function on or off? |
The advantage is, you get the "fixed pattern noise" subtracted automatically. The disadvantage is, well, you know, that 22 minute thing.
So, here's the scoop. The fixed pattern noise is only half the story, the other half, or more than half at higher ISO, is the random noise. Combining multiple exposures reduces random noise, because the noise pattern is different in each shot. The fixed noise is not affected, because it is in the same pattern in each shot. So, in order to reduce both random and fixed pattern noise, do the following:
Take your 22-minute exposure and break it up into, say 22 1-minute exposures. Before you start your exposure series, take some shots with the lens cap on using the same settings 1 minute, same ISO, etc.), then take your 22 images, then take some more lens cap on photos.
The lens cap on photos are your "dark frames." Average all the dark frames together (the before and after ones both), combine your 22 images, then subtract the averaged dark frame from the result. Bingo, random noise is reduced by a factor of about 5 to 1 and fixed-pattern noise is also reduced dramatically.
This is the kind of procedure that astrophotographers do in their sleep.
Message edited by author 2009-03-19 19:11:05. |
|
|
|
03/20/2009 04:20:52 AM · #15 |
kirbic,
That is some fantastic information. When you combine (or average) the multiple exposures to reduce the noise, do you use the 'Generate HDR' funtion in photoshop, or is there another app that you use? |
|
|
|
03/20/2009 07:52:08 AM · #16 |
Originally posted by brumer0:
kirbic,
That is some fantastic information. When you combine (or average) the multiple exposures to reduce the noise, do you use the 'Generate HDR' funtion in photoshop, or is there another app that you use? |
It can be done completely manually, and there are some apps out there that can do it as well. To do it manually, start with image 1 as layer 1, load image 2 as layer 2, image 3 as layer 3, and so on. Set opacity of layer 1 to 1/1 = 100%, layer 2 to 1/2 = 50%, layer 3 to 1/3 = 33%, etcetera. Done. |
|
|
|
03/20/2009 10:45:20 AM · #17 |
| Awesome. Ill have to play around with that. |
|
|
|
03/20/2009 11:55:57 AM · #18 |
Wait....
wouldnt having a transparency of 1, 1/2, 1/3, 1/4, 1/5, 1/6, etc... make the start of the starblur really bright, and the end of it barely visible? |
|
|
|
03/22/2009 12:04:01 PM · #19 |
Originally posted by brumer0:
Wait....
wouldnt having a transparency of 1, 1/2, 1/3, 1/4, 1/5, 1/6, etc... make the start of the starblur really bright, and the end of it barely visible? |
Nope... It's not intuitively obvious, but the end result is that all layers have the same visibility. |
|
|
|
03/22/2009 12:34:20 PM · #20 |
This is all interesting stuff.
I have found by trial and error to use tungsten/incandescent white balance, and it will make the orange sodium light polluted sky a nice midnight blue in the images.
|
|
Home -
Challenges -
Community -
League -
Photos -
Cameras -
Lenses -
Learn -
Help -
Terms of Use -
Privacy -
Top ^
DPChallenge, and website content and design, Copyright © 2001-2026 Challenging Technologies, LLC.
All digital photo copyrights belong to the photographers and may not be used without permission.
Current Server Time: 01/11/2026 06:04:03 AM EST.


