| Author | Thread |
|
|
03/01/2008 07:10:11 PM · #1 |
I've gotten quite a few comments that some of my photos seem "flat". How do I avoid this? Is it the lens, camera, post processing, the aperature I select?....anything else?
Most of the time I shoot in Av, except landscapes I shoot in ADEP.
I'm really just trying to learn, and I really want to give my pictures "pop". Any tips, tricks and hints for me to accomplish this would be much appreciated. |
|
|
|
03/01/2008 07:13:52 PM · #2 |
Lighting is usually the culprit if your image looks flat.
The best light is early or late in the day when it is shining across your subject.
Do you have an image (not currently in voting) that you can post so we can be more specific?
Message edited by author 2008-03-01 19:14:06. |
|
|
|
03/01/2008 07:16:13 PM · #3 |
| Do you do any curves adjustments in processing? I find that often helps with my images that look a bit flat, that and playing with saturation. |
|
|
|
03/01/2008 07:17:16 PM · #4 |
| I get that a lot as well about my photos. I've been working on improving them using Photoshop, and they look better but I still feel like I'm not sure what I'm doing and if I'm doing it right. I look forward to whatever suggestions come up in this thread. |
|
|
|
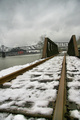
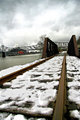
03/01/2008 07:20:13 PM · #5 |
this is one example, but the one that I really want to know about is currently being voted on

that one was taken w/out a flash, so the lighting could definately be improved
the one in current voting was taken in bright sunlight, so I guess that could be the culprit
as for curves adjustment, no I currently don't do any adjustment with that at all...I'm just not experienced enough with anything dealing with post processing and how to make the image look good.
how would you suggest I look at the curves? |
|
|
|
03/01/2008 07:21:23 PM · #6 |
| For the one that's currently being voted on, wait until the challenge is over and if you want more input, post it then. We'll consider this one at the moment. |
|
|
|
03/01/2008 07:22:25 PM · #7 |
| Curves, levels, or brightness contrast can all be used to give your photos a little more pop. |
|
|
|
03/01/2008 07:25:39 PM · #8 |
Originally posted by XMountaineer:
this is one example, but the one that I really want to know about is currently being voted on
that one was taken w/out a flash, so the lighting could definately be improved
the one in current voting was taken in bright sunlight, so I guess that could be the culprit
as for curves adjustment, no I currently don't do any adjustment with that at all...I'm just not experienced enough with anything dealing with post processing and how to make the image look good.
how would you suggest I look at the curves? |
As a starting point, I would suggest using levels rather than curves. Baby steps.
Levels is much easier to comprehend though curves gives you much more control.
In levels, move the far left and far right markers so they just touch the edge of the histogram. This is for shadows and highlights. The middle marker is for midtones. Every image is different so just play with it and see what changes happen. Make sure the preview box is checked. |
|
|
|
03/01/2008 07:25:42 PM · #9 |
| This is a good place to start. Depending on what program you are using, do a google search and you should get quite a few results. |
|
|
|
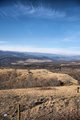
03/01/2008 07:30:10 PM · #10 |
thank you all for your help so far.
I do mess (I use that term loosely) with highlights and shadows. I'm using PSP X2.
here is another example that I feel is "flat"...and it was taken the same time of day as the one thats in current voting
 |
|
|
|
03/01/2008 07:32:14 PM · #11 |
Originally posted by andersbs:
This is a good place to start. Depending on what program you are using, do a google search and you should get quite a few results. |
thank you for that link! |
|
|
|
03/01/2008 07:35:28 PM · #12 |
| No problem! Theres a wealth of info on this site! :D |
|
|
|
03/01/2008 07:42:53 PM · #13 |
Hope you don't mind but I took your photos and added a bit of contrast. I only did about two minutes of editing on this and it seems to pop a bit more. I did USM for contrast at 20%/40pix radius/0threshold, slight levels adj, slight curves and a dup layer on overlay blending at 20% oppacity. There are many ways to boost the contrast to rid the flat look, i like the USM method used for basic editing. Hope that helps a bit as it is just a touch of how to boost contrast Trevor~
Message edited by author 2008-03-01 19:44:40. |
|
|
|
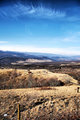
03/01/2008 07:43:22 PM · #14 |
Originally posted by XMountaineer:
thank you all for your help so far.
I do mess (I use that term loosely) with highlights and shadows. I'm using PSP X2.
here is another example that I feel is "flat"...and it was taken the same time of day as the one thats in current voting
|
I can't just comment on the flatness since I feel there are other improvements that could be made.
The horizon line is almost in the middle and I feel for this image that makes it a bit static. Either show more sky and use a polarizer to bring out the blue and texture in the clouds. I don't think this was your intent which leads me to option 2. Get down lower and put your lens through the fence. Fill the image with the leading hills and the distant mountains leaving only a sliver of sky at the top.
Now to the flatness issue. What was the aperture? Shooting in ADEP won't necessarily get you the depth of field you want. Shoot in manual or Av and set the aperture to f16 or 22. Then use a point about 1/3 of the way into the scene to focus on. 1/3 in front of the focus point and 2/3 behind will be in focus.
That takes care of capturing the image. Now for processing.
Applying USM right off the bat with the following settings will help most images by increasing contrast which will in turn address the flatness.
Amount 20
Radius 50
Threshold 0
Sorry for the novel. I hope it helps in some way.
Message edited by author 2008-03-01 19:44:00. |
|
|
|
03/01/2008 07:45:24 PM · #15 |
Basic Curves Tutorial
Curves can be used to extend the tonal range and to heighten the contrast in the mid-tones. The usual shape is an "S" with the darks made darker and the lights lighter; contrast will be enhanced in the tones where the curve is closer to vertical.
Another way to enhance the contrast is to use the Unsharp Mask filter with a high radius/low "amount" setting. If you are using Photoshop or Elements, try these settings:
Amount: 15%
Diameter: 60 pixels
Threshold: 0
Here I applied slightly "milder" settings to your example photo. You need to watch for (or tolerate) some blocking of the shadows and some blown highlights, but I find it an often-effective technique for getting rid of that "flat" look.
 Settings for this version were Settings for this version were
Amount: 12%
Diameter: 48 pixels
Threshold: 0
|
|
|
|
03/01/2008 07:53:26 PM · #16 |
| wow, you all are impressive! |
|
|
|
03/01/2008 08:01:59 PM · #17 |
alright, so what I'm gathering here is "basically" to increase contrast from highlights to shadows....correct?
...and straight from the camera to make it not flat is to improve lighting...? |
|
|
|
03/01/2008 08:05:30 PM · #18 |
Originally posted by XMountaineer:
...and straight from the camera to make it not flat is to improve lighting...? |
And if you're shooting jpeg, play with the contrast parameter so see what works best for the image you are trying to take. This is not a set it and forget it type thing. Each image is different. |
|
|
|
03/01/2008 08:10:53 PM · #19 |
So I'm not understanding how USM affects contrast. My understanding was that when you use USM you are basically softening the image. Is that correct? What about softening an image improves the contrast?
I've also recently been using Sharpen as one of the last steps on my photos. Does that undo the contrast adjustment done by USM?
I'm really new to this whole post-processing thing, so thanks for the help. |
|
|
|
03/01/2008 08:14:14 PM · #20 |
Originally posted by XMountaineer:
alright, so what I'm gathering here is "basically" to increase contrast from highlights to shadows....correct?
...and straight from the camera to make it not flat is to improve lighting...? |
Okay, this is spoken as one with no training and very limited skills, so hopefully someone will correct me if I'm wrong :)
Depending on what you're shooting, DOF can help too. Closeups can look flatter if everything is in focus, because the eye tends to put everything in-focus on pretty close to the same plane.
(btw, GeneralE's tip is pretty much my first step on most shots. I don't always leave it there, but I try it out, usually at about 20% and 60pixels radius. It cuts that "haze" that straight-from-the-camera always seems to have.) |
|
|
|
03/01/2008 08:15:33 PM · #21 |
Moose408 brings up an interesting point that I've been concerned about since I started post processing....(which is since I've been a member here <1month)
where to start....
I've been reading in the forums where some people start w/ USM and others wait until they are done resizing then USM.
I guess what I'm asking is if anyone has a "set" way they "always" PP. Like start with Levels, then Curves, then....etc. I'm sure each photo is different, but anything will help me at this point. |
|
|
|
03/01/2008 08:17:52 PM · #22 |
The USM settings posted in this thread so far are first step USM.
The USM applied after re-sizing is specifically to bring back sharpness that is lost when an image is resized. USM settings for this would be something like Amount 120, Radius 1.8, Threshold 2.
|
|
|
|
03/01/2008 08:20:08 PM · #23 |
Originally posted by cpanaioti:
The USM settings posted in this thread so far are first step USM.
The USM applied after re-sizing is specifically to bring back sharpness that is lost when an image is resized. USM settings for this would be something like Amount 120, Radius 1.8, Threshold 2. |
this forum is awesome!
I'm learning a LOT just from this thread. |
|
|
|
03/01/2008 09:02:55 PM · #24 |
Originally posted by cpanaioti:
The USM settings posted in this thread so far are first step USM.
The USM applied after re-sizing is specifically to bring back sharpness that is lost when an image is resized. USM settings for this would be something like Amount 120, Radius 1.8, Threshold 2. |
The reason for applying USM after resizing is that the settings depend on the actual number of pixels in the image -- a thin object like a rope might be 4 pixels across at the size of a DPC submission, but 20 pixels across on a print-size image.
USM works by looking for neighboring pixels which differ in tonal value by some specified amount (that's the "threshold" setting), and then lightning the lighter pixels and darkening the darker pixels, and thereby making the image appear "sharper." The radius setting determines how many pixels on each side of the tonal junction are affected.
USM or Unsharp Mask sharpens an image, it does not make it softer. I'm sure the "Sharpen" filter works the same, but with arbitrary pre-set values instead of the controls of the USM filter.
I have some USM examples here.
I have some Curves examples here.
Note that I configure my Curves graph with the highlights in the lower-left, opposite of what's shown in the DPC tutorial. You change this setting by clicking on the arrows on the gray tone scale below the graph. |
|
|
|
03/01/2008 09:20:07 PM · #25 |
ok, using some of the tips here, I took my favorite photo so far for challenges and re-edited it, let me know what you think
original submitted for challenge
re-edit
better? worse? |
|
Home -
Challenges -
Community -
League -
Photos -
Cameras -
Lenses -
Learn -
Help -
Terms of Use -
Privacy -
Top ^
DPChallenge, and website content and design, Copyright © 2001-2026 Challenging Technologies, LLC.
All digital photo copyrights belong to the photographers and may not be used without permission.
Current Server Time: 01/08/2026 08:23:55 PM EST.


