| You are not logged in. (log in or register) | |
|
|
|
Tutorials :: Multiple Personality Editing
Multiple Personality Editing by levyj413This tutorial uses Photoshop CS2. There may be equivalent features in other software, but I know only Photoshop. I've found that for day-to-day editing, layer masks (see my tutorial) are useful for controlling various adjustment layers like curves, levels, and color changes. But you can also have a lot of fun with "multiple personality shots" like my entry for Triptych II:
This tutorial walks through the steps of making such an image. I use the shot above as the example, but the techniques apply to any composite. At its simplest, this takes five steps:
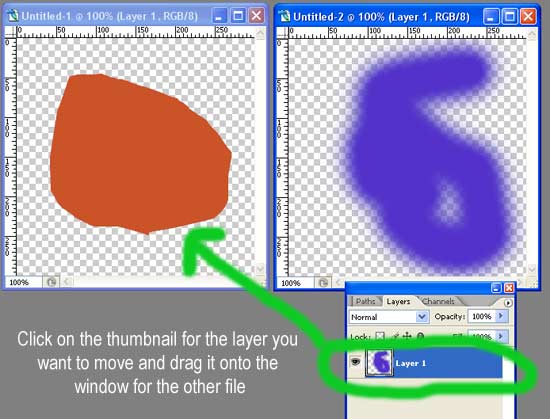
When you're done, I have a couple of assignments: there's nothing like doing it to learn how it all works. ShootUse a tripod and manual settings. You want the lighting to be the same for each shot. Also think about how each image will appear in the final composite. When doing these shots, you can get as complex as you want; changing clothes and hair really sells the effect well. If you shoot outside, try to move quickly. The longer you take, the higher the chance the light will change. To be sure my daughter was in the frame from start to finish, I put something on the ground so she'd be in the frame on the left side. Then I put something else down on the right and told her to land with her foot next to it (that's the thing by her left foot in the right-hand image). Then she did several cartwheels while I shot on burst mode. I picked the one that had the best angle and separation between poses. Edit Each Image to Look GoodIn this case, the bright sun meant some areas of each image were overexposed. This is also when I sharpened. Be careful with lighting and color changes at this step because you don't want the images to look like they were shot at different times. Combine Images into One FileOpen one file as the "base" layer to provide the background for the others. Then open each additional shot and copy it as a layer into the base file. One way to do that is to click and drag the new layer from the layers tab over to the base file and let go; it will then appear as a layer in the base file. You might need to move the new layer to align it correctly. In the example below, I'm moving the blue shape from "untitled-2" to a new layer in "untitled-1" and making it the top layer in that file. The first image shows me clicking and dragging from the layers panel in untitled 2:
The second image shows that untitled-1 is now active, and the layers panel shows there are now two layers, with the new one on top:
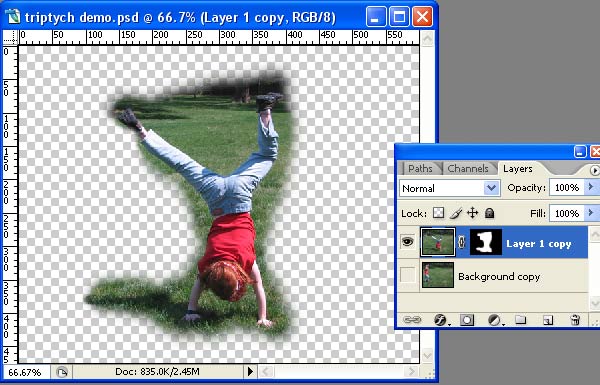
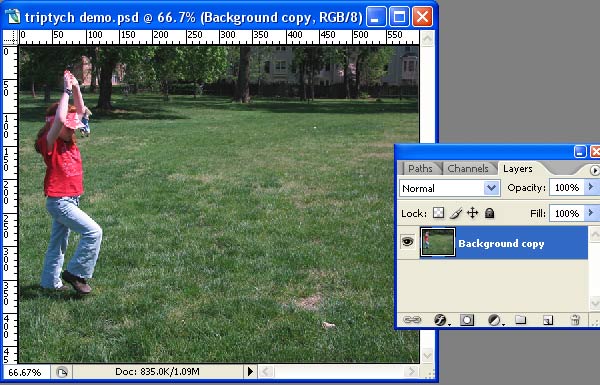
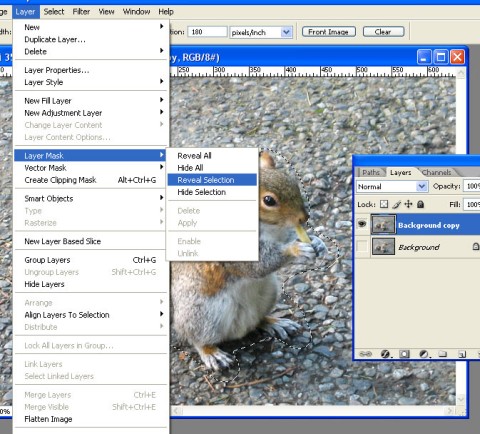
For my triptych, I used the leftmost shot as the base without a layer mask: Use Layer Masks to Create the Final CompositeWith the base providing most of the background, mask out the portion of each additional shot that you want to show. That way, minor changes in the background or lighting won't matter. In each of the triptych's middle and right-hand images, I first used a quick mask to select the area I wanted to show in the final image. Then I created the layer mask by going to the menus and choosing edit->layer mask ->reveal selection. As a reminder, here's the menu selection from the layer masks tutorial:
Here's the quick mask for the middle image. As you can see, there were a couple of girls chasing a ball in the background, but I just left them out of the part that showed. Note that the layers panel initially just shows a thumbnail of the whole image:
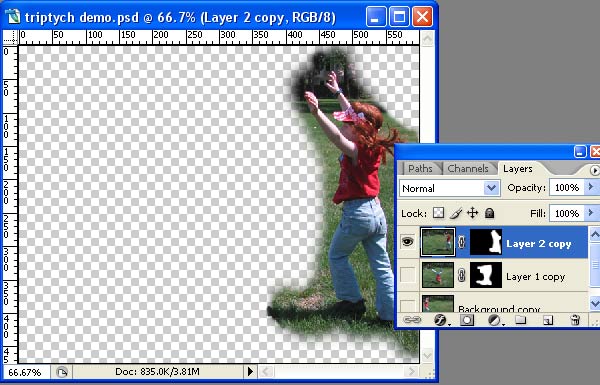
Here's the layer mask applied to the second image. Now note how the layers panel now shows the layer mask. What's white in the layer mask shows up and what's black becomes transparent. Read the layers mask tutorial for more details on creating layer masks. That tutorial explains how to edit the layer mask later if you want to; the transparent pixels aren't really gone, just hidden.
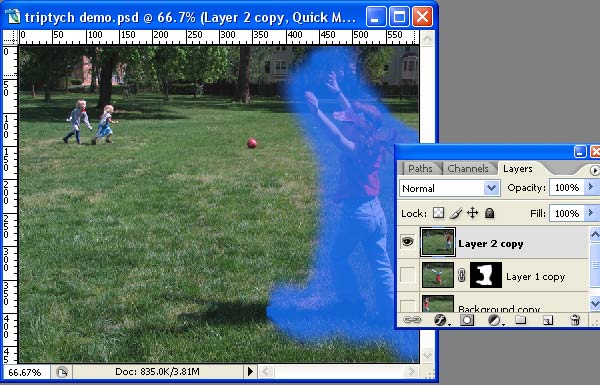
The next two screen shots show the same process for the right-hand image. Those girls were still there with their ball, but still weren't a problem:
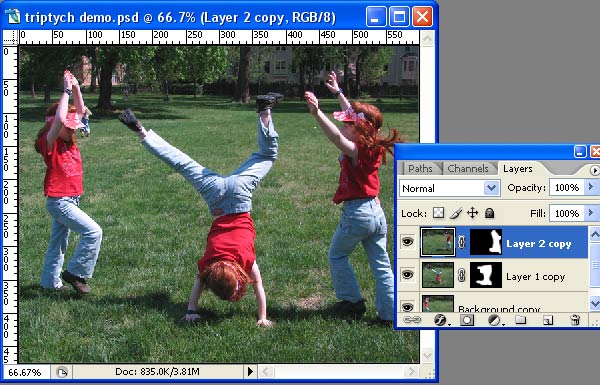
Turning on all the layers, we get the final composite:
Edit the Final ImageWhen editing the final image, be careful of overlapping shadows and reflections that show objects that have been masked out. For example, I deliberately left her shadows in the final triptych, because they really would have lined up like that had there been three of her there at one time. But that's not always the case. The last step was to add the white lines in their own layer. I used the option in the marquee tool to select boxes of a set size, then filled them with white. I'll leave it as an exercise for you to figure out how I used layer masks to make the lines appear to be behind the middle and right-hand images. AssignmentsHere are two assignments: 1) Set up a tripod (or just put your camera on a table), shoot a few pics, and make your own multi-personality shot. Here's another example to inspire you: 2) After doing the above, make a triptych where part of one frame overlaps the other, like in the cartwheel shot above. You now have the layer masking tools to do it in any of various ways. As always, have fun! Feel free to PM me with any questions. |


 Th
Th