| You are not logged in. (log in or register) | |
|
|
|
Tutorials :: A Short Introduction To Night Photography
A Short Introduction To Night Photography by PhilosNight Photography is a very different kind of photography, and requires special knowledge and techniques, but everybody can do it, and can do it right.� This introduction will teach you how to shoot unlit night scenes.
What do you really need?
� A camera that can handle long shutter times preferably Bulb � A sturdy tripod � A flashlight � A nice subject to shoot
What else might you want?
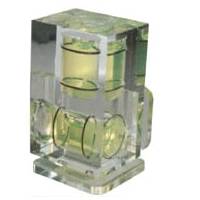
� A camera Bubble level � A shutter remote � A wide angle lens <=10mm to 18mm
In this tutorial I will assume that you use a DSLR, and if not, just go out and try with your camera, see how far you come.
Before you are going to make your night photo, you need a good subject.� It is hard to find nice subjects in the dark, so the best thing is to go somewhere before sunset, check out the scene, do some test shots for your composition, remember how you shot them, where you placed the camera, what type of lens you used and so on. �Next, go and check out the photo�s you took, take the ones that you like the most, and go back when it�s dark.� I don�t mean at sunset, go back when it is totally dark.� Take out your flashlight and go to the place where you took your nice daylight photo.
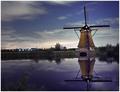
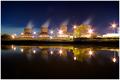
Now comes the fun part. Because it is dark, you will find out that you have to do some things different then during daylight. �First thing you will notice is that in the dark, your auto focus will not work. Your lens will hunt and hunt, but it is to dark to auto-focus, so you need to manual focus, and that is hard in total darkness.� But there is a trick!� If you look at this picture, next to the windmill you see some lights, they are houses, far away, but they are still lights.
Now put your camera to auto-focus, put your focus point over the lights and press the shutter half, et voila, your lens will focus on the light. �Now put your lens on Manual focus without turning the focus ring of your lens.
Ok, so now your lens is focused on a window far away, but your subject (the windmill in this example) is much more nearby, so how are we going to solve this?� Well we don�t, welcome to the world of wide angle. I can write a nice piece here about depth of field and hyper focus and confuse you with equations that you will never use. Take it from me, if you shoot wide, the depth of field is so deep that you can easily focus on a point of light in the distance and still have sharp pictures.� But don�t go out and shoot with your 200mm with your 2.0x extender and tell me that my tutorial is wrong; I am talking about wide angle, 18mm and down.
So we are focussed, and now we need to set things up. This is where the flashlight comes in handy.� Find a good place to set your tripod, and mount your camera to it. We are ultimately going to make 4 or even 8 minutes exposures, so be sure the tripod is set up properly and is sturdy enough to keep your camera still for a few minutes even when it is windy.� If you have it, the external flash mount bubble level, available for just a few dollars at every camera store will come in handy.
Put it on the camera and use it to get your horizon straight while you are composing your shot.
Ok, we are almost ready to make the first test pictures now; it�s getting really exciting isn�t it?� Take out that flashlight again, and set some values, you need to know how to do that, or otherwise just bring the manual and read it while you are there.� Next thing we are going to do is to put the camera to manual, yes, manual, that M thing on your dial that you never use. And set your camera to shoot RAW.� We shoot RAW because we want to play with the colour temperature later on when we are home and not be bothered by it now.� Put your lens on the widest aperture it will go to. �F4 is the widest that my 10-20 Sigma goes. We shoot wide and everything will be in focus anyway, so why dial that aperture up and wait longer then we need while exposing.
Okay, now we need to know what shutter time to use. And we are going to find that out just by trying. �Put your camera�s iso on something like 1600, I know it will be noisy, and you don�t want to shoot 1600, you want to have a nice crisp ISO 100 photo, but for now, just put it on ISO 1600. �Now we try a shutter time of 15 seconds. Press that shutter button, and after 15 seconds look at your display.� Isn�t that amazing? A night photo in just 15 seconds? Your very first results! Congratulations.
Now look at that picture on your display, don�t look at the strange colours, look at the picture itself. Does it look ok? Is it to dark? Is it to light? �Dig up that histogram somewhere in the menu, what do you see? Does it clip somewhere? Or are we underexposed?� If you are underexposed, just take a bit longer shutter time, if you are over exposed, well, take a shorter shutter time.
Also look at your composition, is it what you wanted? Or do you need to turn that camera a bit more to the left or right? This is the time that you make your final adjustments. Now that you have your composition the way you want it, and you have a perfect shutter time for your ISO 1600 shot, we are going to take that amazing ribbon winning night shot on ISO 100.� The shutter time on ISO 1600 was 15 seconds then it is very easy to know what the shutter time will have to be on ISO 100 � just divide the ISO by 2 and multiply the shutter time by 2:
� ISO800: Shutter at 30 seconds � ISO400: Shutter at 1 minute � ISO200: Shutter at 2 minutes � ISO100: Shutter at 4 minutes
So 4 minutes it is. �And this can only be done with BULB and a shutter remote, if you don�t have that the best thing you can do is the 30 sec ISO 800 thing.
Now put your camera shutter time in Bulb, and press and hold that remote for 4 minutes and out comes your photo on ISO100. Go home and play with the colour temperature until you like the result.
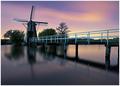
Off course there are different things you can doe while waiting those 4 minutes, you can light up some things with your flashlight, like I did on the grass here:
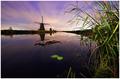
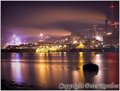
And sometimes you want a longer shutter time, like I needed here to get the reflection in the moving water:
Just close that aperture a bit more and see what you get.
And just a last thing, if there are lights, and you want those nice star like lights on your photo, you don�t need a star filter, you just close your aperture way down and that will do the trick
Home -
Challenges -
Community -
League -
Photos -
Cameras -
Lenses -
Learn -
Help -
Terms of Use -
Privacy -
Top ^
DPChallenge, and website content and design, Copyright © 2001-2026 Challenging Technologies, LLC. All digital photo copyrights belong to the photographers and may not be used without permission. Current Server Time: 07/26/2026 10:23:44 AM EDT. |