| You are not logged in. (log in or register) | |
|
|
Tutorials :: Reversing Lenses for Macro Photography
Reversing Lenses for Macro Photography by PhilI, a true village idiot, have been asked to give a tutorial on reversing lenses for extreme macro shots. If you have a telephoto lens and an old 50mm lying around you might want to give this a shot. It's not too difficult of a procedure and probably won't take 2 minutes to read through this. All you'll need is a reverse ring (coupler), a step up ring, and a small piece of cardboard or folded paper. For less than 20 American dollars you can do it. 20 bucks isn't bad for a super duper wacky crazy macro setup is it? A zoom lens isn't mandatory but it will make focusing on your intended area much easier than combining two primes. You can also decide the magnification of your subject by using one. More on this below. The lenses used here are a cheap Tamron 70-300mm and a Minolta 50mm. Each lenses ring (filter) size will determine the adapters that you'll need. I used a 62mm to 62mm coupler for the 70-300mm and a 49-62 step up ring for the 50mm. All of which are shown below: 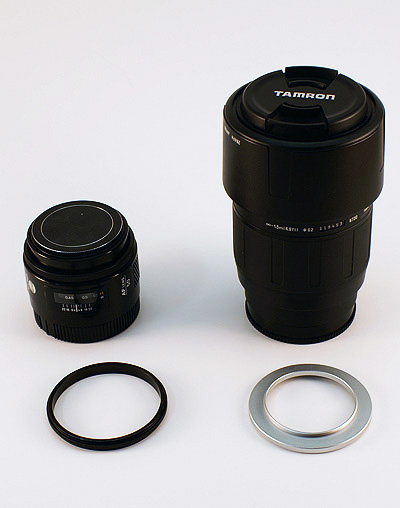
Next, simply attach the ring to the corresponding lens. Should look a little something like this: 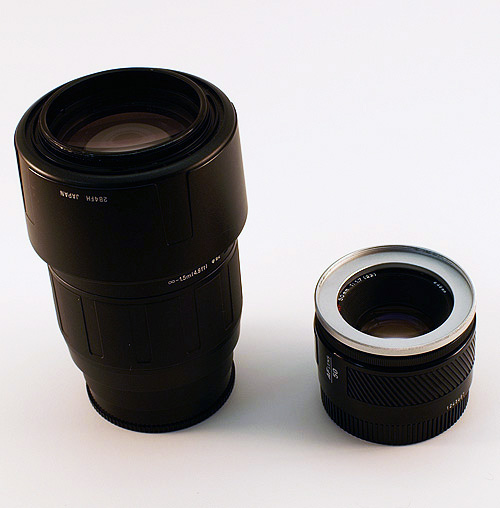
Now just combine the two lenses into one by way of the rings: 
VERY IMPORTANT. You'll want the aperture on the 50mm (or whatever lens you're using) wide open. If your lens doesn't have an aperture dial you'll have to wedge the slide open. This is where the folded piece of cardboard or paper comes in. In the image below, I used a piece of notepad paper folded just enough to open the aperture and fit snugly. Use whatever works for you but I find that it is hard to damage the lens by using this method. 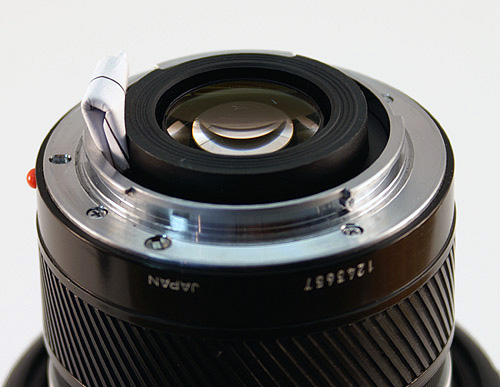
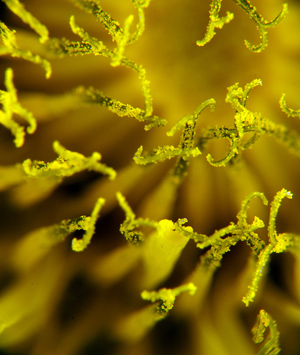
Remember that with the setup I have above, the 70-300 is at full zoom will make your magnification 6:1 - or 6 times the actual size (300mm from the zoom lens divided by 50mm from the prime). For lesser magnification simply pull back on the zoom. In other words, zoomed to 200mm your magnification will be 4:1 - zoomed to 100mm will equal 2:1 etc. Another important thing to remember is that the less you go with zoom the more vignetting you'll get. At full zoom any vignetting will be minimal. Now we'll set up the camera to be able to take full advantage of your macro shot. Please note that if you're outside on a sunny day or if you have plenty of light (and I do mean PLENTY), you may get by without the tripod and long shutter speeds mentioned below, but I'm mainly explaining set up shots for this tutorial. I use manual mode, manual focus (mandatory), tripod, a remote cable release and a makeshift light tent. If you don't have a cable release just use your camera's self timer. Mount the camera, set the aperture as wide as possible (smallest f number), and frame your subject starting at about 2 inches away. "Whoa!!" you might say. "All I see is a blur!". This is where a millimeter can make the difference between a great shot and an unrecognizable object. Just keep your eye in the viewfinder and move your subject left, right, closer or further away until you see what you're after. Might take a few times but you'll eventually get it. You'll now notice that your subject needs to be directly aligned to your lens. If not, you will lose focus on quite a bit of whatever you're shooting. With such an extreme shallow depth of field, the last thing you need to do is start out with a poorly placed subject. Once you get it basically set just slide the zoom until you get the part of your subject you want in focus. Now set your shutter speed to get the exposure and fire away. You might have to make a few test shots to find the correct exposure as I have yet to use the shutter speed that my camera's meter recommends. Because I only have the one camera I don't have any images of the actual shoot - but you should get the idea. Here are two sample shots of what you might expect to see when you look through the viewfinder. The first is a stamen of a dandelion. In this shot you can see the super shallow depth of field when using this technique. The second is a blatant attempt at boosting views to my first, and probably only, ever ribbon winning image. Please note that if you're going to photo bugs in less than optimal lighting don't kill them for the shoot. If you look hard enough you might find dead insects in the corners of your basement, window sills or maybe an old spider web on your porch. Not only does it seem to be a bit "hacky" or cold to kill something to take a picture of it, it's also going to be hard to get a good shot of a squished subject.
I hope this helped anyone interested in using this technique. You'll find that you're scouring the house just trying to discover that one object that'll get you those "ooooohs" and "ahhhhhs" from your friends and family. For starters try simple thumbtacks, edges of coins, or even stick pins. You'll be amazed at what they look like on a larger scale. Cheers - Phil
Home -
Challenges -
Community -
League -
Photos -
Cameras -
Lenses -
Learn -
Help -
Terms of Use -
Privacy -
Top ^
DPChallenge, and website content and design, Copyright © 2001-2026 Challenging Technologies, LLC. All digital photo copyrights belong to the photographers and may not be used without permission. Current Server Time: 01/01/2026 11:44:12 PM EST. |