
| You are not logged in. (log in or register) | |
|
|
|
Tutorials :: Basic Image Sharpening of Digital Photographs
Basic Image Sharpening of Digital Photographs by sheyingshi88Digital photographs, by their very nature, appear somewhat soft focus. This is because as the picture comes off the sensor it's in a mosaic, sort of like the floor pictures found in Pompeii. The camera electronics interpolate this mosaic into a smooth picture, but sharp edges get a little blurred in the process. Some cameras sharpen the image as part of their software, and some cameras let you specify how much sharpening (if any) you want the camera to do, but usually as part of your processing you'll want to fine tune this process in your imaging program. In the explanation that follows I'll be using Photoshop in my examples but Photoshop Elements would look the same. They're not the only way to do this, but they're by far the most widely used programs in image manipulation. Also, my weapon of choice is the Macintosh, as you'll notice from the screenshot, but the basic command structure is the same on Windows machines. The main tool for sharpening your photos is the Unsharp Mask (USM). In both Photoshop and Elements, you'll find it in the Filters menu (Filters > Sharpen > Unsharp Mask). For anyone younger than 50, and quite a few older, the term is confusing. How in the world can you make something sharp by unsharpening it? Well, back in the days of chemical printing if you had a negative that wasn't quite as sharp as you would like, you would make a contact negative from it with a layer of glass between the two so that the light hitting the new negative would be diffused a little. Then the original negative and the new one, which would be a negative of a negative, or a slightly blurred positive, would be sandwiched together and a print made. The interaction between the two caused an apparent increase in sharpness. The word ‘apparent' is important here because it didn't really increase sharpness any, just the appearance of it. OK, let's get down to business. What I was getting at in the last sentence is that you won't be actually increasing sharpness of your blurred photo. If you tried to get that macro shot one handed at 1/15 second, nothing's going to help. What the Unsharp Mask filter does is to find contrast boundaries between groups of pixels and increase the contrast between them so edges appear sharper. It won't have any effect on smooth transitions of colors. When you open the filter the main control panel will look something like this: 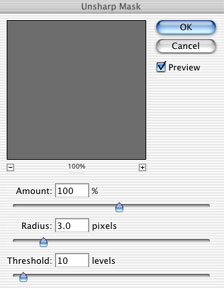
The example is from Photoshop 7 running on Mac OS X, in other versions it'll look basically the same. The window may be smaller, and in some early versions there may be two of them, ‘before' and ‘after'. First of all, be sure you have the preview button checked if you have one so you can see how the sharpening will look on the main picture. The three controls are: Amount (or Strength in some versions), the ‘volume' of the sharpening; Radius, or how far away from the apparent edge the filter will work. and Threshold (or Clipping), how much difference there has to be between lightness or darkness of the pixels before the filter starts to work on them. Let's look at a crop of a photo straight out of the camera with sharpening set to low. It's not exactly blurry, but the focus is a little soft. There's a lot of contrast here, and a lot of detail. As we play with the USM settings watch what happens to the interaction of highlights and shadows. 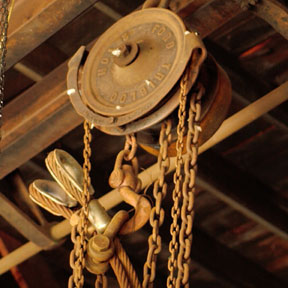
The first thing you have to remember about sharpening is that every image is different. It depends on the amount of detail in your photo and the relation of color to detail. For example if you're sharpening a picture of a large rough rope in bright sun there will be a lot of high contrast both in colors and textures and it will over sharpen easily, but if you're sharpening a photo of the clouds at sunset, there will be less of both and your picture will be able to stand much more before it starts to look over sharpened and harsh. Another very important thing is that sharpening should be the LAST thing you do before printing or resizing for the web. If you sharpen before you adjust the basic file size or crop, or if you do it before you adjust the colors, any imperfections that were introduced by those processes will be magnified by the sharpening process. Remember, sharpen last. Now, lets sharpen this photo. You'll have to experiment a little to find your starting settings because all the different camera manufacturers have different ways of writing the image processing software and they have different ideas about how the JPEG files are compressed in camera. For want of a better choice let's use a starting setting of 100% Amount, a Radius of 3.0, and a Threshold of 10: 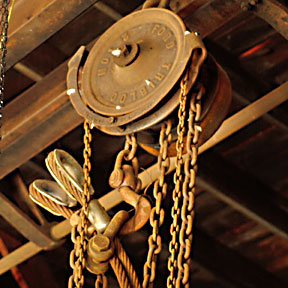
Notice the difference between this image and the first, or unsharpened one. On this image there's only a little sharpening. The edges of the chain and the girders stand out a little more. Also, the whole image appears a little lighter because the USM tends to lighten the lighter part of the edge boundary but the darker parts are untouched. Also, the highlights on the silver colored ends of the steel cable are much more prominent now, and in the examples that follow that's where we'll see the most exaggerated effects of the sharpening process. The way the controls work is that sharpening will increase as Amount is increased or the Radius is increased, but decreases as the Threshold goes up. There's no such thing as hard and fast limits, but digital photos usually respond best to an Amount of between 65% and 130%, a Radius of between 2.5 and 3.5, and the Threshold gives good results between around 2 and 20. If you have very fine detail you'll probably find yourself at the low end of the settings. You would want a slightly lower Radius because you want to differentiate between closely spaced lines and you want the filter to look at each line separately. This will cause you to raise the Amount a little because a lower Radius will decrease the appearance of sharpness. You might also want to lower the Threshold a little so the filter will work on boundaries that have less tonal difference between them. Now, just to see what will happen, let's pump up the amount to 200 and leave the other settings alone: 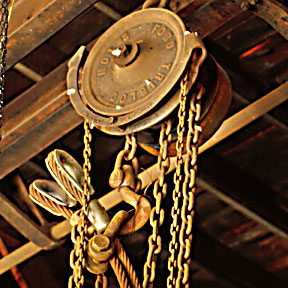
See how over sharpened and garish this makes the image look. The highlights on the silver cable ends are overdone now and blown out. At this Amount, the image appears lighter still than the previous example. If you refer back to the original photo you'll notice that the light was fairly soft and the shadows, especially on the cable and it's attachments, and on the chain were also soft. Now, the shadows are getting quite harsh. One more experiment. Let's go back to an Amount of 100 and raise the Radius to 9.0: 
The image still has too much USM, but in a different way. The edges aren't way over accentuated and the shadows aren't so harsh like in the previous example, but the higher radius works on pixels that are farther apart so the highlights on the cable ends and the bottom of the winch pulley are overdone. Threshold has the least effect of all. A setting over 20 will hardly be noticed and you won't start to see a big difference until you get down below 5. For photos with very slight differences in textures or colors you might have to go lower, possibly even down to 0 to get the effect you want, but you should remember that a Threshold setting that low will have a big effect on the other settings. Each of the settings in fact affects the others so you'll end up going back and forth between them until you get the effect you desire. What you want to look out for though is overly hard edges and light or dark lines or halos next to edges. The final effect should be a subtle increase in apparent sharpness, but like pepper, a little goes a long way. Here's an example of an Amount of 100, a Radius of 3.0, and a Threshold of 1. 
It's hard to see much difference between a Threshold of 1 and 10. If you look at the fine detail on the cable, the nut of the turnbuckle and the chain you'll notice they're a little sharper because the filter requires less tonal difference before it starts to work. Also, the highlights we've been noticing on the silver parts of the cable ends haven't been blown out, they still show a graduation of light. So, what's the best sharpening for this image? I ended up using an Amount of 85, a Radius of 2.5, and a Threshold of 4, and then darkened it 10% in levels to compensate for the USM lightening effect. 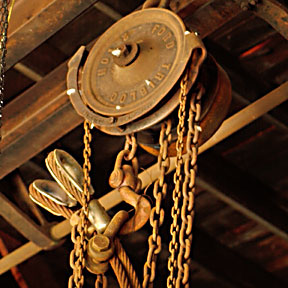
Compare this image with the original. What I've done is just to give it a little more visual impact without destroying the effect of the softness of the diffused light shining in through a grimy factory window. Before I finish I'd like to pass along a few tips.
This is just a basic discussion of the Unsharp Mask filter. My intention wasn't to make you an expert, just to get you started. Experiment on different kinds of photos and notice how the settings react to different levels of detail and color textures. Always remember that there is no such thing as a universal setting; every photo is different and has to be sharpened separately. Finally, it's appropriate at the end of this tutorial to say again that it's important to sharpen last. |
| Rate This Tutorial!
0 = Not Helpful up to 3 = Very Helpful. NR = No Rating.
Questions? Feedback? Join the Discussion on this Tutorial |