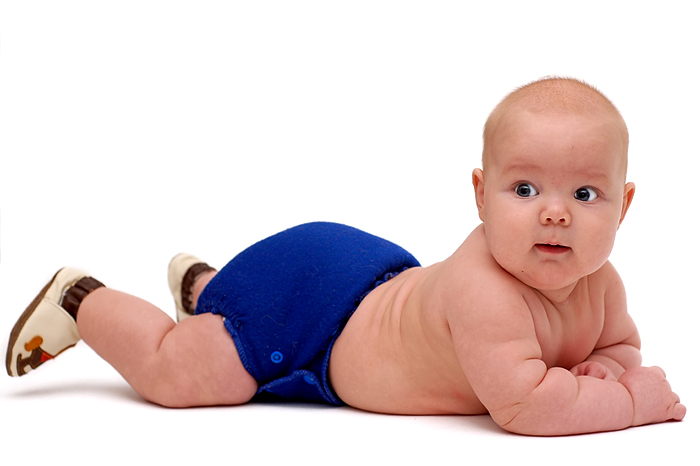
Regarding the first baby shot, klstover did a nice job, but the first step (whitening the BG) has been made unnecessarily complex.
Depending on the particular image, there are two 1-step methods to set the background; auto levels, and white-point selection in levels. When I am working with underexposed pictures I always check auto levels before I do anything else; I may step back in history to undo it, but it gives me a good idea what Photoshop's version of "neutral" is for the particular image. In this specific case, as I suspected, auto levels gave us a good color balance and a white BG to work with. The following is the 640-pixel image downloaded and auto leveled, nothing else has been done to it.
I also did a version using the white-point selection eyedropper in the levels dialogue box. To do this, open a levels adjustment layer and pick the rightmost of the 3 eyedroppers. You will get a crosshairs tool, which you then position on the image over the brightest area that you want to be white and click; it's that simple. If the effect is not exactly what you want for the BG, then try selecting another area that's a little less bright and click that. In this case, the white point method and autolevels were indistinguishable from each other.
The advantage of using these methods? No selection is required. If you were to blow this one way up and compare it with the original edited version also magnified, and look at the baby's rump and the fuzz of hair on the head, you'd see why that's an advantage.
I might add, in passing, that if you want the absolutely pure, white BG after auto leveling, THEN the logical next step is selective color in the white range, just as you did it. I don't think the selection will be required, auto levels and selective color should combine well.
First I make a duplicate copy of the background layer. I usually use adjustment layers, which wouldn't change the image layer, but just in case I want to go back and do some sharpening, etc, that'll make sure I don't do the changes to the original image.
The first thing I notice with your image is the background. You've got a nice background but we could obviously change some things. First, I want to make it whiter. I use an adjustment layer for selective color. I choose whites from the drop down menu, and then adjust the black slider so that there is no black in the whites (making the whites lighter). This does great for the background but also changes highlights in the subject's skin, which we don't want, so we're going to mask the selective color layer.
The selective color layer already has a mask so I don't need to click the little square with a circle in it at the bottom of the layers window. With the white box to the immediate left of "selective color" clicked, I will paint black over the areas of the subject. This masks off the effect, leaving the subject unchanged by the selective color edit.
I use around a 169 pixel brush with soft edges, and the pen selected. This is because I don't need to have any really sharp edges when I mask. It's kind of hard to tell where I paint the black, however, so what I do is this. Between the background and the duplicate background layers, I will use a new fill layer, and choose a light grey color. The duplicate background layer's opacity I adjust to about 20% or so. The selective color edit will effect the color fill, and we can see that since we lowered the opacity of the image. That way I can paint and see where I have painted and where I have not.
After I'm finished filling in the subject, I then adjust the opacity of the background copy layer back to 100% and remove the color fill layer.
Background: Cloning
The next thing I want to do is get rid of the non-white portions of the background in the upper and middle left. I'll use the cloning tool, around 350 pixels, on the *duplicate* background layer. Next, I want to clone out the drool so I will work on the same layer to do this. I use a combination of the clone tool at a much smaller brush size, as well as the healing brush, to get a natural looking result. I zoom in a great deal so that I can work on the smaller details. What I do is clone the area to the bottom left of the whiter drool area, and then paint over the whiter area. I then use the healing brush to blend things together a bit more.
Levels
Before I go any further I definitely want to adjust the levels of the shot. (Curves also works, but I'm not as comfortable with it because I do not know it as well.) I do an adjustment layer for levels. I try auto levels but I'm not satisfied with how that turned out, so I decide instead to adjust it manually. A trick I use is to pull the arrows on the left and right in towards the middle, stopping where the black in the graph starts, see how that looks, and adjust if needed. So what I end up with is 8, 1.00, 226.
Over top of that, I do another adjustment layer for levels, this time seeing what happens when I adjust the channels separately. I end up with red: 17, 1.00, 245 / green: 22, 1.00, 247 / blue: 22, 1.00, 243. My intention was to hide the first levels layer that I did and see how it looked with the second one on its own, to compare the effects and choose between them. But I like how it ended up looking when both of the layers are visible, so that is how I leave it.
Misc
There are several more things I could do with this image. First, I could clone out various marks on the subject's face and clothing. I have done a couple of spots on the clothes but the face I left alone as I prefer it looking more natural.
Secondly, I could change the clothing color. I point this out not because I think the image needs it, but because this is a great example of an easy application of selective color layers. What I mean is that the clothing is all one color, and it's a color that doesn't appear in most other parts of the image. So it would be very easy to just do a quick mask of the eyes (also blue) on a selective color layer. If you wanted to, you would choose blues from the drop-down menu and adjust the color sliders. An option that I am a fan of is cyan +100, magenta -100, yellow -20, black -41.
The two other things to do are sharpening of the image, and enhancement of the eyes.
Sharpening
Sharpening is not one of my strong points. I really liked "smart sharpen" in Photoshop CS2 but I do not have that version right now. I could use USM but that's most always a bit iffy for me because I don't know exactly how to combine the options to get the best result. So I am going to use Neat Image. You can get it for free at neatimage.com - it is a standalone program but also functions as a Photoshop plug-in, and works for noise reduction as well as sharpening. Unfortunately the free version will not do images larger than 1024 pixels so I will resize the image.
(Note: If I were going to do a ton more edits, I would definitely do that before resizing, as it is always better to have full-size versions of things.)
I want to create a duplicate layer of the duplicate background. That will leave the original background image, the image where we cloned the background, and a copy of the image where we cloned the background. (I do this in case I decide, for example, that I have sharpened too much - I can simply reduce the opacity of the layer I used Neat Image. If I blend it with something identical except for the sharpening, it will simply lower the amount of sharpening, but if I don't have that other layer, I am blending it with something that has a brown part on the background, which is definitely not what we want.
(Another advantage to this method is that I can name the layers with the types of edits I have done, if I want, which could help if a shot needs to be validated and I need to see what steps I have taken. I would have "Background" (which is unedited), "Background Copy - clone and healing brush", and "Background copy 2 - Neat Image".)
I make sure that the layer I want to use Neat Image on is selected, and I access NI under the filter menu at the bottom. You will see it will take just that one layer, without any of the other layers added to it. I click "auto profile" and drag the box around if I need to until I find something that doesn't give me "clipping" or "not uniform". "Auto profile" again will sample the image and use that for the next step - the tab "noise filter settings" at the top. At that tab, on the top right of the window I will see presets. I choose "filter and sharpen image" and then "preview" at the top left. I like how that looks so I click "apply".
I could do more sharpening around some areas, especially the eyes and the hair, but I decide not to. The last thing I want to work on is the coloring of the eyes. You will notice that the whites of the eyes look rather grey, and the subject's left iris seems to blend in with the edge of the eye.
Eyes
I make another duplicate layer (I think probably a lot of people would say I am going overboard with the layers; it's just how I like to do things) and mask off everything but the eyes and a very tiny edge around them. To make sure I have masked properly, I hide the other image layers, making them visible again when I am done. For this it is best to use a brush with a hard edge. I then click the square next to the mask (the one with the picture on it) and, using a 2 pixel brush, I dodge the area between the subject's left iris and the edge of the eye, with the range selected as "shadows" and exposure as 100%. I then bring the exposure down to 50% and use a combination of brush sizes to dodge the whites of the eyes, including the newly created part. I am not incredibly pleased with the result, and if you aren't either I would recommend the wonderful DPC tutorial on pimping eyes.
That's it! If you want to have some fun, you can create an additional duplicate of the background, drag it up to the top of the layers list, and have fun hiding and un-hiding so you can see the impact of the neat edits you have made!