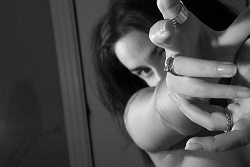
these hands of mine...
by fannybWhen Drew sent me an e-mail asking if I could write a little something for
this photo I thought to myself: "He's insane, I'm an amateur what could I
possibly offer?"
Truth is, I can't offer you highly technical input. So you
won't find any professional photography tips in this article. All you'll get is
my own creative process. Maybe it'll inspire you, maybe it'll only entertain
you, either way, I'm okay with that. So here we go...
Step One:
Inspiration.
Most people will tell you that they got the idea for
their photo or art piece from something else. The same goes for me.
I
was reading a photography magazine, when I came across this unusual self
portrait. It was a man holding out his arm, his right hand brightly lit and in
heavy focus yet you could still make out his figure at the back. It had great
depth of field, and really appealed to me. As an artist, my hands play an
important part in who I am. And let's be honest, there was no way I was going to
submit a 600 X 400 photo of my big ol' face!
I had my idea, now I just
had to execute it...
Step Two: Execution.
Sitting
in my office, I had to improvise a tripod since I didn't have one. I set the
camera on my desk, piling up a few CD's under one side of it to give the shot an
unusual angle. I didn't want to shoot in full light, I wanted something soft and
subtle that put the emphasis on my hands. So I used a desk lamp, these happen to
be perfect for this application since you can usually bend and rotate them at
will. You can get a wide range of effects with these little lamps, anything from
a subtle glow to a soft spotlight.
In my first attempts you can see that
just one lamp wasn't enough...
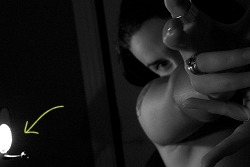
So I went and stole my husbands lamp... (What? You do what
you can!)
Great! The light was just the way I wanted it: subtle and
soft.
But...
Another big problem, which is rather apparent, is the
position of the subject within the frame.
There is more than one reason for
this:
1. I wasn't behind the camera, so I couldn't actually create my
ideal composition.
2. I knew I was going to have to do some cropping, since
the rules at the time only allowed one photo size.
3. Without a tripod there
was no way for me to shoot vertically.
4. I wasn't wearing any shirt. I think
I don't need to explain why that would be a slight problem?!?
5. Let's admit
it, I'm no model! Posing wasn't exactly something I could do
naturally!
After a few hours of uncomfortable shooting, I decided I had
enough and went to work in photoshop.
Step Three: Editing in
photoshop.
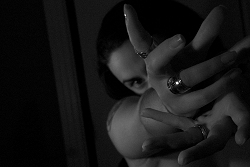
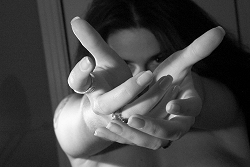
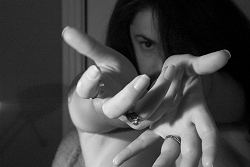
In the end I chose this shot, because you could see my
eyes, all of my rings and I just liked the overall feel of it.
Now I
know that the purists will frown. I'll be the first to admit that I did some
heavy and creative cropping on this picture.
But I felt this photo needed to
be in a vertical format. And since half my fingers were missing anyway, I
decided to use this and crop half my face as well. It filled the frame with the
subject and I was rather fond of that look.
This also solved the problem
of the ugly door in the background.
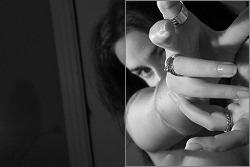
Since I always shoot at a
resolution of 1800 x 1200 I had some leverage. You can see that if I had shot at
600 X 400 this kind of croping wouldn't have been possible. And until I become
an experienced photographer, I prefer to leave myself some room for error. You
never know what will pop up in the frame as you are shooting, this way you can
crop what ever it is out comfortably.(Obviously in this case, it was that
ugly door that popped up unannounced in my shot! ;) )

I didn't play
with the levels on this picture. I know some people feel it needed a little more
contrast. That may be true, but at the time I liked it "as is".
Finally...
Okay so what did I learn?
1. Be mindful
of the background.
Since then I always try to shoot in
front of a blank wall. You can't always crop your way out of it!
2. Be
creative.
After experimenting with office lamps for a few hours
I now know that you can create a dramatic lighting without spending a dramatic
amount of money!
3. Don't quit your day job Fanny, you're no model!
;)
My advice...
Don't be afraid to experiment. Look at
what the pros are doing and try to recreate it in your own way, with your own
touch.
Be creative. Not having the equipment is sometimes a
blessing.
Shoot what you like. It doesn't matter if you don't use the
rule of thirds or any other photography guideline, as long as you shoot what you
like and have fun doing it it's all that matters.
Be proud of yourself.
Because even if you ranked 4th, or 24th, know that you at least had the courage
to submit something. And not very many people are able to do so.
Keep at
it. You can only get
better!
Home -
Challenges -
Community -
League -
Photos -
Cameras -
Lenses -
Learn -
Help -
Terms of Use -
Privacy -
Top ^
DPChallenge, and website content and design, Copyright © 2001-2026 Challenging Technologies, LLC.
All digital photo copyrights belong to the photographers and may not be used without permission.
Current Server Time: 06/16/2026 09:10:50 AM EDT.

 these hands of mine...