
| You are not logged in. (log in or register) | |
|
|
|
How'd They Do That? :: The Invisible Man (1933)
The Invisible Man (1933) by xtabintunA few challenges ago, I produced a picture entitled "The Invisible Man (1933)" for the Faceless challenge. Blatantly defying the challenge description, I formulated an idea based on the original Claude Rains movie The Invisible Man. What I would like to do now is provide a walkthrough of how I went about creating the picture, for those of you who were curious (or figured it out and want to prove yourselves right to boost your ego). Step I - Build a Torso Since my name isn’t Jeffrey Dahlmer, I didn’t have a spare Torso lying around, so I had to fabricate one. I used this chicken-wire sort of stuff (I forget what it’s called anymore) and painstakingly, with a pare of pliers, wire cutters, and tinsnips, I crafted a torso. 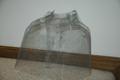
To get him to stay together, I used a bit of wire twisted around two of the segments like so: 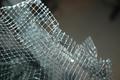
Step II - Clothe the Man...Err, Torso Since Nudity is not the most comfortable of positions, especially in cold Ohio, I decided that it’d be a good idea to dress my torso. Since I built him on measurements based off of me, but a little smaller, I got some of my old clothes. First, I threw on an undershirt to help belie the structure (incidentally, when I was undressing him a few weeks later, I thought to myself "Hey, that’s where that undershirt is. I thought I was missing one :D). 
I know, it looks pretty lifeless, but oh well. I didn’t take pictures of the rest of the clothes because I forgot to, but you can imagine how that went: dress shirt, tie, jacket. Step III - Prop Him Up! Ok, now I had to figure out a way to get him standing up. This was pretty hard to do, believe it or not. I had accidentally left a little notch that jutted out of his back in the torso. Since you wouldn’t see his back, I figured no problem. Eventually, I took this mishap to my advantage after a number of unsuccessful attempts. When I do lighting, I usually do the poor thing to do by attaching the sources to PVC poles to hold them up. I took my shortest PVC pole (because some are like, 10 ft. high) and set it snugly into the notch in his back. I used duct tape to secure the pole as running along his back, so he’d have good posture. Because posture = cool! 
^That’s my entire setup, pretty much. It has other stuff that I haven’t got to yet, but it’s the only picture took demonstrating the PVC pole. Step IV - Securing the Bloody Pole to Stand Straight Up The most aggravating of the steps. Believe it or not, but when you attach a large, not necessarily balanced in any way, obscure object to the end of a long slender pole, it will not necessarily stand upright. I had a hard time believe it at first, until he kept falling. It sucked. So, I made good use of some school textbooks. 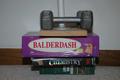
That’s more than I use them for regularly, believe me. I actually left my Chemistry book down there for weeks and didn’t need it at all. I also put a few freeweights on the plywood base that holds the pole. After that it was just a matter of anticipating the lean of the pole and setting up the sunglasses in the right proportion. Hey, what a segue, huh? Step V - Donning the Shades of Cool Ok, so these weren’t exactly the shades of cool. I actually found them on the ground in Scioto Park, where Leatherlips is. Someone had lost them. Or abandoned them. Either way, they were the closest I could find to the old school metal framed side-lensed glasses Rains wears in the original movie. So I went with it. To secure the glasses, I used my awesome eagle scout ability of knot tying to lash fishing wire to both the glasses and a thumb tack. I used four thumb tacks and stretched them out so the glasses would be secure, the line would be taut, and the glasses wouldn’t curve in so it looked like they were piercing his head (they make sort a triangle shape in their base position). After several attempts, I got it right (well, what seemed to be right. It didn’t look right in the picture because I was taking it at an upwards angle, since my tripod wasn’t that high :P) Here’s some pictures.  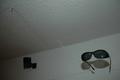
Step VI - Extreme Post Processing Hardcore Woo! Ok, after taking a few pictures at various angles with the light going various places (D70, Kit Lens, SB800 Flash), I came up with this as an original: 
Points of exclamation: So then I pretty much had it. I ran it through a few filters to get it less sharp (gasp! Less sharp on DPC!?!). These were my various steps of post processing (mainly inbetween programs) Original 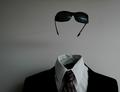 Fix in Compupic Pro 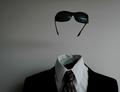 ATTACK OF THE CLONES!!!!  Black and White, a bit of brightening, and the final take. 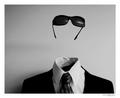 With border and text for print production. So I hope that was informative, educational, and most of all entertaining. Cheers, James
Home -
Challenges -
Community -
League -
Photos -
Cameras -
Lenses -
Learn -
Help -
Terms of Use -
Privacy -
Top ^
DPChallenge, and website content and design, Copyright © 2001-2026 Challenging Technologies, LLC. All digital photo copyrights belong to the photographers and may not be used without permission. Current Server Time: 07/30/2026 05:04:24 PM EDT. |
