
| You are not logged in. (log in or register) | |
|
|
|
How'd They Do That? :: X-Rays (Accidentally Discovered in 1895)
X-Rays (Accidentally Discovered in 1895) by labudsAlright, this shot was pretty simple. I thought of this technique a while ago but hadn’t had the chance to use it, until Serendipity came along and the first thing that came to mind was: X-rays. For those who don’t know, X-rays were discovered by total accident by Roentgen in 1895… I’d say the most serendipitous scientific discovery, as it involved absolutely no thinking while the bones of his hand accidentally appeared on his film after handling radioactive material. So, I started with this X-ray shot (left) and used Corel PhotoPaint to turn it into a more proportional hand (right). Actually, I have very long fingers so I had to make the index longer, rotate it towards the left, while moving the thumb inwards to create the “Peace” sign. 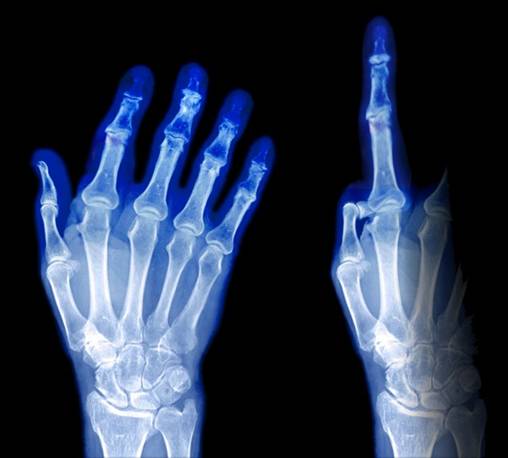 Now, I laid down my large velvet cloth on the ground, setup two 500W lights and put my Nikon 4500 on a tripod. But before, a slight modification was necessary. I placed a piece of black cardboard on half of the lens. Let’s call it a “half lens cover”. With the perfect size, it simply “clicked” into the thread of the lens. This causes the picture to gradually fade to darkness in the middle of the picture. 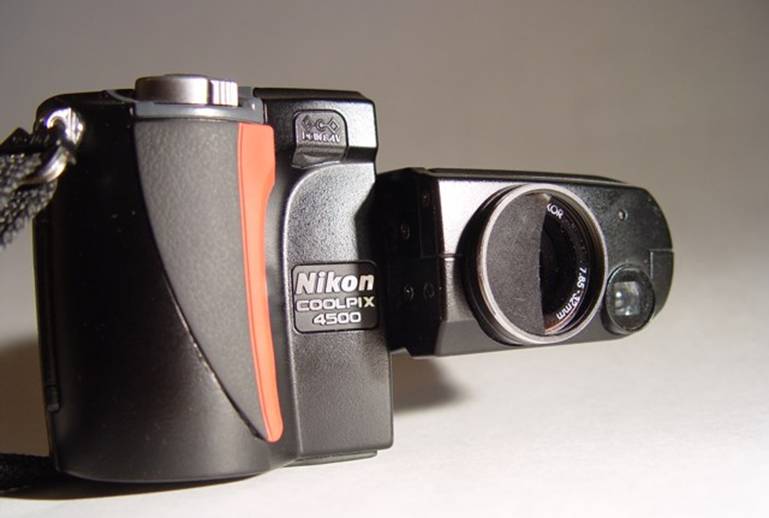 Precautions: Now, I set the EV value (trial and error indicated -2.0 was good) while pre-focusing on a piece of paper. Then set the timer and quickly positioned my hand on the velvet cloth where it should be. Click! So now I had my first picture: a hand disappearing into darkness. At this point, I removed the half lens cover. With the hand displayed on the LCD with 50% transparency, I aligned it with the X-ray hand which was on my screen. This was the difficult part: aligning every bone and making sure that my fingers were proportional. Also, I had to avoid taking too sharp of a picture to prevent interference patterns caused by the difference in pixel frequency of the CCD (camera) and that of the LCD (screen). So I focused and then moved back a tiny bit to be just out of focus. Here’s the shot, it was my third take. Had I known it would win, I would have retaken it because of the out of focus on the tip of my middle finger; but after being told that my idea was stupid and that the picture would ugly by my friends, combined with my exam the next day, I decided to submit “whatever”.  Post processing: NeatImage; crop; rotate; contrast enhancement; color balance; resample; unsharpen; border. And here’s the final shot: 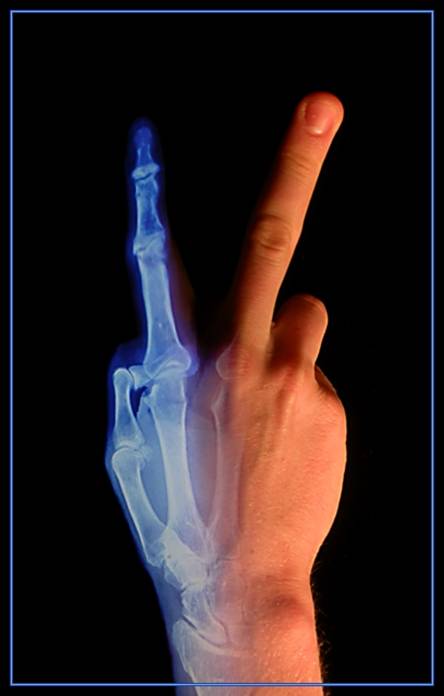
Home -
Challenges -
Community -
League -
Photos -
Cameras -
Lenses -
Learn -
Help -
Terms of Use -
Privacy -
Top ^
DPChallenge, and website content and design, Copyright © 2001-2026 Challenging Technologies, LLC. All digital photo copyrights belong to the photographers and may not be used without permission. Current Server Time: 07/30/2026 05:04:28 PM EDT. |

 X-Rays (Accidentally Discovered in 1895)