| Author | Thread |
|
|
01/08/2010 12:53:18 AM · #1 |
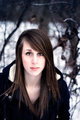
I'm pretty new to portraits so looking for some help with editing and anything else really. For example the crop, should I have centered it to begin with? In the free study I just took some off the top.
If anyone would care to have a go at the picture I used for the December free study I uploaded the full size out of camera jpeg. If you also post some insight into what your steps were I'd be very grateful!

Message edited by author 2010-01-08 01:05:33. |
|
|
|
01/08/2010 01:23:57 AM · #2 |
I took a stab at it.

Here is what I did:
Crop
Copy layer and run Virtual Photographer in BW preset (adjusted contrast a lot)
Changed layer opacity to 30% and set the blending mode to multiply
Merged visible onto a new layer and ran VP again this time with a soft light effect turned up very very high set blending mode to multiply, changed opacity to 30%, added a layer mask and masked out her face
Merged visible onto a new layer and burned a bit of the background until I liked the look
Flattened and saved
Took image into Portrait Professional and used the sharpen eye area setting to boost the sharpness of the eye area and allowed the program to tint her lips a little bit redder
Saved
Back into photoshop and made a copy layer
Blurred it with a 2px radius, added a layer mask, masked out her eyes, mouth, and a little of her hair
Flattened
Ran USM at 50, .5, 4
Used color balance a bit because a few of the above steps added a bit of red and tweaked it all over to the cyans and blues a bit. Just a bit ;)
resized
set history brush to resize
USM at above settings and used history brush on the bg and skin
SFW |
|
|
|
01/08/2010 01:35:19 AM · #3 |
:)
Message edited by author 2010-01-08 01:45:34. |
|
|
|
01/08/2010 01:45:12 AM · #4 |
Andrew,
Here is my quick take from your fullsize file. IMO, the portrait needs very little editing. I think your FS went a little too high contrast leading to some really harsh light on her face. To me it seems like a soft winter scene so I went that direction. Wish all my subjects had skin as nice as hers!
 edit 1 edit 1
1. Cloned out a few crazy hairs, particularly the ones that run perpindicular to the fall of her hair. Caught a couple of stray ones around the outside but since it isn't a studio portrait--i didn't chase them all down. More natural IMO.
2. Used a black brush(soft light) to add a bit of color back into her lips. painted direct to her lips @ about 3% flow rate until i was happy.
3. Used a white brush(soft light) to lighten her eyes slightly--very slightly. I think you overdid it in your entry a bit on her eyes! :)
4. Selected her neck, feather the selection by 15 pixels and used a curve adjustment layer to lower it's tonal value. My theory is that more light on her face, relative to her neck is a good thing. Her neck seemed too bright.
5. Cropped to 720 pixels on the long side(roughly a 5x7 ratio I think). Gave it a slight rotation to place her eyes on a little diagonal.
6. Duplicate layer, gaussian blur (4 pixel radius), faded to about 20-25%
7. Erased eyes, lips, and some hair from this layer.
8. Flattened image
9. Luko sharpening action on a duplicate layer, faded to taste(about 45%). Google Luko USM--i use an action attributed to Manny  Librodo. Librodo.
10. Flatten and save.
 edit 2 edit 2
Same steps as above until the Luko layer. I set the Luko USM layer to Soft LIght and faded to about 50% after desaturating it. Slightly higher contrast with less saturation.
about 3-4 minutes total--she has beautiful skin.
Watch the hair when running USM or sharpening--doesn't take much to over do it.
If I were editing for 8x10 print some of my settings would change a bit but the basic workflow wouldn't.
Many people suggest cropping as a last step, right before sharpening but I"m a little wierd. I hate working on a file that isn't cropped correctly to my eye. I do always save cropping until i've touched up skin, caught the wierd hairs, and played around with curves and contrast.
Nice base file--very sharp... i'm sure youll love the 50. pm me with any questions or post in the this thread. HOpe it helps a little. :)
|
|
|
|
01/08/2010 04:54:32 AM · #5 |
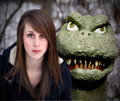
Best I could do. She looked lonely.
 |
|
|
|
01/08/2010 06:27:57 AM · #6 |
Originally posted by Art Roflmao:
Best I could do. She looked lonely.
|
Brilliant Art!
Great lighting on Godzilla :)
@Andrew
I like the 2nd edit of Mark better, since the weather was very cold, the colour in her cheeks contrast a bit with the surroundings. It's harsh to have that difference.
Overall, I would have liked to see less background, since it's harder to distinguish the model, but the shot is very cool, and she looks very peaceful.
Cheers,
Joao
|
|
|
|
01/08/2010 07:30:10 AM · #7 |
How are you guys copying the picture to even edit it?
By the way, I don't think your Free study edit was too bad.
Message edited by author 2010-01-08 08:02:57. |
|
|
|
01/08/2010 10:12:01 AM · #8 |
Thanks guys! It does help a lot!
Haha thanks Art, had originally cropped Godzilla out, some voters just don't understand him/her/it.
To albc28, under where it says the amount of views there's a button that says view full sized image, thanks! |
|
|
|
01/08/2010 10:59:27 AM · #9 |
Originally posted by albc28:
How are you guys copying the picture to even edit it?
By the way, I don't think your Free study edit was too bad. |
Since his is the full sized file, you can click on view image full size and save it from there. No right click needed. |
|
|
|
01/08/2010 11:32:36 AM · #10 |
My effort hope you like it

adjusted colouring on hair (added a little more red via levels)
smoothed skin (very slightly as model has good skin) using Lens Blur
also brightened up the coat a little (more blue via levels) and sharpened
Message edited by author 2010-01-08 11:36:10. |
|
|
|
01/08/2010 01:13:01 PM · #11 |
Okay here is what i did real quick. I did not get rid of all the stray hairs...I figured you could do that.

Heal brush to rid of some stray hairs, moles, pimples lines under eyes, etc
Auto Levels
Selection of entire eyes - curves layer with blending mode luminosity...made a shallow s curve (keeps contrast while brightening)
Dodge Iris
select irises - feathered selection - color balance adding blues, cyans, and some green (just enought to boost her original color)
Burned the edges of the iris
Burned the pupils
dogded the catchlight in her left (my right) eye
Selected and feathered lips
Selective color adjustment layer - added magenta and yellow to red channel and magenta to the magenta channel
Duplicated the selective color layer
Selected and feathered the hair - curves layer - lightened it some
Flattened
duplicate layer
Channel mixer adjustment layer - convert to black and white
Merge channel mixer and duplicate layer
Blend duplicate layer and background layer using softlight
Smart Sharpen
***here is where I sort of cheated and did a quick work instead of how I normally do it***
using lasso I selected the skin of her face and neck - copied and pasted it as a new layer
Added a layer mask to take out her lips and eyes
Surface blur top layer
Reduce opacity
Flatten\
Crop (not sure how much I like the crop I did)
Resize using bicubic sharper
If I had to do anything else either add some color to her skin or just add some red to her cheeks. Maybe tone done the bright spots on her skin and add some color to her hair.
Flatten |
|
|
|
01/08/2010 01:23:45 PM · #12 |
What the heck...figured I'm not doing much work (although i have hundreds of my own photos to edit lol).
Additional steps
Selected cheeks and feathered - Selective color layer - Red Channel: add magenta and yellow, yellow channel: add magenta and yellow, Magenta Channel: Add magenta and yellow, White channel: add magenta and yellow (all at different levels)
Reduced opacity
Select hair and feather - Selective color layer - Yellow channel: add magenta and yellow, red channel: add magenta and yellow
Select face minus eyes and feather - curves layer darken
On whole photo, curves layer - luminosity blend mode - an shallow s-curve to add contrast.
 |
|
|
|
01/08/2010 01:25:04 PM · #13 |
a colder kind of feel... |
|
|
|
01/08/2010 02:58:43 PM · #14 |
I personally like  TCGuru's the most. Keeps plenty of skin detail and really makes the eyes pop. All this while increasing contrast. TCGuru's the most. Keeps plenty of skin detail and really makes the eyes pop. All this while increasing contrast.
Edit: I don't like that she centered it though. Personal preference...
Message edited by author 2010-01-08 14:59:17. |
|
|
|
01/08/2010 03:05:43 PM · #15 |
had to have another go , don't ask what I done can't remember :-)

Message edited by author 2010-01-08 15:05:58. |
|
|
|
01/08/2010 11:26:13 PM · #16 |
|
Thanks guys! Now to absorb all of this information haha. You've all been very helpful, keep an eye out for future portraits ;) |
|
Home -
Challenges -
Community -
League -
Photos -
Cameras -
Lenses -
Learn -
Help -
Terms of Use -
Privacy -
Top ^
DPChallenge, and website content and design, Copyright © 2001-2026 Challenging Technologies, LLC.
All digital photo copyrights belong to the photographers and may not be used without permission.
Current Server Time: 07/06/2026 03:41:06 PM EDT.


