|
| Author | Thread |
|
|
06/27/2009 08:24:46 AM · #26 |
This is actually related to an issue I've been trying to sort regarding metering.
How would you meter this image to get the best workable result?
Certainly there is some better techniques than others......I have a LOT of trouble figuring this out......
|
|
|
|
06/27/2009 08:44:32 AM · #27 |
Originally posted by ursula:
Originally posted by Emerkaza:
So let me ask, can you use the neutral density filters and the polarizer at the same time by stacking them? |
I really don't know, I've never tried it. The polarizer by itself cuts out a lot of light already. |
Absolutely, but it starts getting tricky trying to turn the circular polarizer into position and then turning the holder of the neutral density filter.
One thing that you have to watch out for is turning the sky so dark blue that it is almost black when using a CP along with an ND filter. Seems to do well for black and white conversions but it doesn't look natural in color.
I stack varying ND filters on top of the CP somethimes to try to get as much of the bright and dark areas in the capture as possible. Sometimes I stack them in the same orientation to increase density. Sometimes I'll flip one so that the sky is adjusted down a little and the reflection in the foreground water is adjusted down too, leaving the 'strip' of darker grass and foliage exposed for detail.
edited for clarity
Message edited by author 2009-06-27 08:45:51. |
|
|
|
06/27/2009 08:59:57 AM · #28 |
Originally posted by yakatme:
Absolutely, but it starts getting tricky trying to turn the circular polarizer into position and then turning the holder of the neutral density filter.
One thing that you have to watch out for is turning the sky so dark blue that it is almost black when using a CP along with an ND filter. Seems to do well for black and white conversions but it doesn't look natural in color.
I stack varying ND filters on top of the CP somethimes to try to get as much of the bright and dark areas in the capture as possible. Sometimes I stack them in the same orientation to increase density. Sometimes I'll flip one so that the sky is adjusted down a little and the reflection in the foreground water is adjusted down too, leaving the 'strip' of darker grass and foliage exposed for detail.
edited for clarity |
Umm....
The filters are graduated and directional?
|
|
|
|
06/27/2009 09:03:03 AM · #29 |
Originally posted by yakatme:
Originally posted by ursula:
Originally posted by Emerkaza:
So let me ask, can you use the neutral density filters and the polarizer at the same time by stacking them? |
I really don't know, I've never tried it. The polarizer by itself cuts out a lot of light already. |
Absolutely, but it starts getting tricky trying to turn the circular polarizer into position and then turning the holder of the neutral density filter.
One thing that you have to watch out for is turning the sky so dark blue that it is almost black when using a CP along with an ND filter. Seems to do well for black and white conversions but it doesn't look natural in color.
I stack varying ND filters on top of the CP somethimes to try to get as much of the bright and dark areas in the capture as possible. Sometimes I stack them in the same orientation to increase density. Sometimes I'll flip one so that the sky is adjusted down a little and the reflection in the foreground water is adjusted down too, leaving the 'strip' of darker grass and foliage exposed for detail.
edited for clarity |
This is assuming the ND filters are "graduated" or "split"; that is to say, they show a horizon line. Mine are just ordinary, even-toned ND filters, I don't use the split-toned ones, and you can stack the ones like mine with the polarizer no problem. Except vignetting issues, in WA shots.
R. |
|
|
|
06/27/2009 09:34:09 AM · #30 |
Originally posted by NikonJeb:
This is actually related to an issue I've been trying to sort regarding metering.
How would you meter this image to get the best workable result?
Certainly there is some better techniques than others......I have a LOT of trouble figuring this out...... |
It kind of depends what your camera's capable of. If you have spot metering capability, that's what you want to use. If you have plenty of time to work, you can mount your longest lens and meter different sections of the scene and note the respective "recommended" exposures. This would be ideal. Then you do some mental gymnastics to come up with the actual, "correct" exposure.
By way of illustration: since your meter is presuming that the light is reflecting off a Zone V neutral gray surface, the recommended exposure will render a Zone V tonality. Accordingly, if you fill your frame with a white wall and use the "recommended" exposure you get a Zone V gray wall. Do the same thing with a black wall, and you'll get the identical result; a Zone V rendering. On the other hand, find a wall that's half white/half black, use average metering, put the dividing line in the middle of the frame, and both black and white will be correctly exposed.
But to backtrack a little, the correct exposure for the white wall will be indicated exposure plus 3 stops, roughly. The correct exposure for the black wall would be indicated exposure minus 3 stops, roughly. (If you want detailed whites and blacks, make that 2 stops each). In theory, the two exposures would be the same, and would be identical to the averaged exposure indicated on the black/white wall above.
So, in a general sense, when you meter a bright scene you ADD exposure to get the correct exposure, and when you meter a dark scene you SUBTRACT exposure to get the correct exposure. You probably know this, but it may be news to others who read it, so I have elaborated.
*********
Now, in the particular scene, there are TWO Issues we have to deal with:
1. There is a great contrast *range* between the brightest water and the darkest rocks, and that has to be contained somehow. In all likelihood, there's no single exposure that will allow detail in the shadow areas without blowing out the sunlit part of the water.
2. There is an *overall* brightness to the scene that is fighting against the shooter's desire to have the water be blurred-but-not-blown-out. He wants a long enough exposure to blur the water, but even stopped way down this long exposure is overexposing even the shadows and totally blowing the water highlights.
This is where the ND filter comes into play; it doesn't help with the *range* of tones at all, but it allows a longer exposure at a given f/stop. Now in theory a graduated ND filter can help with the range also, but this is really only practical where the varying brightnesses are in horizontal zones, i.e. sky vs foreground, stuff like that. I'm not aware of any ND filter that can be customized to single our irregular, bright shapes entirely contained within the image, except of course selection tools in post processing :-)
So going back to #1 (excessive range in the image) and ignoring for the moment the issue of capturing water flow, concentrating just on correct exposure, generally your best bet is to give 2 stops more exposure than indicated when you meter the water alone; this will give you a *textured white* Zone VII exposure for the water, and this would be ideal.
If you find that this exposure seriously underexposes the shadows (which it probably will, check your histogram after shooting) then take additional exposures in plus-half stop increments, and then when working with the RAW converter (you are shooting RAW, right?) choose whichever image is the brightest one that allows you to recover the highlights. Or, of course, do an actual HDR merge if that's possible.
There's also an issue of whether a scene like this is better rendered, as far as "silky motion" is concerned, if the water actually IS blown away to untextured white; that's an aesthetic decision but even within that context there's such a thing as acceptable blown highlights and overblown highlights, so you need to be aware of that.
Hope this helps.
R. |
|
|
|
06/27/2009 10:22:27 AM · #31 |
Excellent explanation Robert...
here is what I get by applying a gradient two times from my PS program
 vs... vs...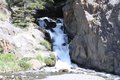
it helps to bring out the detail in the rocks to the left but it doesn't fix it...time of day shooting is key here...I try to not shoot beyond 11 am and before 3 pm to the time between 11 am to 3 pm is just way to bright and intense
Keep in mind "I AM NO EXPERT" but using the gradient in PS can really help
also the other key thing here would be to shoot in RAW...again it wouldn't fix this shot but it would certainly help (time of day is what would "fix" this IMO)
Message edited by author 2009-06-27 10:33:20. |
|
|
|
06/27/2009 11:03:30 AM · #32 |
Originally posted by NikonJeb:
Umm....
The filters are graduated and directional? |
Yes, they are graduated and directional. Directional in that the graduation (or split) is along a straight line, either a soft edge or a more defined, hard edge.
Most often, I'll align these edges along the horizon. Hard edged when there is a horizon without much breaking the horizon (like trees, mountains, etc.) and a soft edge when I want to allow some detail in what sticks up through the horizon. Choosing which to use is a matter of compromising here and there.
There are times, however, when I'll use multiple graduated neutral density filters that don't align with the horizon and even times where I'll use one grad ND aligned along the horizon and another aligned with a slanting cloud bank. This requires holding the grad ND's with my hand because the holder only allows putting them into slots that align them all the same way. This is where it gets really tricky...adjusting the CP, and then trying to get the desired positioning of two hand held grad ND's while taking the shot.
It can get complicated, but this is how I take a lot of my shots on the water with storm clouds in the distance and reflecting in the water.
Here's an example of one shot of mine in which I did exactly as I described above.
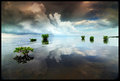
I wanted to balance the differences in light between the sky and the mangrove islands (using grad ND's) while reducing glare on the foreground (using a circular polarizer) so that I could get the detail of the sea grasses at my feet.
|
|
|
|
06/27/2009 02:07:39 PM · #33 |
My favorite mentor told me right off the bat the best advice for taking perfectly exposed pictures. He said, the most important camera equipment you will ever need is an alarm clock. Unfortunately, really there is no substitute for getting up and being at your scene at sunrise, setting up your tripod and getting your shot before the harsh, bright sun blazes down on the scene. You can do polarizers, smaller apertures, shutter speed adjustments, and it will help some, but even with your best tricks, you will always be able to see the difference between a photo utilizing that key piece of equipment, the alarm clock, and one that heads out in midday and tries to compensate.
Sunset can work too tho if that alarm clock thing is just too hard to come by.
|
|
|
|
06/27/2009 02:23:06 PM · #34 |
Originally posted by yakatme:
Absolutely, but it starts getting tricky trying to turn the circular polarizer into position and then turning the holder of the neutral density filter.
One thing that you have to watch out for is turning the sky so dark blue that it is almost black when using a CP along with an ND filter. Seems to do well for black and white conversions but it doesn't look natural in color.
I stack varying ND filters on top of the CP somethimes to try to get as much of the bright and dark areas in the capture as possible. Sometimes I stack them in the same orientation to increase density. Sometimes I'll flip one so that the sky is adjusted down a little and the reflection in the foreground water is adjusted down too, leaving the 'strip' of darker grass and foliage exposed for detail. |
Thank you for explaining this. I have much to learn. Apparently photography is a delicate balancing act. =) |
|
|
|
06/27/2009 03:12:25 PM · #35 |
Originally posted by Emerkaza:
I have much to learn. Apparently photography is a delicate balancing act. =) |
In dozens of ways, small and large. :)
I'm fond of saying that getting a photo perfect takes ... forever. That applies to both shooting and editing.
So it's a matter of deciding when you've put enough time into it and want to move on. If you're using a model, that person's tolerance also plays a role.
Oh, btw, for that waterfall shot I posted, I stacked a couple of neutral density filters on top of a circular polarizer.
Message edited by author 2009-06-27 15:12:56. |
|
|
|
06/27/2009 03:17:02 PM · #36 |
Originally posted by SandyP:
My favorite mentor told me right off the bat the best advice for taking perfectly exposed pictures. He said, the most important camera equipment you will ever need is an alarm clock. Unfortunately, really there is no substitute for getting up and being at your scene at sunrise, setting up your tripod and getting your shot before the harsh, bright sun blazes down on the scene. You can do polarizers, smaller apertures, shutter speed adjustments, and it will help some, but even with your best tricks, you will always be able to see the difference between a photo utilizing that key piece of equipment, the alarm clock, and one that heads out in midday and tries to compensate.
Sunset can work too tho if that alarm clock thing is just too hard to come by. |
this is well said... |
|
|
|
06/27/2009 05:32:26 PM · #37 |
Originally posted by NikonJeb:
This is actually related to an issue I've been trying to sort regarding metering.
How would you meter this image to get the best workable result?
Certainly there is some better techniques than others......I have a LOT of trouble figuring this out...... |
The very unprofessional way to meter that I use is to sort of guess, and then look at the histogram, and then adjust up or down. Oh well, it works for me :) |
|

|
|
Current Server Time: 07/17/2026 11:51:37 AM  |
Home -
Challenges -
Community -
League -
Photos -
Cameras -
Lenses -
Learn -
Help -
Terms of Use -
Privacy -
Top ^
DPChallenge, and website content and design, Copyright © 2001-2026 Challenging Technologies, LLC.
All digital photo copyrights belong to the photographers and may not be used without permission.
Current Server Time: 07/17/2026 11:51:37 AM EDT.
|


