| Author | Thread |
|
|
06/12/2009 08:57:19 PM · #1 |
Is there any way to remove the noise from this image without losing all the detail in the feathers?
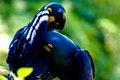
Edit: I have been trying with neat image.. but not having much luck.
Message edited by author 2009-06-12 20:58:29. |
|
|
|
06/12/2009 09:12:30 PM · #2 |
For a situation like this, I would try removing the noise at the highest resolution image possible. I think this image begs for use of a duplicate layer with some masking. Add a duplicate layer, perform the noise reduction on the second layer to smooth out the background, and then erase the birds on the dup. layer so that they are still sharp.
Here is a quick take on it.

But I am sure you can do a bit better with a little more time and effort. Good luck.
Message edited by author 2009-06-12 21:12:56. |
|
|
|
06/12/2009 09:18:50 PM · #3 |
Wow...that's spiffy! =)
It's obvious I don't use layers enough. |
|
|
|
06/12/2009 09:19:06 PM · #4 |
Selective editing was the trick for me.

Duplicated image on another layer
-Applied heavy Topaz denoise for background
-Applied light denoise on birds
-Applied light Paintshop pro Noise reduction on birds
-Selected grainy area under right bird and applied slightly heavier NR to that area only.
-Merged and saved.
Looks like Bassbone did the same. |
|
|
|
06/12/2009 09:23:08 PM · #5 |
| lol...your spiffy too...or maybe your just Spiff.. |
|
|
|
06/12/2009 09:43:09 PM · #6 |
I'll answer to Spiffy. BTW, sharpening instead of blurring the background brought out some interesting and previously unseen details.

Message edited by author 2009-06-12 22:09:20. |
|
|
|
06/12/2009 09:52:45 PM · #7 |
Originally posted by bassbone:
For a situation like this, I would try removing the noise at the highest resolution image possible. I think this image begs for use of a duplicate layer with some masking. Add a duplicate layer, perform the noise reduction on the second layer to smooth out the background, and then erase the birds on the dup. layer so that they are still sharp.
Here is a quick take on it.
But I am sure you can do a bit better with a little more time and effort. Good luck. |
A very newbee question. I dont use layers but want to. If i was to erase the birds from the upper layer, how do i do do that exactly so that none of it remains in second layer or i dont erase in excess ? I mean how do i select only the bird ? I have tried doing such things but it leave the edges uneven .
Message edited by author 2009-06-12 21:54:15. |
|
|
|
06/12/2009 10:02:25 PM · #8 |
Originally posted by Shaurya:
Originally posted by bassbone:
For a situation like this, I would try removing the noise at the highest resolution image possible. I think this image begs for use of a duplicate layer with some masking. Add a duplicate layer, perform the noise reduction on the second layer to smooth out the background, and then erase the birds on the dup. layer so that they are still sharp.
Here is a quick take on it.
But I am sure you can do a bit better with a little more time and effort. Good luck. |
A very newbee question. I dont use layers but want to. If i was to erase the birds from the upper layer, how do i do do that exactly so that none of it remains in second layer or i dont erase in excess ? I mean how do i select only the bird ? I have tried doing such things but it leave the edges uneven . |
Blow the image up on your screen, select a small brush size and use less than 100% opacity. I like between 50-75% and generally use a 'soft brush'. It takes a bit of time to perform the erasing, but the results are worth it. |
|
|
|
06/12/2009 10:06:10 PM · #9 |
Originally posted by Shaurya:
If i was to erase the birds from the upper layer, how do i do do that exactly so that none of it remains in second layer or i dont erase in excess ? I mean how do i select only the bird ? I have tried doing such things but it leave the edges uneven . |
I use a soft edged erase brush or mask brush and get it reasonably close, then I use a finer brush to edit closer in. If you have a large contrast in color between the foreground and background it gets easier. Another way might me to use a selection method that snaps to the edges. I use PaintShop Pro and that app has two similar fucntions like that, called "edge seeker" and "smart edge". Not sure what the Photoshop term is called.
|
|
|
|
06/12/2009 10:08:36 PM · #10 |
Originally posted by bassbone:
select a small brush size and use less than 100% opacity. I like between 50-75% and generally use a 'soft brush'. It takes a bit of time to perform the erasing, but the results are worth it. |
Nice to see we both suggested similar things. |
|
Home -
Challenges -
Community -
League -
Photos -
Cameras -
Lenses -
Learn -
Help -
Terms of Use -
Privacy -
Top ^
DPChallenge, and website content and design, Copyright © 2001-2026 Challenging Technologies, LLC.
All digital photo copyrights belong to the photographers and may not be used without permission.
Current Server Time: 04/27/2026 09:33:42 PM EDT.


