| Author | Thread |
|
|
10/05/2008 09:11:50 AM · #1 |
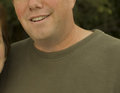
As part of the cleanup on this shot, I'd like to remove his double chin. Does anyone know of a Photoshop CS3 compatible tutorial? I've tried the Smudge stick, which works fine to thin down the upper area where it's against the black background, but it really screws with the sweater.
Any advice appreciated, as usual. Thanks!

|
|
|
|
10/05/2008 09:18:03 AM · #2 |
| Don't use the smudge tool, use the liquify tool. It takes practice but it'll do the job you want. Go with small steps, don't try to do it all in a few larger steps. I'm not a master at it but that's what most use to get rid of that double chin. |
|
|
|
10/05/2008 09:24:52 AM · #3 |

as Jac said subtle in this case wins
this is with a brush 49,12,2 in liquify
using the push left tool |
|
|
|
10/05/2008 09:35:00 AM · #4 |
Here's my 5 minute try at it. The blubber hanging over his tshirt will be tough to do but you'll get it i'm sure, with practice.
[thumb]728491[/thumb]
Ralph made him thinner. ;]
Like in real life, don't want to lose too much too fast. eheh
Message edited by author 2008-10-05 09:37:48. |
|
|
|
10/05/2008 10:57:03 AM · #5 |
| nah .. just removed a bit o'jowl |
|
|
|
10/05/2008 11:40:19 AM · #6 |
Here is my final result:
And here are the steps along the way:
Step 1) First, I asked myself, what is it about this image that makes me think he has a double chin? Remember that I'm looking at a two-dimensional rendering of a three-dimensional subject. So what do I see in this two dimensional object that makes me think he has a double chin? My first answer is ... the double chin is too light. There is extra light reaching that part of the skin that should have been in shadow.
So my first step is to use the Burn tool to darken the highlights to put his double chin back into shadow: 
Step 2) Then I'm thinking... okay, there is extra skin hanging out the left side of the image (the subject's right side) that is making his neck line thicker.
So I bring in the liquify tool to push the skin back towards the neck: 
Step 3) Then the crease along his neck where the skin folds over catches my eye.
I decided to create a duplicate layer and then use the Patch Tool in Photoshop to completely remove the crease, and then fade the opacity of the 2nd layer to bring back a little bit of the crease (because I never completely remove creases or wrinkles). I also softened the skin texture just a little bit at this step: 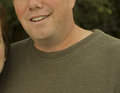
Step 4) Now I'm looking to finish up the image, and I decide to shade the subjects left cheek a little bit. This was both to make his face a little bit skinnier as well as to blend my previous edits into the final image.
So I once again use the Burn tool, this time using a large brush to bring his cheek into shadow and this is my final edit:
|
|
|
|
10/05/2008 11:41:50 AM · #7 |
|
|
|
10/05/2008 11:59:51 AM · #8 |
I find it easier to work at removing wrinkles and evening the shadows.
So the Patch tool or stamp(clone) on lighten mode (5 to 10%, several passes) works well
|
|
|
|
10/05/2008 01:08:13 PM · #9 |
| Nice job David. Thanks for posting the steps used. :) |
|
|
|
10/05/2008 01:10:12 PM · #10 |
And here all along I thought the way to remove a double chin was through dieting. Why didnt I think of this.
Matt
|
|
|
|
10/05/2008 03:25:59 PM · #11 |
Wow, thanks everyone! :-) I post up a final once I get around to it. But I'm very sore and in need of a nap after playing hockey last night for the first time in years. I got a goal(!!!), but it was because everyone was very generous with their passes. :-)
|
|
Home -
Challenges -
Community -
League -
Photos -
Cameras -
Lenses -
Learn -
Help -
Terms of Use -
Privacy -
Top ^
DPChallenge, and website content and design, Copyright © 2001-2026 Challenging Technologies, LLC.
All digital photo copyrights belong to the photographers and may not be used without permission.
Current Server Time: 04/28/2026 02:57:41 PM EDT.


