| Author | Thread |
|
|
06/12/2008 10:22:45 PM · #1 |
Besides dodge and burn, what are some techniques for bringing people out of the shadows? I have several outdoor candids I'm working on where the face is somewhat underexposed and against a bright background. The detail is there, it seems, but sometimes when I use dodge to brighten things, I lose contrast.
Any thoughts or ideas? Thanks!
|
|
|
|
06/12/2008 10:24:10 PM · #2 |
Try this tutorial on for size...Move The Light by  idnic idnic |
|
|
|
06/12/2008 10:59:17 PM · #3 |
Have you tried this one before?
Duplicate your background layer.
Convert the new layer to black and white.
Invert (negative) the B/W layer.
Change the B/W layer to Overlay blend mode.
Adjust the B/W layer's Opacity for the lightness you are going for(somewhere around 30-40).
Merge it down on a dup of the background layer.
Season to taste... (levels/curves etc)
Message edited by author 2008-06-12 23:00:00. |
|
|
|
06/12/2008 11:14:38 PM · #4 |
this is the first i've seen this. makes me want to go back and reedit all my photos. great tutorial! |
|
|
|
06/12/2008 11:23:44 PM · #5 |
|
|
|
06/12/2008 11:26:35 PM · #6 |
Sometimes when I have faces shaded by baseball caps and hats, I find that filter>render>lighting effects is useful for lightening the faces. I use Omni light and then play with the sliders. I used it on this shot.
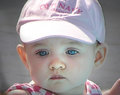
Note: the noise is not a result of the lighting effect, it comes from cropping a low res P&S image too much. |
|
|
|
06/12/2008 11:31:04 PM · #7 |
|
Can yo do the same..in reverse...for blown out pictures? |
|
|
|
06/12/2008 11:44:25 PM · #8 |
Originally posted by egamble:
Can yo do the same..in reverse...for blown out pictures? |
Once an image is "blown out" the pixel data is not saved, its pute white and saved that way on the mem card (unless you shoot RAW). So, no, it will not bring back pixel data that is lost, but will adjust areas that are too bright but not "blown".
|
|
|
|
06/12/2008 11:57:32 PM · #9 |
Originally posted by bvy:
Besides dodge and burn, what are some techniques for bringing people out of the shadows? I have several outdoor candids I'm working on where the face is somewhat underexposed and against a bright background. The detail is there, it seems, but sometimes when I use dodge to brighten things, I lose contrast.
Any thoughts or ideas? Thanks! |
Shadow/Highlight adjustment. (Lightens shadows, darkens highlights) I set to 10% each as an Action as a starting point, but allow myself to bring them up or down as I see fit.
Not an adjustment layer, so it's destructive on the layer you're on, unless you do a Smart Filter, but you can always dupe the layer first and then use a layer mask to insure it's only on the parts of the layer you want.
Message edited by author 2008-06-12 23:59:00.
|
|
|
|
06/13/2008 04:37:33 AM · #10 |
"Bringing People Out Of The Shadows"
LOL - I thought this thread was about lurkers. But I see about 150 views and less than 10 replies, so it's failing miserably. ;-)
On Topic: Cindi's tutorial is excellent. I use that method, but put the lightening and darkening on separate layers so I can adjust the blur and opacity independently. I've also used shadow/highlight, but since I shoot RAW, I usually just create 2 or three exposure levels from the RAW converter, stack those, put the best on the top layer and erase areas with a 50% opacity eraser to reveal the other (lighter or darker) layers.
I tried  awpollard's method above tonight and it works pretty well also. And as mentioned by juliboc with the baby pic example, render lighting effects works great too. I've used Lucis and "Mr. Contrast" (from Flaming Pear) also - apply and then use SHIFT+CTRL+F to change the blending mode and/or opacity to reduce the strength of the effect and/or use the history brush to remove unwanted effects. awpollard's method above tonight and it works pretty well also. And as mentioned by juliboc with the baby pic example, render lighting effects works great too. I've used Lucis and "Mr. Contrast" (from Flaming Pear) also - apply and then use SHIFT+CTRL+F to change the blending mode and/or opacity to reduce the strength of the effect and/or use the history brush to remove unwanted effects.
Like so many things in photoshop, there are a zillion ways to achieve essentially the same thing. Try them all and find a method that suits. |
|
|
|
06/13/2008 09:40:20 AM · #11 |
Thanks, folks. Some good advice and links here.
|
|
|
|
06/13/2008 09:54:57 AM · #12 |
There are a couple of nice things you can try using "Color Efex Pro 3.0". Very good program for the price.
|
|
|
|
06/13/2008 12:15:13 PM · #13 |
Originally posted by bvy:
Besides dodge and burn, what are some techniques for bringing people out of the shadows? I have several outdoor candids I'm working on where the face is somewhat underexposed and against a bright background. |
This might be a good situation (in the future) to use a fill-flash. |
|
|
|
06/14/2008 10:30:10 AM · #14 |
Lots of great ideas here, and just what I was hoping for -- some creative advanced editing techniques. I was most intrigued with Art Roflmao's method of stacking different exposure layers (I do shoot in RAW) although I found it pretty dramatic undiluted. I got plenty of mileage with a 10% opacity eraser. I'm curious when and how you apply this method, Art. Do you have some samples? Also, do you use Normal blending at 100% with this method?
awpollard's method is more subtle, and it seems to boost saturation a bit as well -- for me at least. idnic's tutorial I hadn't seen before, but I like it also, especially that it's pretty easy to apply. I need to experiment more with shadows/highlights adjustments.
There were other good ideas, but a lot of what I do is take what works with Photoshop (the tool of choice) and try to make it work with Paint Shop Pro. A lot of things translate easily, but some of the more obscure or proprietary functions, I can't easily apply.
Thanks again. |
|
|
|
06/16/2008 03:44:04 AM · #15 |
Originally posted by bvy:
Lots of great ideas here, and just what I was hoping for -- some creative advanced editing techniques. I was most intrigued with Art Roflmao's method of stacking different exposure layers (I do shoot in RAW) although I found it pretty dramatic undiluted. I got plenty of mileage with a 10% opacity eraser. I'm curious when and how you apply this method, Art. Do you have some samples? Also, do you use Normal blending at 100% with this method? |
Here's an example:
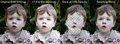
Not a dramatic example, but a quick one. :) |
|
|
|
06/16/2008 05:49:29 AM · #16 |
Another option is to use "fill light" in programs like Lightroom.
Cheers
M
Message edited by author 2008-06-16 06:05:13.
|
|
|
|
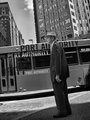
06/16/2008 10:09:11 PM · #17 |
Originally posted by Art Roflmao:
Originally posted by bvy:
Lots of great ideas here, and just what I was hoping for -- some creative advanced editing techniques. I was most intrigued with Art Roflmao's method of stacking different exposure layers (I do shoot in RAW) although I found it pretty dramatic undiluted. I got plenty of mileage with a 10% opacity eraser. I'm curious when and how you apply this method, Art. Do you have some samples? Also, do you use Normal blending at 100% with this method? |
Here's an example:
Not a dramatic example, but a quick one. :) |
That's great, Art! Thanks for taking the time to put that together.
Do you use this method fairly often -- i.e. if you're shooting in RAW, is this your first approach (or consideration) for correcting exposure?
I tried a variation of your method to better expose the subject of this image. He was underexposed and the background was overexposed. In this case though, I selected the whole figure with a two pixel feather, and erased the underexposed top layer with a 1% opacity eraser (again, I'm using PSP). It doesn't look perfect, but I think it's an improvement -- it's just a candid study really. I think your method works better for areas where less discrete areas need exposure correction.
 |
|
|
|
06/17/2008 02:24:48 AM · #18 |
Originally posted by bvy:
Do you use this method fairly often -- i.e. if you're shooting in RAW, is this your first approach (or consideration) for correcting exposure? |
It's typically my only approach any more. Like I've said, there are a million ways to do the same thing, but subtle differences between them - I become a creature of habit. I have not tried HDR, but it seems to me the concept is the same, except it is done automatically and applies to the whole image.
Originally posted by bvy:
I tried a variation of your method to better expose the subject of this image. He was underexposed and the background was overexposed. In this case though, I selected the whole figure with a two pixel feather, and erased the underexposed top layer with a 1% opacity eraser (again, I'm using PSP). It doesn't look perfect, but I think it's an improvement -- it's just a candid study really. I think your method works better for areas where less discrete areas need exposure correction.
|
That's great! You just have to watch the edges and sometimes it is a tedious task of reverting part of the image back to a little to get a better blend. In this case, you might be better off just going wide and over exposing the bus or part of the bus to blend a little better. Also, blurring the halo around the subject helps. |
|
Home -
Challenges -
Community -
League -
Photos -
Cameras -
Lenses -
Learn -
Help -
Terms of Use -
Privacy -
Top ^
DPChallenge, and website content and design, Copyright © 2001-2026 Challenging Technologies, LLC.
All digital photo copyrights belong to the photographers and may not be used without permission.
Current Server Time: 07/22/2026 06:32:14 PM EDT.


